Table of Contents
Advertisement
Quick Links
Instruction Manual
BODY COMPOSITION ANALYZER
<Usage Conditions>
: 5 ー 35°C
Temperature Range
: 30 ー 80% (non-condensing)
Relative Humidity Range
: 2,000m ASL/6500ft ASL
Max Altitude
Atmospheric Pressure Range : 86 ー 106kPa
Please read this Instruction Manual carefully and keep it for future reference.
DC-13C
<Storage Conditions>
Temperature Range
Relative Humidity Range
Atmospheric Pressure Range : 70 ー 106kPa
To avoid malfunctions, avoid storing the equipment in a place with direct sunlight,
significant temperature changes, a risk of dampness, a large amount of dust or a
risk of vibration or impact, or in the vicinity of flames.
: -10 ー 60°C
: 10 ー 90% (non-condensing)
Advertisement
Table of Contents

Related Manuals for Tanita DC-13C


Summary of Contents for Tanita DC-13C
- Page 1 Instruction Manual BODY COMPOSITION ANALYZER DC-13C <Usage Conditions> <Storage Conditions> : 5 ー 35°C : -10 ー 60°C Temperature Range Temperature Range : 30 ー 80% (non-condensing) : 10 ー 90% (non-condensing) Relative Humidity Range Relative Humidity Range Atmospheric Pressure Range : 70 ー 106kPa...
-
Page 2: Table Of Contents
Contents Before Use For Your Safety ……………………………… 3 Checking the Contained Items ……………… 7 Positioning the Scale/Setting up the Mat …… 8 Part Names & Connection Procedure ………… 9 Setting the Printer Paper …………………… 12 Setting an SD Card …………………………… 13 Power Supply …………………………………... -
Page 3: For Your Safety
For Your Safety This section explains precautionary measures to be taken to avoid injury to the users of this equipment and others, and to prevent damage to property. Please familiarise yourself with this information to ensure safe operation of this equipment. Failure to follow instructions highlighted with this mark could result in death or severe injury. - Page 4 For Your Safety (continued) Do not allow the equipment to get wet. Avoid using on subjects with allergies to metals. Allergic reactions may be caused by the stainless steel used in the electrodes of this equipment. Do not jump on the equipment. Do not tilt the equipment.
- Page 5 Avoid measuring after strenuous exercise. This may cause inaccurate measurements. Please take measurements after sufficient rest. Avoid measuring after over-eating or over-drinking, or when severely dehydrated. This may cause inaccurate measurements. For greater accuracy, avoid using directly after waking up. Use at the same time of day each time, at least three hours after the last meal. Ensure arms are not touching sides and inner thighs are not touching each other during measurement.
- Page 6 For Your Safety (continued) TANITA recommends that each facility conduct periodic checks of each unit. 1. Check the following at least daily: • Date and time settings 2. Visually inspect the following at least weekly: • The display for any damage or contamination •...
-
Page 7: Checking The Contained Items
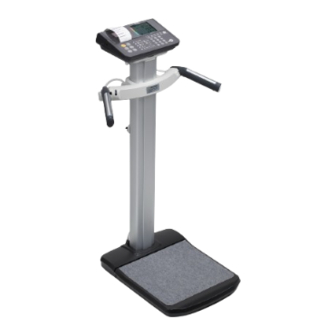
Checking the Contained Items Checking the Contained Items (Platform, Control box, Accessories) Ⓐ Ⓐ Control box Column Ⓑ Platform Ⓒ Cover (front) Ⓓ Ⓓ Cover (back) Ⓒ Grip Ⓑ Accessories □ □ □ □ AC adaptor AC cord Screws x 4 Mats x 3 □... -
Page 8: Positioning The Scale/Setting Up The Mat
Positioning the Scale/Setting up the Mat Positioning the Scale Checking that the equipment is level. Unfasten the knobs on the platform and stabilize the feet (× 4) and adjustable feet (× 2). Feet Adjustable feet × 2 Note For accurate measurements, make the equipment as even as possible. Setting up the Mat You can use the device while wearing your shoes. -
Page 9: Part Names & Connection Procedure
Part Names & Connection Procedure Control Box Electrodes × 4 Grip holder Casters ×2 Platform Adjustable feet ×2 Feet × 4 Symbols and their Meanings WEEE - Waste Electrical SD card Positive polarity and Electronic Equipment Directives Alternating current Serial interface For indoor use only Input, Output See the instructions... - Page 10 Part Names & Connection Procedure (continued) Control Box Printer Cover Display SD card slot Operating key Connecting the Power Plug 〈Back of the controller〉 1. Connect the AC adapter to the AC cord and plug the AC adapter into the controller jack.
- Page 11 Display and Keys Meanings of the LED Indicators and Keys Display Body Fat (percentage and mass) Turn ON / OFF the power *Not measured value but calculated value Display Body Muscle (percentage and mass) *Not measured value but calculated value Feeds the printer paper Display Body Water (percentage and mass) *Not measured value but calculated value...
-
Page 12: Setting The Printer Paper
Setting the Printer Paper ② ③ handle on the left hand side of the controller. ① ④ 10cm of printer paper. original place. Press to turn on the device. After all the indicators are displayed, displayed. If the device is turned on with the printer cover open, is displayed. -
Page 13: Setting An Sd Card
Setting an SD Card When the power is turned OFF, insert an SD card into the slot with the logo side facing upwards. Make sure the card is facing in the correct direction when inserting it. Press to turn on the device. When the device detects the SD card, the mark on the right appears in the upper left corner of the screen. -
Page 14: Power Supply
Power Supply Turning the Main Power ON/OFF Turning the main power ON. Press the key to turn on the power. The initial screen is displayed. Turning the main power OFF. Press the key to turn the power OFF. Emergency Shut Down Keep the area around the plug socket clear during operation of the equipment in case of an emergency. -
Page 15: Settings
Settings Press the key to change the mode. The setting screen is displayed. Note •The key cannot be used when the scale is measuring weight or results are displayed while standing on the platform after measurement. Select the setting item from the list below. Enter numerical values and press the key. - Page 16 Settings (continued) Select the Measurement Mode Select the measurement mode by pressing the key. Body Composition Mode The measurement mode is switched in the following order when the key is pressed: “Body Composition” “Scale” Scale Mode The “ ” mark is displayed when the scale mode is selected.
-
Page 17: Taking A Measurement
0.5kg 0.7kg 1.0kg 2.5kg *The weight is based on the standards as researched by Tanita. Enter ID number. If the ID number function is set to OFF, the scale switches directly to “Measure body weight” without requesting an ID number. If the ID number is set to ON, ID number will be increased automatically. - Page 18 Taking a Measurement (continued) Body Composition Mode Select gender. Enter age. The age range: 5 ー Enter height. The height range: 90.0 249.9cm ー Note Height input unit setting → See P.15 Setting item 10 Set target body fat ratio. If the target body fat ratio function is set to OFF, the scale switches directly to “Measuring impedance”...
-
Page 19: Measurement Results
Measurement Results Output Measurement Results (Body Composition Mode) The measurement results are displayed on the LCD after measurement is completed. The results are printed immediately after measurement is completed. Press the key to select the measurement display. The measurement display is switched in the following order by pressing the key. - Page 20 Taking a Measurement (continued) Measurement Results Total Body water (Applicable age: 5 ー Body weight (kg) Body water (kg) Body water % Body water icon Visceral fat rating (Applicable age: 18 ー Body weight (kg) Visceral fat rating Visceral fat rating VFR icon Basal metabolic rate (Applicable age: 5...
-
Page 21: Scale Mode
0.5kg 0.7kg 1.0kg 2.5kg *The weight is based on the standards as researched by Tanita. Enter the ID number If the ID number function is set to OFF, the scale starts measuring weight immediately. If the ID number is set to ON, ID number will be increased automatically. -
Page 22: Output And Storage Of Measurement Results
People who are undertaking training such as bodybuilding to increase their muscle mass. Target Body Fat • A target body fat % should be set by a professional only. Tanita is not responsible for setting the Attention • Posture when measuring. -
Page 23: Select Printing Data
1.on Indicator BMR 1.on Visceral Fat Rating 1.on Physique Rating 1.on 1.on Bioelectrical Data 1.on Ideal Body Weight 1.on TANITA Logo 1.on Degree of Obesity 1.on Muscle Mass % 1.on Press the key again to return to the measurement display. -
Page 24: Lists Of Contents Of The Print Item Preset
Lists of Contents of the Print Item Preset Body composition analyzer Print item Full Short Scale Body Type Standard Athletic Child Standard Athletic Child TANITA LOGO ✓ ✓ ✓ ✓ ✓ ✓ ✓ Category Name ✓ ✓ ✓ ✓ ✓... -
Page 25: In The Case To Select The Print Item Preset
Please consult your doctor before ・Total weight of fat mass in the body. you start a body weight manage- ment program. TANITA is not responsible for the ・Fat Free Mass is comprised of target body fat ratio. muscle, bone, tissue, water, and all other fat free mass in the body. -
Page 26: Reading Stored Measurement Result Data
Output and Storage of Measurement Results (continued) Reading Stored Measurement Result Data Press the key while the display is on, and select the setting 80. Make sure the SD card is inserted. Enter the measurement date (YYYYMMDD) using the keypad, then press the Enter key and “oPEn”... -
Page 27: Data Output
• Please provide your own cable as necessary as none are included. USB cable: Type A 4 - pin (male) - Type B 4 - pin (male) • Please install the necessary driver on your PC. Drivers can be downloaded from: https://www.tanita.eu/ • RS-232C and USB are mutually exclusive. Data Storage... -
Page 28: Troubleshooting
Troubleshooting Please check the following before requesting repair. Problem Solution • Stand barefoot on the platform for measurement. Error with impedance • If the soles of the feet are dry, use a dropper measurement to apply about 0.5 mL of water before “Err40”... -
Page 29: Specifications
Specifi cations Model Number DC-13C 100 ー 240V AC Power Source Rated power 36VA Measurement System Dual-frequency 4 electrode Measurement Frequency 6.25kHz / 50kHz Electrode Materials Plastic plated Impedance Measurement Part Between both hands Measurement 150.0 ー 1,500.0 (0.1 increments) - Page 30 Specifi cations (continued) 0.0 ー 10.0kg (0.1kg increments) Clothes Weight ID No. 16 digits Gender Female / Male Body Type Input Items Standard / Athletic * 5 ー 99 years 90.0 ー 249.9cm (0.1cm increments) Height 4 ー 55% (1% increments) Target Body Fat % ID No.
- Page 31 Be sure to follow the regulations in your area when disposing of this product. Manufacturer EU Representative TANITA Corporation of America, Inc. TANITA Corporation TANITA Europe B.V. 2625 South Clearbrook Drive, Arlington Heights, Illinois 60005 U.S.A.
Need help?
Do you have a question about the DC-13C and is the answer not in the manual?
Questions and answers
How are the results sent to laptop when USB is connected
When connected via USB, the Tanita DC-13C sends the measurement results to the laptop immediately after the measurement is completed. The data is output in CSV format. A USB Type B 4-pin female connector is located on the back of the control box, and a USB Type A 4-pin male to Type B 4-pin male cable (not included) is required. USB and RS-232C cannot be used at the same time.
This answer is automatically generated