
Related Manuals for minipcr bio GELATO


Summary of Contents for minipcr bio GELATO
- Page 1 GELATO electrophoresis and visualization system User’s guide ©2023 Amplyus LLC. The GELATO and miniPCR bio logos are trademarks of Amplyus LLC GELATO User’s guide support@minipcr.com...
-
Page 2: Table Of Contents
TABLE OF CONTENTS Technical specifications Compliance and safety Safety testing Warranty Components Operation Casting a gel Setting up the system Starting the run Interface Transillumination Band excision kit Troubleshooting support@minipcr.com GELATO User’s guide... - Page 3 MANUFACTURER Amplyus LLC, dba miniPCR bio . 1770 Massachusetts Avenue, Suite 167, Cambridge, Massachusetts, 02140, United States of America. INTENDED USE OF THE EQUIPMENT This device is intended for separation and visualization of biological molecules. TECHNICAL SUPPORT The miniPCR bio technical support department is open Monday through Friday, 9:00 AM to 5:00 PM, Eastern Time.
-
Page 4: Technical Specifications
, GreenView COMPATIBLE DNA DYES other blue-light compatible DNA dyes DOCUMENTATION Fold-a-View photo hood TIMER Variable, up to 120 min DIMENSIONS 25 x 17 x 8 cm WEIGHT 800 grams POWER SUPPLY DC 9 V, 4 A support@minipcr.com GELATO User’s guide... -
Page 5: Safety Testing
Operation of this equipment in a residential area is likely to cause harmful interference in which case the user will be required to correct the interference at their own expense. support@minipcr.com GELATO User’s guide... - Page 6 Equipment shall be installed on a level, dry and flat surface that will support its weight and dimensions. At least 9 inches of unobstructed space around the unit are required for appropriate ventilation. Note: the safety of any system incorporating the equipment is the responsibility of the assembler of the system. support@minipcr.com GELATO User’s guide...
- Page 7 Do not clean with ethanol or other alcohols. If needed, warm soapy water can be used followed by a rinse with distilled water. EQUIPMENT MAINTENANCE AND SERVICE The GELATO electrophoresis and illumination system does not require regular maintenance. Contact the manufacturer if any problems are encountered during use. support@minipcr.com GELATO User’s guide...
-
Page 8: Warranty
Amplyus’ sole liability, under this Limited Warranty, for failure to repair the GELATO electrophoresis and illumination system after a reasonable number of attempts, is limited to the replacement of the Product or, at Amplyus’ sole discretion, the refund of the original purchase price of the Product. support@minipcr.com GELATO User’s guide... - Page 9 Four double-sided combs (two with 25 teeth for large gels and 13 teeth for small gels, and two with 13 teeth for large gels and 9 for small gels) Fold-a-View™ photo documentation hood Gel-cutting tray DNA visualization goggles ClearView™ anti-fog spray Microfiber cleaning cloth support@minipcr.com GELATO User’s guide...
-
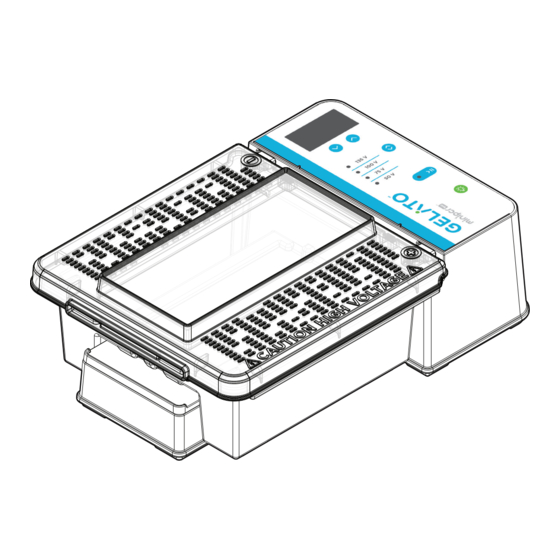
Page 10: Components
Console Cover with blue-light filter Transilluminator Buffer chamber Caution: Light is very bright. Use DNA visualization goggles if the cover is not in place. Fold-a-View A portable, foldable darkroom. Capture images even in brightly lit rooms. support@minipcr.com GELATO User’s guide... - Page 11 Small Gel Tray Finger notch 20 ml gels 9 wells each to pull the Up to 26 samples comb away 13 wells each / Multichannel compatible from the gel 25/13 Comb 25 wells / Multichannel compatible support@minipcr.com GELATO User’s guide...
-
Page 12: Operation
The GELATO electrophoresis and visualization system is compatible with TAE and TBE running solutions. 1 -- Place the tray or trays in the casting platform. 2 -- Place comb or combs on the platform, using the comb notches for proper alignment. Comb notches support@minipcr.com GELATO User’s guide... - Page 13 500 bp to 5 kb 400 bp to 4 kb 50 bp to 1.5 kb GELATO can be used with SeeGreen™ tabs (SKU: RG-1500-20). Tabs contain pre-weighed agarose, TBE and DNA stain. Just add water, microwave and pour. support@minipcr.com GELATO User’s guide...
- Page 14 Gels will typically be ready in about 10 minutes. • Gel is ready when cool and firm to the touch. • Gels can be stored for up to three days at room temperature in an airtight container protected from light. support@minipcr.com GELATO User’s guide...
-
Page 15: Setting Up The System
Place the buffer chamber on the console by aligning the buffer chamber hexagonal pins with the metal clips on the console. Note: In GELATO models without pins and clips, simply place the buffer chamber on the console. support@minipcr.com GELATO User’s guide... - Page 16 Add running solution to the buffer chamber. There should be enough liquid to cover the gel, about 350 ml. 4 -- Load samples. 5 -- Slide the cover until it is fully inserted into the console. A short beep indicates that the instrument is ready for use. support@minipcr.com GELATO User’s guide...
-
Page 17: Starting The Run
The unit will beep three times when the time is up. Notes: The time can be modified while the unit is running. To change the voltage, the run needs to be stopped using the Start/Stop button. support@minipcr.com GELATO User’s guide... -
Page 18: Interface
Blinking ouC (overcurrent) error. Make sure you are using fresh 1X running solution. Please contact support@minipcr.com if the problem persists Blinking oPn (open) error. The open message can be caused by a variety of reasons. -
Page 19: Transillumination
The Fold-a-View included with your equipment may look like the one shown here. support@minipcr.com GELATO User’s guide... -
Page 20: Band Excision Kit
Place the supplied cutting tray on the transilluminator. Not using the cutting tray while using a sharp object may permanently damage the transilluminator. 3 -- Place the gel on the cutting tray. 4 -- Wear the DNA visualization goggles. support@minipcr.com GELATO User’s guide... - Page 21 Turn on the blue light by pressing the transillumination button. Press a second time for maximum intensity. 6 -- Cut the gel portion of interest. 135 V 100 V 75 V 50 V 7 -- Remove the gel and cutting tray. Rinse the tray with distilled water and dry. support@minipcr.com GELATO User’s guide...
-
Page 22: Troubleshooting
Additional ClearView spray can be purchased on the miniPCR bio website. The gel trays won’t fit in the buffer chamber Ensure that the guides on the sides of the gel tray align with the ridges on the buffer chamber.
Need help?
Do you have a question about the bio GELATO and is the answer not in the manual?
Questions and answers