Advertisement
Available languages
Available languages
Models:
ODE−5004
WARNING
TO REDUCE THE RISK OF FIRE, ELECTRIC SHOCK, OR INJURY TO PERSONS, OBSERVE THE FOLLOWING:
1. Use this unit only in the manner intended by the manufacturer. If you have questions, contact the manufacturer at the
address or telephone number listed in the warranty.
2. Before servicing or cleaning unit, switch power off at service panel and lock the service disconnecting means to prevent
power from being switched on accidentally. When the service disconnecting means cannot be locked, securely fasten
a prominent warning device, such as a tag, to the service panel.
3. Installation work and electrical wiring must be done by a qualified person(s) in accordance with all applicable codes
and standards, including fire-rated construction codes and standards.
4. Sufficient air is needed for proper combustion and exhausting of gases through the flue (chimney) of fuel burning
equipment to prevent backdrafting. Follow the heating equipment manufacturer's guideline and safety standards such
as those published by the National Fire Protection Association (NFPA), and the American Society for Heating, Refriger-
ation and Air Conditioning Engineers (ASHRAE), and the local code authorities.
5. When cutting or drilling into wall or ceiling, do not damage electrical wiring and other hidden utilities.
6. Ducted fans must always be vented to the outdoors.
7. Acceptable for use over a tub or shower when connected to a GFCI (Ground Fault Circuit Interrupter) - protected
branch circuit (ceiling installation only).
8. This unit must be grounded.
CAUTION
1. For general ventilating use only. Do not use to exhaust hazardous or explosive materials and vapors.
2. This product is designed for installation in ceilings up to a 12/12 pitch (45 degree angle). Duct connector must point up.
DO NOT MOUNT THIS PRODUCT IN A WALL.
3. Do not let plaster dust or any other construction residue enter the fan. During construction or renovation, cover the fan.
4. Combustible products used for cleaning such as acetone, alcohol, ether, or benzol are highly explosive and should
never be used close to the fan.
CLEANING & MAINTENANCE
The ventilation fan should be cleaned regularly (internally and externally) to preserve its appearance and performance.
Use a dusting brush attachment to gently vacuum the exterior and interior of the ventilation fan to remove dust and debris.
OPERATION
Use an on/off switch to operate this fan. See "Connect Wiring Diagram" for details.
PLAN THE INSTALLATION
1. Do not use in a cooking area.
2. Two ways to connect ductwork to a factory-shipped unit.
READ AND SAVE THESE INSTRUCTIONS
Installer: Leave this manual with the homeowner.
Cod: 0060303836-A
ODE−8007
ODE−9010
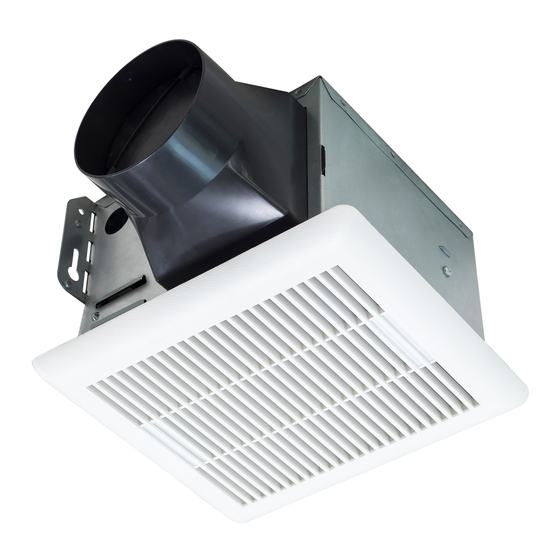
VENTILATION FAN
INSULATION*
(Place around and
over Fan Housing.)
FAN
POWER
HOUSING
CABLE*
Seal gaps
around
Housing.
ROUND
DUCT*
Seal duct
*
Purchase
ROUND
joints with
ELBOW(S) *
separately
tape.
ROOF CAP*
(with built-in
damper)
Keep duct
runs short
WALL CAP*
(with built-in
damper)
www.ortechindustries.ca
Advertisement
Table of Contents

Related Manuals for Ortech ODE-5004


Summary of Contents for Ortech ODE-5004
- Page 1 VENTILATION FAN Models: ODE−5004 ODE−8007 ODE−9010 WARNING TO REDUCE THE RISK OF FIRE, ELECTRIC SHOCK, OR INJURY TO PERSONS, OBSERVE THE FOLLOWING: 1. Use this unit only in the manner intended by the manufacturer. If you have questions, contact the manufacturer at the address or telephone number listed in the warranty.
- Page 2 ASSEMBLY INSTRUCTIONS 1. MOUNT HOUSING TO JOIST OR I-JOIST. a. Hold the housing so that it is in contact with the bottom of the joist. b. Attach the housing with four (4) screws to the joist through the holes in each mounting flange. 2.
-
Page 3: Connect Electrical Wiring
ASSEMBLY INSTRUCTIONS 4. INSTALL ROUND DUCTWORK a. Connect the round ductwork (not included) to the damper/duct connector, and run the ductwork to a roof or wall cap (not included). b. Using tape (not included), secure all the ductwork connections so that they are air tight. -
Page 4: Service Parts
SERVICE PARTS PART PART NAME Qty. Grille Assembly (includes part 2) Grille Spring Blower Blower Wheel Motor Motor Plate Housing Wire Panel / Harness Assembly Duct/Duct Connector Screw Screw Screw * Blower Assembly includes part 3, 4, 5,6, a, b Replacement installation: Remove the screw (part a), then take out the blower assembly from the housing (part 7). - Page 5 VENTILATEUR MODÈLE: ODE−5004 ODE−8007 ODE−9010 AVERTISSEMENT 1. Utilisez cet appareil uniquement de la manière prévue par le fabricant. Si vous avez des questions, contactez le fabricant à l'adresse ou au numéro de téléphone figurant dans la garantie. 2. Avant de réparer ou de nettoyer l'appareil, éteignez celle-ci au panneau de service et verrouillez-le pour empêcher l'alimentation accidentelle.
- Page 6 INSTRUCTIONS 2. Monter avec des trous de fixation supplémentaires L'intérieur du boîtier du ventilateur contient des trous de montage supplémentaires au cas où un montage extérieur n'est pas possible. Vissez ou clouez le boîtier du ventilateur directement à la charpente ou aux solives.
- Page 7 INSTRUCTIONS 4. INSTALL ROND c. Un conduit flexible isolé est recommandé pour une installation la plus silencieuse possible. Si un conduit rigide est utilisé, une courte section de conduit flexible isolé de 305 à 914 mm (1 à 3 pieds) assurera un fonctionnement silencieux.
-
Page 8: Garantie Limitée
LIST DE PIECES DE RECHANGE Qté. Assemblage de grille (inclue la partie 2) Ressort de grille Ventilateur Soufflante Moteur Plaque de moteur Boîtier Panneau de câblage / Assemblage de harnais Connecteur de clapet 3, 4, 5, 6, a, b. Installation de remplacement : Retirez la vis (partie a), puis retirez le ventilateur du boîtier (pièce 7).
Need help?
Do you have a question about the ODE-5004 and is the answer not in the manual?
Questions and answers