Table of Contents
Advertisement
Quick Links
Assembly Instructions
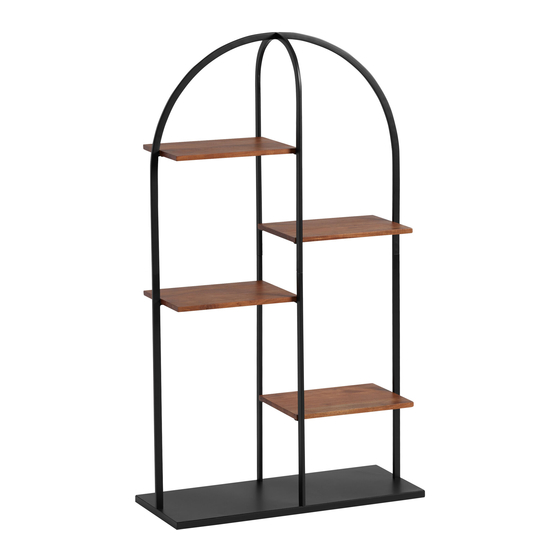
DAPHNE ARCH TOP BOOKCASE
SKU-622514
THANK YOU FOR YOUR PURCHASE. IF YOU HAVE ANY QUESTIONS
PERTAINING TO THE ASSEMBLY OF THIS PRODUCT, PLEASE CONTACT
THE NEAREST WORLD MARKET STORE.
IF YOU ARE NOT NEAR A STORE, PLEASE CALL OUR CUSTOM ER SERVICE CALL
CENTER TOLL FREE AT 877- 967-5362 FOR ASSISTANCE.
ALL PRODUCTS SOLD AT WORLD MARKET
ARE NOT FOR COMMERCIAL USE AND ARE
INTENDED FOR RESIDENTIAL USE ONLY.
Page 1
2022-09-05.
Advertisement
Table of Contents

Related Manuals for World Market DAPHNE ARCH TOP BOOKCASE 622514


Summary of Contents for World Market DAPHNE ARCH TOP BOOKCASE 622514
- Page 1 IF YOU ARE NOT NEAR A STORE, PLEASE CALL OUR CUSTOM ER SERVICE CALL CENTER TOLL FREE AT 877- 967-5362 FOR ASSISTANCE. ALL PRODUCTS SOLD AT WORLD MARKET ARE NOT FOR COMMERCIAL USE AND ARE INTENDED FOR RESIDENTIAL USE ONLY.
-
Page 2: Component List
Component List LABEL DESCRIPTION Metal Base Wooden Shelf Left Post L1 Left Frame L2 Right Post R1 Right Frame R2 Middle Post M1 Middle Frame M2... -
Page 3: Hardware List
Hardware List LABEL DESCRIPTION Short Allen Bolt (6 mm x 10 mm) Long Allen Bolt (6 mm x 15 mm) Flat Washer (16 mm ) Tool List LABEL DESCRIPTION Allen Key (4 mm) Page 3... -
Page 4: Assembly Preparation
Assemble on a clean non-marring surface (packing foam)- Save all packaging until finished- In case of missing parts, please contact your nearest World Market store or call our customer service call center at call 1-877-967-5362. WARNING: Small parts are a choking hazard. Adult supervision is required before, during, and after assembly. -
Page 5: Assembly Steps
Assembly Steps Step 1 PLEASE MAKE NOTE OF THE DIFFERENT BOLT SIZES AND ENSURE YOU ARE USING THE CORRECT SIZE BOLT FOR EACH STEP. Place the Metal Base (A) onto a padded, non-marring surface as illustrated. Align the hole of Left Post L1 (C) with the pre-drilled hole underneath Metal Base (A). - Page 6 Assembly Steps Step 3 Position Right Frame R2 (F) onto both Right Post R1 (E) and Middle Frame M2 (G), aligning the holes in each component. Loosely secure connection with Short Allen Bolts (H-1) and Flat Washers (H-3) using Provided Allen Key (T-1), stacking the hardware in the order as shown. Do not yet fully tighten. Repeat the same steps to assemble Left Frame L2 (D).
- Page 7 Step 5 NOTE- Levellers are using for adjustment if needed. Using a second person to assist you, carefully turn the product into upright position. Ensure the product sits evenly and all hardware from step 1 to 5 have been fully tightened. Assembly is complete and the product is ready to use.
- Page 8 Anti- Tip Kit "Warning: Serious or fatal injuries can occur from furniture tip-over. To help prevent furniture tip-over. - Use provided mounting hardware to secure furniture to the wall. This may reduce but not eliminate the risk of furniture tip-over. - Do not allow children to climb on furniture.
- Page 10 All products sold at World Market are not for commercial use and are intended for residential use only.
- Page 11 Page 11...
Need help?
Do you have a question about the DAPHNE ARCH TOP BOOKCASE 622514 and is the answer not in the manual?
Questions and answers