
Related Manuals for Sheldon BACTRON400HP


Summary of Contents for Sheldon BACTRON400HP
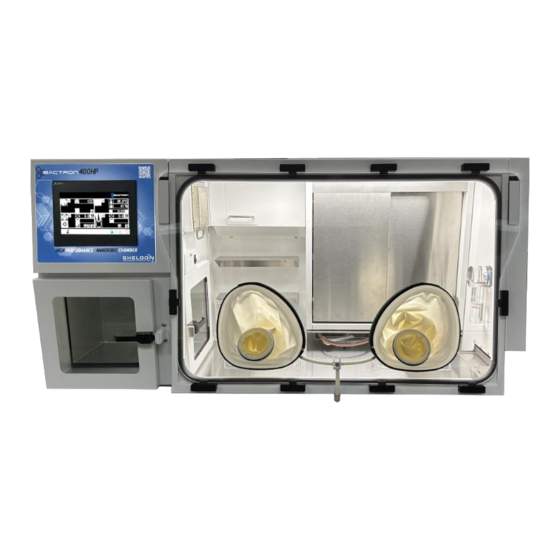
- Page 1 Installation - Operation Manual BACTRON400HP, 110 – 120 Volts BACTRON400HP-2, 220 – 240 Volts...
- Page 2 Warning: This product contains chemicals, including Triglycidyl Isocyanurate, known to the State of California to cause cancer as well as birth defects or other reproductive harm. For more information, go to www.P65Warnings.ca.gov. ¡Advertencia! Este producto contiene sustancias químicas, incluido el triglicidil isocianurato, que el estado de California sabe que causa cáncer, así...
- Page 3 BACTRON400HP Anaerobic Chamber 110 – 120 Volts 220 – 240 Volts Part Number Manual): 4861852, Revision: Jun 19, 2023 Bactron is a brand of Sheldon Manufacturing, Inc., an ISO 9001 certified manufacturer. Model BACTRON400HP BACTRON400HP-2 Part ID BAA400HP22 BAA400HP22-E Safety Certifications UL 61010-1:2012 Ed.3+R:...
- Page 4 This page is blank. P a g...
-
Page 5: Table Of Contents
Manufacturing Defect Warranty ...................... 11 Required Items ..........................12 Temperature Reference Device ....................... 15 RECEIVING YOUR BACTRON400HP ..................17 Inspect The BACTRON400HP Shipment ................... 17 Orientation ............................ 19 110 Power Panel and Fuses ......................20 220 Power Panel and Fuses ......................20 Record Data Plate Information ...................... - Page 6 TABLE OF CONTENTS Settings ............................ 50 Anaerobic Commissioning ......................53 Overview ........................... 53 Readings, Indicators, and Buttons ....................54 Alarms ............................57 Aborts ............................57 Success Screens ........................58 Incubator ............................59 Overview ........................... 59 Reading and Indicators ......................60 Alarms ............................
- Page 7 TABLE OF CONTENTS Launch the Anaerobic Commissioning Cycle .................. 113 Attach the Sleeves ........................115 Enter the Chamber ........................116 Moving in the Pressurized Chamber ....................118 Anaerobic Monitoring ........................120 Exit the Chamber......................... 121 Armport Seal Check ........................122 Incubator Temperature Setpoint....................
- Page 8 TABLE OF CONTENTS Ordering Parts And Consumables ....................162 ACCESSORIES ........................164 APPENDICES ......................... 166 AMG Usage ..........................166 Autocycle Settings by Elevation ....................167 Airlock Autocycle cycle count ......................167 Armport Autocycle cycle count ..................... 168 Autocycle Completion Times ......................168 P a g...
-
Page 9: Introduction
Intended Applications and Locations BACTRON400HP anaerobic chambers are intended for professional, industrial, and educational applications suitable for the cultivation of clinical bacteria. These units are not intended for use at hazardous or household locations. Only use this equipment for its intended range of applications. - Page 10 Use only approved accessories. • Do not modify system components. • Any alterations or modifications to your unit not explicitly authorized by the manufacturer can be dangerous and may void your warranty. BACTRON400HP 10 |...
-
Page 11: Contact Assistance
Some changes, modifications, and improvements may not be covered in this manual. If your unit’s operating characteristics or appearance differs from those described in this manual, please contact your BACTRON400HP dealer or distributor for assistance. -
Page 12: Required Items
5% hydrogen, 5% carbon dioxide, and 90% nitrogen. Note: Do Not exceed 5% hydrogen concentration or explosive mixtures can occur. The BACTRON400HP can be connected to either a standalone supply cylinder or an in-house system. On-Site Supply The manufacturer strongly recommends keeping at least two size 200 cylinders of AMG (size N 8.76M... - Page 13 INTRODUCTION Required Gas Pressure Delivery to the BACTRON400HP Delivery of less than 50 psi gas flow pressure to the BACTRON400HP may slow cycle times. Delivery pressures of less than 40 psi will interrupt the airlock, sleeve, and commissioning cycles, and prevent the BACTRON400HP from keeping overpressure in the workspace chamber.
- Page 14 INTRODUCTION Scrubber Cartridge Reactivation Oven The BACTRON400HP requires a scrubber cartridge oven to reactivate the /activated carbon media scrubber cartridges. There are two Catalyst/Activated Carbon containers included in the BACTRON400HP. Each cartridge requires a bake out of at least 8 hours at 200°C to reactivate after 24-hours of use in the chamber.
-
Page 15: Temperature Reference Device
INTRODUCTION EMPERATURE EFERENCE EVICE Must be purchased separately. A temperature reference device is needed to calibrate the BACTRON400HP incubator temperature displays. Reference devices must meet the following standards: Temperature Accurate to at least 0.05°C • Reference The device should be regularly calibrated, preferably by a third party. - Page 16 This page is blank. 16 | P a g...
-
Page 17: Receiving Your Bactron400Hp
• The unit should come with an end-user Installation and Operation Manual. • Verify that the correct number of accessory items have been included. • Standard accessory items included with the BACTRON400HP: Leveling Feet Armport Door Armport Door Power Cords... - Page 18 18 | P a g...
-
Page 19: Orientation
RECEIVING YOUR BACTRON400HP RIENTATION BACTRON400HP Petri Dish Slot Interior Petri Dish Slot Exterior Petri Dish Slot Exterior Petri Dish Slot Closed Opened Closed 19 | P a g... -
Page 20: Power Panel And Fuses
BACTRON400HP Power Panel 110 P OWER ANEL AND USES 220 P OWER ANEL AND USES Note: The BACTRON400HP is delivered with all fuses installed. Replace fuses with the same type of fuse. Insert the correct power cords. 20 | P a g... - Page 21 RECEIVING YOUR BACTRON400HP Receiving and Inspecting Your BACTRON400HP Workspace Chamber 21 | P a g...
-
Page 22: Record Data Plate Information
RECEIVING YOUR BACTRON400HP ECORD LATE NFORMATION The data plate has the incubator model number, serial number, part number, and Part ID number. Tech Support will need this information during any support call. Record it below for future reference. The data plate is in the workspace chamber above the inner airlock door. - Page 23 This page is blank. 23 | P a g...
-
Page 24: Installation
Connect the foot pedal switch to the BACTRON400HP, page 33 Fill the manometer in the workspace chamber with water, page 33 Clean and disinfect the BACTRON400HP, accessories, and items to be placed in the chamber, page 35 Open the incubator doors all the way and leave... -
Page 25: Required Ambient Conditions
The room temperature is to be maintained between 15°C and 30°C (59°F and 86°F) and the room temperature should not vary more than +/-1°C per hour. Relative Humidity should be no more than 80% at 25°C / 77°F. Operating the BACTRON400HP outside of these conditions may adversely affect its incubator temperature stability and effective operating range. -
Page 26: Environmental Disruption Sources
IGHTING Sustained exposure to direct sunlight, UVC, or UV germicidal lighting around 254nm will cause rapid aging of BACTRON400HP acrylic glass panels and armport sleeves. Check to see if your laboratory or workspace contains sources of UV lighting. Periodic use of long-wave (365nm) UV hand lamps for bacterial identification should not damage the Maintaining the Acrylic Glass Panels acrylic glass. -
Page 27: Power Requirements
Accessory Outlet • Internal Power Source: The power source for the BACTRON400HP must match the voltage, and match or exceed the ampere requirements listed on the unit data plate. Note: Unit may be damaged if the supplied voltage varies by more than 10% from the data plate rating. - Page 28 T - 12.5 9 ft 5 in (2.86m) Power Cords (2) 250 V CAUTION: The unit must be positioned so that all end-users can quickly unplug the BACTRON400HP if there is an emergency. Note: Always use this cord or an identical replacement.
-
Page 29: Gas Supply Requirements
AMG Regulator Requirements The AMG Regulator that is available to purchase from Sheldon Manufacturing with the BACTRON is compliant with the requirements listed below: The regulator for each AMG cylinder must be a dual-stage regulator to ensure precise flow •... - Page 30 INSTALLATION Nitrogen Option - Dual Gas Configuration AMG is used to cycle the airlock to create and maintain an anaerobic atmosphere in the workspace chamber. This is a major source of AMG usage; however, AMG is only necessary for the final gas backfill.
-
Page 31: Lifting And Handling
Remove all removable components, such as trays and containers, and secure all doors in the • closed position during transfer to prevent shifting and damage. Note: To prevent damage when moving the BACTRON400HP, turn each of the four leveling feet completely clockwise. EVELING The BACTRON400HP must be level and stable for safe operation. -
Page 32: Install The Bactron400Hp
Warning: Never exceed a 5% hydrogen concentration inside the anaerobic workspace chamber. Exceeding 5% may create an explosion and flammability hazard. Single Gas Configuration Dual Gas Configuration CAUTION: Do not start a flow of gas to the BACTRON400HP at this point for either configuration. 32 | P a g... -
Page 33: Connect The Foot Pedal
Fill with 2 fl oz (60 ml) of water. • The water should reach the top (black) measuring ring when the BACTRON400HP is off, and the bottom poppet ring is on. To avoid scaling (mineralization build-up), • use distilled water. Never use deionized water. -
Page 34: Vacuum Supply
ACUUM UPPLY The BACTRON400HP comes with an internal vacuum pump to evacuate the airlock and the armport sleeves when cycling to remove oxygen. The BACTRON400HP is not designed to connect to an in- house supply system. 34 | P a g... -
Page 35: Installation Cleaning And Disinfection
Cleaning and disinfecting the chamber during installation reduces the chance of microbiological contamination. The BACTRON400HP was cleaned, and the workspace chamber disinfected at the factory. However, the BACTRON400HP may have been exposed to contaminants during shipping, or the factory procedure may not meet the standards of your institutional protocols. -
Page 36: Open The Incubator Doors
INSTALLATION PEN THE NCUBATOR OORS Incubator doors must be open during the commissioning cycle while the BACTRON400HP establishes an anaerobic atmosphere in its workspace chamber. The incubator doors must be open and centered to allow optimum circulation. • Failure to open the incubator doors will leave significant reservoirs of oxygenated •... -
Page 37: Installing The Armport Doors
INSTALLATION NSTALLING THE RMPORT OORS The armport doors must be installed for the commissioning cycle to successfully establish an anaerobic atmosphere. Turn the locking bar on both doors to a roughly 45° • position. Insert the tabs for one door into the slots on the •... -
Page 38: Symbols
SYMBOLS YMBOLS Below is the On/Off Power Switch for the BACTRON400HP, and the Caution indicator which points out potentially hazardous situations. Interior & Exterior Symbols Definitions & Icons I/ON O/OFF The power switch can be found on the back of the BACTRON400HP. - Page 39 This page is blank. 39 | P a g...
-
Page 40: Control Panel Overview
CONTROL PANEL OVERVIEW CREEN Overview The Home Screen is divided into five sections: Four control screens and the taskbar. Workspace Control Incubator Control Airlock Control Armport Control Taskbar Control Screens Each of the four controls have: Specific sensor readings (Such as, O2 ppm, temperature, relative humidity, pressure inHg) •... -
Page 41: Taskbar
CONTROL PANEL OVERVIEW – HOME SCREEN Taskbar The Home Screen Taskbar has up to six buttons and two alarm indicators: User Login: Authorized users can access secured functions. Names from left to right. Locked, DataLog, Manager, Customer Service, Service. Always present. AMG Low: Present when pressure from tank is too low. - Page 42 42 | P a g...
-
Page 43: Login
CONTROL PANEL OVERVIEW – HOME SCREEN Login Tap User login button Tap the user to log in as Tap password input box Enter Password Log in box changes to show new Tap enter user Factory Default Passwords: Datalog: Password = 1. (Operator changeable after logged in as Manager.) •... -
Page 44: Logout
CONTROL PANEL OVERVIEW – HOME SCREEN Logout When the user has completed their task and is ready to log out. 1. Tap User login button 2. Tap Lock 3. Log in box changes to Lock 44 | P a g... -
Page 45: Secure Access
CONTROL PANEL OVERVIEW – HOME SCREEN Secure Access If an operator attempts to access a secured screen and they are not authorized, this message appears. Secured Access is provided for the following functions: Icon Function Minimum Access Workspace Anaerobic Commissioning Manager Control Settings Manager... - Page 46 Must contact Customer Service to get the temporary password. • CustSrv Temporarily elevated access for Service providers. Must contact Customer Service to get the temporary password. • Service Note: BACTRON400HP does not require users to login for normal operations. 46 | P a g...
-
Page 47: Workspace
CONTROL PANEL OVERVIEW - WORKSPACE ORKSPACE Overview Manages and reports the status of the Workspace. Anaerobic Indicator Disabled Above 1200ppm Oxygen Above Oxygen Reading Anaerobic Parts per Million Setpoint in the Workspace Workspace Anaerobic Settings Alarm Anaerobic Indicator Commissioning Control Not Active Active Exception... -
Page 48: Reading And Indicators
CONTROL PANEL OVERVIEW - WORKSPACE Reading and Indicators Oxygen reading - reports in parts per million with a minimum of 0 ppm and maximum of 1,200 ppm (0% to 0.12% oxygen). Ambient air contains around 210,000 ppm of oxygen (21%), well above the sensor’s maximum reading when oxygen is not scrubbed from the workspace. -
Page 49: Alarms
CONTROL PANEL OVERVIEW - WORKSPACE Alarms The Workspace Control has the following alarms : Long Injection Alarm - Occurs when AMG has injected into the workspace longer than the workspace setting. AMG Low – Pressure is not detected from the AMG tank. Tank may be empty., valve may be shut off (tank side or Bactron side), hose could have come off or been kinked, possible leak on fittings or filters. -
Page 50: Settings
CONTROL PANEL OVERVIEW - WORKSPACE Settings Login Security: To access, operator must be logged in as manager (refer to the section on page 43). Tap the gear on the Home Screen of the Workspace control. It will open the settings screen below. - Page 51 CONTROL PANEL OVERVIEW - WORKSPACE Factory Reset All settings screens have a factory reset button at the bottom right-hand corner that allows the operator to set all the settings for selected control back to factory default. Return Button Return to previous screen 51 | P a g e...
- Page 52 This page is blank. 52 | P a g e...
-
Page 53: Anaerobic Commissioning
CONTROL PANEL OVERVIEW – ANAEROBIC COMMISSIONING NAEROBIC OMMISSIONING Overview Manages and reports the status of the Anaerobic Commissioning Process. Login Security: To access, operator must be logged in as manager (refer to the section on page 43). Tap the Anaerobic Commissioning button on the Home Screen of the Workspace control. It will display the screen below. -
Page 54: Readings, Indicators, And Buttons
CONTROL PANEL OVERVIEW – ANAEROBIC COMMISSIONING Readings, Indicators, and Buttons Count Down Timer – Counts down from Five hours to Zero and ends commissioning cycle. If the Oxygen Sensor is enabled, it normally stops the commissioning cycle in less than five hours. Oxygen reading - reports in parts per million with a minimum of 0 ppm and maximum of 1,200 ppm (0% to 0.12% oxygen). - Page 55 CONTROL PANEL OVERVIEW – ANAEROBIC COMMISSIONING AMG Injection Indicator Not Active Anaerobic Mixed Gas is not injecting into the workspace Active Anaerobic Mixed Gas is injecting into the workspace. Exception Injecting longer time set for Long Injection Alarm. See Workspace Settings on page 50 5.
- Page 56 CONTROL PANEL OVERVIEW – ANAEROBIC COMMISSIONING AMG Inject Indicator Not Active Injecting Exception AMG Low Indicator active • AMG Continuous Injection active. • Start / Stop Button Start Anaerobic Commissioning Process Stop Anaerobic Commissioning Process Anaerobic Commissioning Process Resetting Anaerobic Commissioning Process Disabled Inside airlock door opened •...
-
Page 57: Alarms
CONTROL PANEL OVERVIEW – ANAEROBIC COMMISSIONING Alarms The Anaerobic Commission Control has the following alarms : Long Injection Alarm - Occurs when AMG has injected into the workspace longer than the workspace setting (page 50) reports. AMG Low – Tank may be empty. High Alarm –... -
Page 58: Success Screens
CONTROL PANEL OVERVIEW – ANAEROBIC COMMISSIONING Success Screens When the Anaerobic Commission Process completes it will display one of the following screens and wait for the operator to return the screen back to Home. Note: The oxygen setpoint that the Anaerobic Commissioning stops at is 400 ppm. This is not adjustable by the operator. -
Page 59: Incubator
CONTROL PANEL OVERVIEW - INCUBATOR NCUBATOR Overview Manages and reports the status of the incubator. Incubator Temperature Incubator Settings Humidity Incubator Alarm Temperature Indicator Setpoint Not Heating Over Temperature Heating Indicator Over Temp Under Temperature Limit Active Indicator 59 | P a g e... -
Page 60: Reading And Indicators
CONTROL PANEL OVERVIEW - INCUBATOR Reading and Indicators Incubator Temperature – Reports the temperature of the incubator. Relative Humidity – Reports the relative humidity in the incubator. It does not control humidity; the operator must put open containers of water in the incubator to raise the humidity. Setpoint - Reports the setpoint the incubator is set to achieve. -
Page 61: Settings
CONTROL PANEL OVERVIEW - INCUBATOR Settings Login Security: To access, operator must be logged in as manager (refer to the section on page 43). Tap the gear on the Home Screen of the Incubator control. It will open the settings screen below. - Page 62 CONTROL PANEL OVERVIEW - INCUBATOR Factory Reset All settings screens have a factory reset button at the bottom right-hand corner that allows the operator to set all the settings for selected control back to factory default. Return Button Return to previous screen 62 | P a g e...
-
Page 63: Over Temperature Limit
CONTROL PANEL OVERVIEW – INCUBATOR Over Temperature Limit The Over Temperature Limit (OTL) alarm is activated when the incubator temperature is above the OTL setpoint. When the control is active, will appear on the heat activated indicator. The system stops heating by switching off the power to the heating elements and the buzzer will sound. - Page 64 This page is blank. 64 | P a g e...
-
Page 65: Airlock
CONTROL PANEL OVERVIEW - AIRLOCK IRLOCK Overview Manages and reports the status of the Armport pressure and autocycle. Inside Door Both Doors Closed Opened Airlock Outside Door Both Doors Opened Opened Pressure Inside Door Locked Door Sensors Run Autocycle to unlock Disabled Progress Bar Settings... -
Page 66: Buttons, Readings, And Indicators
CONTROL PANEL OVERVIEW - AIRLOCK Buttons, Readings, and Indicators Start / Stop Autocycle Button – The face of the button changes to reflect the next available action. Tapping the button will activate the action. Start O Purge Autocycle – Starts the Airlock Purge Cycle. Stop Autocycle –... - Page 67 CONTROL PANEL OVERVIEW - AIRLOCK Door and Lock Indicator – Reports: Current state of doors (Open/Closed). • The state of the inside door lock (Locked/Unlocked. • The door sensors state (Enabled/Disabled). Normally the door sensors will be enabled, • however, if there were an issue with the door sensor, the operator could temporarily disable the door sensor in settings and run autocycles.
-
Page 68: Alarms
CONTROL PANEL OVERVIEW - AIRLOCK Alarms Appears if one of these conditions’ triggers while the autocycle is running. AMG Low – Tank may be empty. N2 Low – Tank may be empty. The current vacuum, N or AMG pass fails to maintain the stall rate (page 69) for more than 4 seconds. -
Page 69: Settings
CONTROL PANEL OVERVIEW - AIRLOCK Settings Tap the gear on the Home Screen of the Airlock control. It will open the settings screen below. Login Security: To access, operator must be logged in as manager (refer to the section on page 43). - Page 70 CONTROL PANEL OVERVIEW - AIRLOCK Factory Reset All settings screens have a factory reset button at the bottom right-hand corner that allows the operator to set all the settings for selected control back to factory default. Return Button Return to previous screen 70 | P a g e...
-
Page 71: Airlock Manual Operations
CONTROL PANEL OVERVIEW - AIRLOCK MANUAL OPERATIONS IRLOCK ANUAL PERATIONS Overview Manually apply vacuum or gas in the airlock and door lock override for the inside airlock door. Tap the Manual Operations button on the Home Screen of the Airlock control. It will display the screen below. -
Page 72: Readings And Indicators
CONTROL PANEL OVERVIEW - AIRLOCK MANUAL OPERATIONS Readings and Indicators Door and Lock Indicator – Reports Current state of doors (Open/Closed). • The state of the inside door lock (Locked/Unlocked. • The door sensors state (Enabled/Disabled). Normally the door sensors will be enabled, •... -
Page 73: Buttons
CONTROL PANEL OVERVIEW - AIRLOCK MANUAL OPERATIONS Buttons Manual Vacuum and Gas Vacuum Start Will shut off after 30 seconds. Stop Indicates that the operation is active and can be stopped by taping the button again. Note: N2 will only appear if the Bactron is set to Dual Gas. Inside Airlock Door Lock Normal operation. - Page 74 This page is blank. 74 | P a g e...
-
Page 75: Armports
CONTROL PANEL OVERVIEW - ARMPORTS RMPORTS Overview Manages and reports the status of the Armport Sleeve processes. The foot pedal activates the Armport Sleeve autocycle. Armport Pressure Settings Progress Alarm Indicator Vacuum Reset Not Active Ready Autocycle Autocycle Disabled Active Running Check Gas Alarm... -
Page 76: Readings And Indicators
CONTROL PANEL OVERVIEW - ARMPORTS Readings and Indicators Autocycle Activity Status – The indicator changes to reflect the current action. Note: This is not a button. Use the foot pedal to activate the Armport Sleeve process. Ready – Indicates that the armport autocycle can be started. Running –... - Page 77 CONTROL PANEL OVERVIEW - ARMPORTS Autocycle Progress Bar – The bar is updated at the completion of each vacuum or gas pass and will be filled with a blue box when the unit has completed the autocycle. The bar will remain blue for one minute.
-
Page 78: Alarms
CONTROL PANEL OVERVIEW - ARMPORTS Alarms Will appear if one of the conditions below trigger while autocycle is running. AMG Low. The tank may be empty. Vacuum or Gas Pass took too long to complete. Time to complete Entire cycle took too long. 78 | P a g e... -
Page 79: Settings
CONTROL PANEL OVERVIEW - AIRLOCK Settings Tap the gear on the Home Screen of the Armport control. It will open the settings screen below. Login Security: To access, operator must be logged in as manager (refer to the section on page 43). - Page 80 CONTROL PANEL OVERVIEW - AIRLOCK Factory Reset All settings screens have a factory reset button at the bottom right-hand corner that allows the operator to set all the settings for selected control back to factory default. Return Button Return to previous screen 80 | P a g e...
-
Page 81: Global Options
CONTROL PANEL OVERVIEW – GLOBAL OPTIONS LOBAL PTIONS Overview Provides access to a menu of miscellaneous options for the Bactron. Tap the Global Options button on the Home Screen Taskbar. It will display the screen below. About Tap the About button on Global Options. It will display the screen below. -
Page 82: Calibrations
CONTROL PANEL OVERVIEW – GLOBAL - CALIBRATION Calibrations Tap the Calibrations button on Global Options. It will display the screen below. The Calibrations screen allows the operator to adjust the offset of the Oxygen, Humidity and Temperature sensors. Login Security: To access, operator must be logged in as manager (refer to the section on page 43). - Page 83 CONTROL PANEL OVERVIEW – GLOBAL - CALIBRATION Oxygen Calibration Tap the Calibrate Oxygen button on the Calibration screen. It will display the screen below. Note: This is a single calibrated sensor. It should be calibrated while the chamber is anaerobic. The Calibrate Oxygen screen allows the operator to adjust the offset of the Oxygen sensor.
- Page 84 CONTROL PANEL OVERVIEW – GLOBAL - CALIBRATION Relative Humidity Calibration Tap the Calibrate Humidity button on the Calibration screen. It will display the screen below. The Calibrate Humidity screen allows the operator to adjust the offset of the Humidity sensor. Calibration Process Insert the sensor for the reference device that measures relative humidity into...
- Page 85 CONTROL PANEL OVERVIEW – GLOBAL - CALIBRATION Temperature Calibration Tap the Calibrate Temperature button on the Calibration screen. It will display the screen below. Note: This is a single setpoint calibrated control. It should be calibrated to the setpoint temperature. The Calibrate Temperature screen allows the operator to adjust the offset of the Temperature sensor.
- Page 86 This page is blank. 86 | P a g e...
-
Page 87: Change Password
CONTROL PANEL OVERVIEW – GLOBAL– CHANGE PASSWORD Change Password Tap the Change Password button on Global Options. The Change Password screen allows the operator to change the passwords for Datalog and Manager. The operator can also select the default user that the Bactron will log into when powered Login Security: To access, operator must be logged in as manager (refer to the... - Page 88 CONTROL PANEL OVERVIEW – GLOBAL– CHANGE PASSWORD Set default power on user. When the Bactron is powered on, all the secured functions will require authorization. Locked When the Bactron is powered on, Datalog functions will not require authorization. Manager functions will require authorization Datalog When the Bactron is powered on, none of the secured operator functions will require authorization.
-
Page 89: Log To Sd Card
CONTROL PANEL OVERVIEW – GLOBAL– LOG TO SD CARD Log to SD Card Tap the Log to SD Card button on the Global Options screen. The Log to SD Card screen allows the operator to enable or disable the datalogger, stop the datalogger to remove the SD Card, start the datalogger, set the logging interval from the predefined list of minutes. - Page 90 CONTROL PANEL OVERVIEW – GLOBAL– LOG TO SD CARD Minutes per Sample Sets the number of minutes between logged samples. Start / Stop Button Starts Datalogger. Play Stops Datalogger Stop The Start / Stop button will be disabled if: Enable / Disable button is Disabled. •...
- Page 91 CONTROL PANEL OVERVIEW – GLOBAL– LOG TO SD CARD SD Card Ready No SD card detected SD card detected and ready to be used by the logger. Datalog Indicator Datalogger not active. Datalogger initializing. Datalogger Running. Datalogger Error. 91 | P a g e...
- Page 92 CONTROL PANEL OVERVIEW – GLOBAL– LOG TO SD CARD Copy SD Datalog to a PC. Stop Datalogger Remove SD Card from the Bactron Insert SD card into card reader on a PC Open Card reader drive on PC using the path below as a model. <your drive letter>:\LOGGING\Bactron Find the newest folder.
-
Page 93: Date & Time
CONTROL PANEL OVERVIEW – GLOBAL– DATE & TIME Date & Time Tap the Date & Time button on the Global Options screen. The Date & Time screen allows the operator to set the date and time on the Bactron and turn the home screen date and/or time display on or off. - Page 94 CONTROL PANEL OVERVIEW – GLOBAL– DATE & TIME Set Date Changes the Bactron’s month, day, and year. Tap Month Value Tap Day Value Tap Year Value Use Keypad to change value Use Keypad to change value Use Keypad to change value Tap Enter to complete Tap Enter to complete Tap Enter to complete...
- Page 95 CONTROL PANEL OVERVIEW – GLOBAL– DATE & TIME Set Time Changes the Bactron’s hour and minute. Tap Hour Value Tap Minute Value Use Keypad to change value Use Keypad to change value Tap Enter to complete Tap Enter to complete 95 | P a g e...
- Page 96 This page is blank. 96 | P a g e...
-
Page 97: Screen Settings
CONTROL PANEL OVERVIEW – GLOBAL– SCREEN SETTINGS Screen Settings Tap the Screen Settings button on the Global Options screen. The Screens Settings screen allows the operator to set the brightness and Home Screen Background. Login Security: To access, operator must be logged in as manager (refer to the section on page 43). - Page 98 This page is blank. 98 | P a g e...
-
Page 99: Graphs
CONTROL PANEL OVERVIEW – GRAPHS RAPHS Overview Presents graphs of readings for last 24 hours of Temperature, Relative Humidity, and Oxygen. Tap the Graph button on the Home Screen Taskbar. It will display the Temperature Graph. The Graph button always displays the Temperature. Use the three buttons on the taskbar to switch between graphs. -
Page 100: Relative Humidity
CONTROL PANEL OVERVIEW – GRAPHS Relative Humidity Displays the incubator’s relative humidity history for the last 24 hours. The humidity is not controlled and does not have a setpoint. Humidity may be increased by placing containers of water on the incubator shelves. Oxygen Displays the workspace oxygen level and anaerobic point history for the last 24 hours. -
Page 101: Operation
PERATION Achieving Anaerobic Conditions The BACTRON400HP is designed to create and maintain an anaerobic workspace chamber atmosphere suitable for clinical cultivation of anaerobic bacteria. The anaerobic atmosphere is initially achieved by purging the chamber with pulses of anaerobic mixed gas (AMG) as part of an auto-commissioning cycle. - Page 102 OPERATION Accessing the Workspace Chamber The BACTRON400HP features an airlock system designed for the safe introduction and removal of sample containers and laboratory equipment from its workspace chamber. This airlock operates by creating a nearly anaerobic environment, achieved through a series of partial vacuum evacuations and subsequent backfills with anaerobic gas.
- Page 103 Workspace HEPA Air Filtering The BACTRON400HP features a state-of-the-art HEPA air filtering system, designed to purify the air within the workspace. HEPA, standing for "High Efficiency Particulate Air [filter]," is a highly efficient type of mechanical air filter, as defined by the U.S.
- Page 104 OPERATION Manometer Pressure Gauge and Check Valve The workspace chamber of the BACTRON is equipped with a water-filled manometer, serving two essential functions: as a visual indicator of pressure levels and as a dynamic venting mechanism in case of excessive pressure. Under normal conditions, with the chamber unpowered and at room pressure, the manometer is filled to its top reference ring.
-
Page 105: Put The Bactron Into Operation
OPERATION BACTRON UT THE INTO PERATION Note: Once in operation, the BACTRON should run for 24 hours prior to loading samples. This ensures the stability of both the anaerobic atmosphere and incubator air temperature. After installation in a new workspace environment, check the following items prior to placing the unit into operation. - Page 106 OPERATION Perform the following procedures and steps Install the O Scrubber, Activated Carbon, and HEPA Filter (procedure on page 109) Workspace O2 CATALYST HEPA Filter ACTIVATED CARBON CARTRIDGE Workspace Plug in the BACTRON procedure on page 110. Supply Gas to the BACTRON procedure on page 111.
- Page 107 OPERATION Zero the Pressure Displays This sets the pressure gauges to local conditions. See page 48. Set incubator temperature to 15C It is recommend that the operator set the the incubator to 15C to avoid it heating during the anaerobic commission process. See the Set the Incubator Temperature on page 57 for how to...
- Page 108 OPERATION Verify the Anaerobic Atmosphere, page 120. If the chamber is not fully anaerobic perform the Troubleshooting O in the Chamber, page 150. Enter the Chamber after the commissioning cycle has finished, page 116. Optional: If you are required to verify the accuracy of the incubator temperature display(s), set up the verification equipment now.
-
Page 109: Install O 2 Catalyst / Activated Carbon Cartridge And Hepa Filter
OPERATION HEPA NSTALL ATALYST CTIVATED ARBON ARTRIDGE AND ILTER Workspace O2 CATALYST HEPA Filter ACTIVATED CARBON CARTRIDGE HEPA Filter Arrow Workspace Open the left armport door. • Install one O Catalyst and Activated Carbon cartridge. • Install the Workspace HEPA filter into the filter holder (pull on silver handle). The filter •... -
Page 110: Plug In The Bactron
OPERATION BACTRON N THE 110 |... -
Page 111: Supply Gas To The Bactron
OPERATION BACTRON UPPLY AS TO THE Open the supply cylinder valve. Example only. Supply cylinder valve open – close directions vary by country. The supply gauge (right) will jump from zero ( 0 ) to showing the current gas supply pressure level. Open the Regulator Flow Valve to supply an AMG flow of 50 psi to the BACTRON. -
Page 112: Zero The Pressure Displays
OPERATION ERO THE RESSURE ISPLAYS Function: The Airlock and Sleeve Pressure Displays on the main control panel should each show 0 (zero) when exposed to room atmosphere pressure. The gauges help restore the airlock and sleeves to near room pressure when completing a cycle. The gauges were originally zeroed near sea level. Sleeve Pressure Display Zero the Sleeve display if the display shows a reading other than 0 when the sleeves are attached to the armports but not being used. -
Page 113: Launch The Anaerobic Commissioning Cycle
OPERATION AUNCH THE NAEROBIC OMMISSIONING YCLE The cycle establishes an anaerobic atmosphere in the workspace chamber over the course of several hours. Note: Commissioning cycles will not initiate while a sleeve cycle or an airlock cycle is active. Prior to launching the cycle, verify that: Incubator door is open Incubator is set to 15C ✓... - Page 114 OPERATION The process may take as long as 5 hours to complete, it is normally faster as it uses the concentration of oxygen to stop the process at 400ppm. The Bactron will continue scrub out the remaining oxygen in a short period of time. During the cycle, extended AMG injections force aerobic chamber atmosphere out through a one- way commissioning vent valve.
-
Page 115: Attach The Sleeves
OPERATION TTACH THE LEEVES Attach and secure both sleeves to the armports. This allows reach-in access to the chamber through the ports without introducing an aerobic ambient atmosphere. Figure 9: Sleeve Installation Begin with either Armport 1. Unroll the large opening of a sleeve over the lip of the armport door. -
Page 116: Enter The Chamber
OPERATION NTER THE HAMBER Prior to entry, read the Exiting the Chamber procedure (page 121) for how to withdraw your arms from the chamber without compromising the anaerobic atmosphere. 1. Don the Sleeves Note: Sleeves come with mid-sized, size 8 cuffs. Please see the Parts List on page 160 for other cuff sizes. - Page 117 OPERATION 4. Open the Armport Doors Watch Video https://youtu.be/JhCl85Fzdes When the cycle has finished, loosen both armport doorknobs by two or three turns. Rotate the locking bars to roughly 45°. Slowly push one door into the chamber, then slowly push the other door into the chamber.
-
Page 118: Moving In The Pressurized Chamber
OPERATION OVING IN THE RESSURIZED HAMBER Undisturbed Overpressure When sealed and sitting undisturbed, the BACTRON maintains a positive 0.5 inches (1cm) of water column pressure in the workspace chamber to prevent infiltration by external atmosphere. 0.5 inches (1.3 cm) water column pressure Pressure Increase Introducing hands and objects into the sealed chamber displaces the atmosphere, further increasing the pressure. - Page 119 OPERATION Pressure Management Use a swimming motion, withdrawing one arm while reaching in with the other. Slow movements avoid spiking the chamber pressure and venting anaerobic atmosphere. Slow, deliberate, • simultaneous movements balancing out one another. No atmosphere vented. • 119 |...
-
Page 120: Anaerobic Monitoring
OPERATION NAEROBIC ONITORING The BACTRON400HP is equipped with an oxygen sensor to monitor the oxygen concentration in the chamber. The results are displayed on the Home screen > Workspace control and the Anaerobic Commissioning Screen. Note: The Anaerobic Commissioning Process reports complete when the oxygen concentration drops to 400 ppm. -
Page 121: Exit The Chamber
OPERATION XIT THE HAMBER Pressure in the chamber drops when a user withdraws their arms. If done too quickly, this can draw in outside air through the sleeve cuffs or manometer. Use the following steps to exit the chamber without pulling in aerobic atmosphere. -
Page 122: Armport Seal Check
OPERATION RMPORT HECK Checking the Armport Door seal requires having the sleeve installed. The process is: Twist off the sleeve near the cuff to make it airtight. Plug the air/vacuum hole on the other armport. Inflates the sleeve. Tap foot pedal four consecutive times within three seconds. -
Page 123: Incubator Temperature Setpoint
OPERATION NCUBATOR EMPERATURE ETPOINT Close the incubator doors prior to setting a temperature setpoint. Heating the incubator with the door(s) open for longer than a few moments may result in temperature instability and overshoots once the doors are closed. 1. Set OTL control to its maximum setting, if not already set to max. Turning the OTL all the way to the right (clockwise) prevents the heating cutoff •... -
Page 124: Set The Over Temperature Limit
OPERATION Test the OTL heating cutoff system at least once each year for functionality. ET THE EMPERATURE IMIT The incubator must be operating at your incubation application temperature and must be stable for at least 1 hour prior to setting the OTL. The incubator OTL must be set independently on the BACTRON. 1. -
Page 125: Set The Airlock Cycle Iterations
OPERATION ET THE IRLOCK YCLE TERATIONS Optional: The BACTRON comes from the factory set to run a 3-iteration auto cycle. The airlock can be set to run from two through nine cycles. Each cycle consists of a vacuum down air purge phase followed by a gas backfill of the airlock chamber. More cycles decrease the amount of O left in the airlock chamber upon cycle completion but increase gas usage and cycle run times. -
Page 126: Cycling The Airlock
OPERATION YCLING THE IRLOCK Airlock Control Overview can be found on page 65. Cycle the airlock prior to opening the inner airlock door whenever the Airlock Progess Indicator is not 100% textured blue. Close and latch both the inner and outer airlock doors to enable the autocycle button. Tap the Airlock Auto Cycle start button on the Home Screen Airlock Control. -
Page 127: Manually Cycling The Airlock
OPERATION ANUALLY YCLING THE IRLOCK Airlock Manual Vacuum / Gas Control Overview can be found on page 71. This control is intended as a backup for the airlock autocycle system. It can also be used to carry out custom cycles or low-pressure applications down to -18inHg in the airlock chamber. Tap the Manual Operations button on the Home Screen of the Airlock control. - Page 128 OPERATION Manual Vacuum and Gas Process Tap the Manual Cycle switch for Vacuum. The airlock will draw down 30 seconds unless the operator presses the button again. If the pressure is not low enough when the pump shuts off, tap the button again.
-
Page 129: Inside Airlock Door Lock
OPERATION NSIDE IRLOCK Home Screen > Airlock Control > Manual Vacuum and Gas. If the operator manually cycles the airlock the progress bar will not show 100% textured blue. The inside airlock door will not automatically unlock. This function will enable the operator to open the inside airlock door, anyway. -
Page 130: Loading Samples
OPERATION OADING AMPLES The manufacturer recommends waiting 24 hours after establishing an anaerobic atmosphere before loading samples into the unit. Containers Airtight containers can introduce significant amounts of oxygen into the anaerobic environment of the BACTRON. Whenever possible, closed containers placed in the airlock should be loose-capped or ventilated to allow the airlock cycles to draw oxygen from the containers. -
Page 131: Humidifying The Incubators
OPERATION UMIDIFYING THE NCUBATORS Placing a small number of Petri dishes or other open media containers in the BACTRON for several weeks may lead to excessive drying of sample media. A small open container such as a flask of 500ml of distilled water set on each shelf of the incubator can help to slow sample drying. -
Page 132: Volatile Compound Scrubber And Rejuvenation Cycle
EJUVENATION YCLE The BACTRON400HP is equipped with an activated carbon scrubber as a standard feature, enhancing its functionality. This scrubber, which is attached to the O2 catalyst, is strategically placed in the workspace area above the inner airlock door. Its primary function is to absorb volatile fatty acids (VFAs) and volatile sulfur compounds (VSCs), which are commonly produced during the cultivation of samples. -
Page 133: Condensation And The Dew Point
OPERATION ONDENSATION AND THE OINT Relative humidity inside the BACTRON should never exceed 80% at 25°C. Exceeding this threshold can result in condensate forming on the incubator and workspace surfaces. Condensate will appear whenever the humidity level in the chamber reaches the dew point. The dew point is the level of humidity at which the air cannot hold more water vapor. -
Page 134: Deionized And Distilled Water
OPERATION EIONIZED AND ISTILLED ATER Warning: Do not use deionized water for cleaning or humidifying the BACTRON! Although deionized water is readily found in laboratory settings, it is a potent solvent that can corrode metal surfaces. Accordingly, using deionized water in a BACTRON is discouraged as it not only risks damaging the unit but also voids the warranty against manufacturing defects. - Page 135 This page is blank. 135 |...
-
Page 136: User Maintenance
USER MAINTENANCE HAMBER UALITY ONTROL HECK HEET Month: _____________________ Tank Workspace Incubator AMG Tank Pressure Oxygen Temperature Pressure Reading Reading Reading Reading You may copy this sheet for institutional use. 136 |... -
Page 137: Daily Maintenance
ORMAL ONSUMPTION A sealed and undisturbed BACTRON400HP will typically run for more than 30 minutes between gas injections into the workspace chamber. The AMG Injecting light will illuminate while pulsing gas into the workspace chamber, accompanied by a pair of audible clicks from the gas solenoid opening and closing. -
Page 138: Door Gasket Maintenance And Usage
For institutions where multiple users operate the same BACTRON400HP, it is advisable to have an assortment of sleeves in various sizes - small, medium, and large - readily available. Alternatively, assigning a specific pair of sleeves to each user can be an effective strategy to ensure hygiene and personalization in shared use environments. -
Page 139: O2 Catalyst/Activated Carbon Cartridge: Test In The Airlock
USER MAINTENANCE CAUTION: The O Catalyst Cartridge temperature may become hot in the presence of oxygen and AMG. Use caution when touching the O2 Catalyst. O2 C ATALYST CTIVATED ARBON ARTRIDGE IRLOCK Tests to confirm the O Catalyst cartridge is functioning properly. Place the baked O Catalyst/ Activated Carbon cartridge in the airlock. -
Page 140: Quality Control Test - Scrubber Cartridges
USER MAINTENANCE – S UALITY ONTROL CRUBBER ARTRIDGES Perform a quality control test on each O scrubber cartridge once per month. Place a reactivated O scrubber cartridge in the airlock with an aerobic atmosphere and Run • Airlock Autocycle (page 126) The palladium-coated pellets inside the catalyst cartridge should grow warm in the presence of oxygen and hydrogen which shows that the cartridge is ready for use. - Page 141 USER MAINTENANCE AMG C ONSERVATION ETHODS Minimize the number of airlock cycles per day. • Use the dual AMG - N gas configuration for auto cycling the airlock. • Use the single petri dish entry slot if you have just a few dishes to put into the chamber. •...
-
Page 142: Reassembling The Sleeve Assembly
USER MAINTENANCE EASSEMBLING LEEVE SSEMBLY Perform the following steps to disassemble the sleeve assembly: Cuff-Ring and Sleeve • Roll the black O-ring from the sleeve. Cuff • Pull the sleeve cuff and cuff-ring from the sleeve body. • Remove the second black O-ring. Sleeve Cuff •... -
Page 143: Cleaning And Disinfecting
Hazardous Material Spill Containment protocol. Contact your local Site Safety Officer and follow instructions per the site policy and procedures. LEANING ISINFECTING The BACTRON400HP should be cleaned and disinfected prior to first use. • Periodic cleaning and disinfection are required to prevent microbiological contamination. •... - Page 144 USER MAINTENANCE Keep the following in mind when cleaning the BACTRON400HP interior. Remove and clean the sleeve assemblies and all removable workspace chamber accessory • items, except the currently installed O Catalyst/Activated Carbon cartridge. Do not clean the Catalytic O Catalyst/Activated Carbon using water, cleaning agents, or disinfectants.
- Page 145 Concentration in the chamber atmosphere will increase over time, potentially leading to inhibited growth or metabolic symptoms in sample populations. Open all the BACTRON400HP doors to facilitate disinfection, ventilation of disinfectants, and • drying.
-
Page 146: Maintaining The Acrylic Glass Panels
BACTRON. Please see the Accessories section (page 163). Alcohol or alcohol-based solvents and other aggressive solvents should never be used to clean the BACTRON400HP and may damage the acrylic glass panels. Ultraviolet Lighting Never expose the BACTRON400HP to sustained ultraviolet (UV) light. -
Page 147: Calibrate The Temperature Display
USER MAINTENANCE ALIBRATE EMPERATURE ISPLAY Performing a temperature display calibration requires a temperature reference Note: device. Please see the Temperature Reference Device entry on page 15 for the device requirements. Temperature calibrations are performed to match an incubator temperature display to the actual air temperature inside the incubator which is supplied by a calibrated reference device. - Page 148 • least 24-hours. when first putting the BACTRON400HP into operation in a new environment. Operating 8 hours undisturbed with the doors shut will suffice for a BACTRON400HP that has been • in operation for at least 1 day. Note: Failure to wait until the incubator is fully stabilized will result in an inaccurate reading.
- Page 149 ±2°C out of calibration. If the temperature readings of the incubator temperature display and the temperature reference device still falls outside of your protocol after three calibration attempts, contact your BACTRON400HP distributor or Technical Support for assistance. 149 | P a g...
-
Page 150: Troubleshooting
Set the airlock cycle to greater than 3 iterations to reduce post-cycle oxygen in the airlock chamber. Note: The airlock should not be used until the BACTRON400HP has run with an anaerobic atmosphere in the workspace chamber for at least 24 hours, except as a diagnostic. -
Page 151: Leak Diagnostic
Perform this procedure to check for leaks in and around the workspace chamber when the BACTRON400HP is loaded with samples and cannot be taken out of use. Leaks can result from damage, long-term wear on BACTRON400HP components, or user error. - Page 152 The manometer exhaust port on the back of the BACTRON400HP will register as a leak under normal operating conditions. Some hydrogen gas naturally diffuses through the water-filled manometer.
-
Page 153: Unit Empty Procedure
TROUBLESHOOTING - LEAK DIAGNOSTIC Unit Empty Procedure Use this comprehensive procedure to check the atmospheric integrity of the workspace chamber when the BACTRON has been taken out of operation. All samples should be removed from the chamber before performing this procedure since an aerobic atmosphere will be present in the chamber. - Page 154 TROUBLESHOOTING - LEAK DIAGNOSTIC 16. Set the incubator(s) to Off to prevent heating. An incubator actively heating from room temperature to achieve a setpoint increases • air pressure in the chamber due to thermal expansion of the chamber atmosphere. This can interfere with performing an accurate leak check. 17.
- Page 155 This page is blank. 155 | P a g...
-
Page 156: Unit Specifications
UNIT SPECIFICATIONS The BACTRON400HP units are either 110 – 120-volt units or 220 – 240-volt units. Please refer to the unit data plate for individual electrical specifications. Technical data specified applies to units with standard equipment at an ambient temperature of 25°C (77°F) and nominal voltage. -
Page 157: Dimensions
IMENSIONS Unit (Inches) Model Exterior W × D × H Workspace Chamber W × D × H BACTRON400HP 64.0 x 32.4 x 32.6 in 19.8 cu.ft./560L; 42.5 x 28.9 x 25.0 in Unit (Millimeters) Model Exterior W × D × H Workspace Chamber W ×... -
Page 158: Volumes And Capacity
UNIT SPECIFICATIONS OLUMES APACITY Workspace Chamber Volume Model Cubic Feet Liters BACTRON400HP 19.8 560.0 Incubator Volume Model Cubic Feet Liters BACTRON400HP 45.3 Airlock Volume Model Cubic Feet Liters BACTRON400HP 45.3 Plate Capacity Model Airlock Incubator BACTRON400HP 158 |... -
Page 159: Incubator Temperature
UNIT SPECIFICATIONS NCUBATOR EMPERATURE Range Model Range BACTRON400HP Ambient +5°C to 70°C Temperature Uniformity Model Workspace Incubator BACTRON400HP ±1.0°C @ 37°C Temperature Stability Model Workspace Incubator BACTRON400HP Mid-range 0.2°C @ 37°C 159 |... -
Page 160: Parts
PARTS Parts List Part Number Description Parts Number Description Power Cord (2)* O 2 Catalyst/Activated 7.5 feet (2.29m), detachable used Carbon Cartridge Assembly with 120 and 220 1800510 9990953 Airlock Door Gasket, 1 Each Foot Pedal Control 12in x 12in (burgundy) 3450507 9830516 Fuse, Power Cord Inlet, Type T,... - Page 161 PARTS Parts Description Parts Number Description Number Sleeve Cuffs Latex, Petri Dish Rack, 2 stacks of 12 Petri plates, Size 6.5 2X12 (for extra small sleeve assembly) 5111228 9990774 Sleeve Cuffs Latex, Sleeve Assembly Size 6.5, Extra Small (2 Size 7 cuffs, 2 cuff-rings, (for Small sleeve 4 0-rings, 2 sleeve bodies, 2 self- gripping straps)
-
Page 162: Ordering Parts And Consumables
1-800-322-4897 ext. 4 or (503) 640-3000 ext. 4. Please have the model, serial, and part numbers, and Part ID of the BACTRON400HP unit ready. Tech Support needs this information to match your unit to the correct part. - Page 163 This page is blank. 163 | P a g...
-
Page 164: Accessories
ACCESSORIES Activated Carbon Media (2 lbs / 0.9 kgs) For scrubbing hydrogen sulfides, fatty acids, and some toxic or corrosive compounds from the chamber atmosphere. Part Number 1060500 Acrylic Glass Cleaner (2oz / 59.2ml) Novus brand acrylic glass cleaner. Part Number 1060503 Acrylic Glass Scratch Remover (2oz / 59.2ml) Helps to remove visible scratches and nicks from acrylic glass. - Page 165 ACCESSORIES Nitrogen Regulator Kit Delivery gauge range of 2 – 60 PSIG. Includes barbed adaptor fitting and 16 feet (4.9 meters) of flexible tubing. Part Number 9740567 Oxygen Sensor, PreSens Fibox Trace 4 A hand-held O 2 sensor for real-time O 2 monitoring or sampling in the BACTRON workspace chamber.
-
Page 166: Appendices
0.8 scf 22 sl Resting State When a BACTRON400HP is sitting sealed and undisturbed, it uses approximately 4 - 15 standard liters per day of supplementary nitrogen supply (0.15 – 0.53 standard cubic feet per day). 166 | P a g... -
Page 167: Autocycle Settings By Elevation
UTOCYCLE ETTINGS BY LEVATION Ambient pressure lowers as the elevation increases. As a result, the Airlock Full Vacuum, Airlock Interim Vacuum, and the Armport Full Vacuum settings may require adjustment. The table below shows recommendations for given elevations. Your results may vary and require adjusting the value a few points in either direction to achieve reliable switching points for the autocycles. -
Page 168: Armport Autocycle Cycle Count
RMPORT UTOCYCLE CYCLE COUNT It may be necessary to increase the number of cycles per autocycle in the armport settings, to improve the oxygen purging at higher elevations. To test the effect of the number of cycles • The workspace must be anaerobic. •... - Page 169 P.O. Box 627 Cornelius, Oregon 97113 support@sheldonmfg .com Sheldonmanufacturing .com 1-800-322-4897 503-640-3000 FAX: 503-640-1366 169 | P a g...
Need help?
Do you have a question about the BACTRON400HP and is the answer not in the manual?
Questions and answers