
Related Manuals for Airzone EASYZONE


Summary of Contents for Airzone EASYZONE
- Page 1 Quick Installation Guide Español English Français EASYZONE Italiano Italiano Português Deutsch Magyar Svenska Nederlands Italiano P d r a o b p il C u N e g a r e b m...
-
Page 2: Table Of Contents
Standard motorized plenum (AZEZ6DAIST) ....................................30 Low profile motorized plenum (AZEZ6DAISL) .................................... 31 System installation..............................................31 System assembly ................................................ 32 Easyzone assembly .............................................. 32 Assembly to indoor unit ............................................ 32 Bypass damper assembly ..........................................33 Ventilation air inlet assembly ........................................... 33 How to change the actuator.......................................... -
Page 3: Warnings And Environmental Policy
Those breaking the law or by-laws will be subject to such fines and measures as are laid down in environmental protection legislation. Access all our technical documents and the self-diagnosis section, check the most FAQs, certificates and watch our videos at: myzone.airzone.es/products/ Access our declaration of conformity at: http://doc.airzone.es/producto/Gama_AZ6/Airzone/Certificados/Declarat ion_of_conformity_AZ6.pdf... -
Page 4: General Requirements
Make all the connections with total absence of power. · Set and connect the elements in accordance with the electronic regulations in force. · In order to connect the elements of the system, use the Airzone cable: shielded twisted cable formed by 4 wires (2x0.22 mm 2x0.5mm ·... -
Page 5: System Elements
Communication with units of integral control of the installation. · Communications with other external control systems through integration bus. Technical specs Power supply and consumption Airzone connection bus Nº of ports Type of power supply 110 / 230 V Shielded twisted pair... -
Page 6: Daikin Communication Gateway (Azx6Qadaptdai)
You can find compatibility information on the Daikin communication gateway at: http://doc.airzone.es/producto/Gama_AZ6/Airzone/Comunes/Fichas_tecnicas/Pasarelas_comunicaciones/Compatibilidades/ UC_AZX6QADAPTDAI_MUL.pdf BLUEFACE INTELLIGENT THERMOSTAT (AZCE6BLUEFACEC) Colour graphic interface with capacitive screen for controlling zones in Airzone systems. Powered by main control board. Finish ed in steel and glass. Available in white or black. Functionalities: ·... -
Page 7: Technical Specs
92x 92x15,85 mm WIRELESS THINK THERMOSTAT (AZCE6THINKR) Graphic interface with low-energy e-ink screen and capacitive buttons for controlling zones in Airzone systems. Wireless communications. Powered by battery button CR2450. Finished in steel and glass. Available in white or black. Functionalities: ·... -
Page 8: Wireless Lite Thermostat (Azce6Liter)
WIRELESS LITE THERMOSTAT (AZCE6LITER) Thermostat with capacitive buttons for controlling the temperature of the zones in Airzone systems. Finished in steel and glass. Wireless communications. Powered by CR2450 button battery. Available in white and black. Functionalities: · On/off of the zone. -
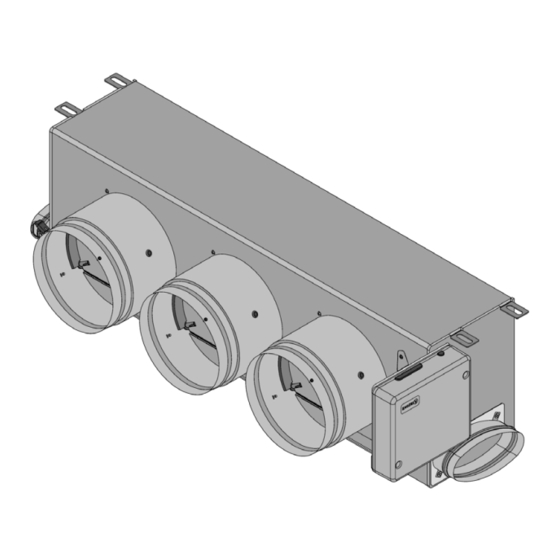
Page 9: Low Profile Motorized Plenum (Azez6Daisl)
Configure all the thermostats (see sections Initial configuration and Advanced settings). Remember that Airzone system allow you to configure master and zone thermostats (Master thermostats let you change operating modes, select the efficiency degree with the Eco-Adapt function or select the speed of the system). -
Page 10: System Assembly
SYSTEM ASSEMBLY EASYZONE ASSEMBLY Important: It is recommended to insulate all the metal parts of Easyzone that are exposed to outdoor conditions in order to prevent condensation. Remember: The motorized elements are numbered the following way: ASSEMBLY TO INDOOR UNIT Place the Easyzone in the pressure port of the unit and attach it to this using the screws. -
Page 11: Bypass Damper Assembly
BYPASS DAMPER ASSEMBLY Sharply hit it to take away the pre-cut area of the sides corresponding to the bypass. Use a sharp blade to remove the insulation that covers the area of the bypass and uncover the mounting slots on the bypass. -
Page 12: How To Change The Actuator
HOW TO CHANGE THE ACTUATOR Disconnect the actuator. Loosen the fixing screw using an Allen key (number 3) and remove the actuator from the damper. Fix the new actuator to fit in the bolt. Turn the actuator until it fits in the second bolt to guarantee the proper position of the damper. Insert and screw the fixing screw. -
Page 13: Thermostat Assembly (Azce6Bluefacec / Azce6Thinkr / Azce6Liter)
THERMOSTAT ASSEMBLY (AZCE6BLUEFACEC / AZCE6THINKR / AZCE6LITER) Airzone thermostats are mounted on the wall through a support. It is recommended not to locate it more than 40 meters away from the main control board. To fix it to the wall, follow these steps: ·... -
Page 14: System Assembly
Important: Use a shielded twisted cable to control the inputs of the on/off module. 1.- Airzone thermostats Connect the control elements of the system in any of the 3 Airzone connection bus terminals . The connection can be both a Bus connection or a star connection. -
Page 15: Reset The System
Important: According to the current local and national regulations, it is mandatory to add a switch (or other element to disconnect the system) to the external supply wiring so that a constant separation between poles is guaranteed. The system will restart automatically if the supply is eventually turned off. Remember: Once all the connections are made, make sure you replace the cover properly. -
Page 16: Blueface And Think Thermostats
Select your language and country. These are the available languages: Spanish, English, French, Italian, German and Portuguese. To associate a Think, press Airzone to start seeking and then confirm the wireless association. Verify the range is correct (minimum 30%) and confirm. -
Page 17: Lite Thermostat
Think Important: Use to confirm and to return. LITE THERMOSTAT Important: To configure a Lite thermostat you must move it away from its base. Once the microswitchs are configured, put it back in its original position. Zone address Select the zone associated to the thermostat pulling up the microswitch of the corresponding zone. -
Page 18: Lite Thermostat Reset
Associated outputs If required, select other control outputs associated to the zone. The address zone will be the one with a lower value. Other settings Configure other functionalities of the LITE thermostat from the advanced configuration menu of a Blueface thermostat (see section Advanced Settings, Zone parameters). -
Page 19: Minimum Air Setting (A-M)
MINIMUM AIR SETTING (A-M) Turn on and generate demand in all zones to open all the dampers. Adjust the minimum opening you want with the M-A lever (a/b/c/d) Turn on the zone and check the minimum air flow is correct. ADVANCED SETTINGS To access the advanced configuration menu of the thermostat and Blueface Think follow the following steps: Blueface... -
Page 20: System Parameters
SYSTEM PARAMETERS · System address. Defines the number of the system within your installation. The value 1 is shown by default. The system will display the available values (max = 247). · Temperature range. Selects the highest temperature in heating mode (19-30 ºC) in steps of 1ºC. It is also possible to disable the mode. -
Page 21: Self-Diagnose
Data reception from automation bus Blinking Green Data transmission from automation bus Blinking Main control board activity Blinking Green Data transmission from Airzone connection bus Blinking Data reception from Airzone connection bus Blinking Green AC unit On/Off Blinking Green CMV/Boiler... -
Page 22: Daikin Communication Gateway (Azx6Qadaptdai)
DAIKIN COMMUNICATION GATEWAY (AZX6QADAPTDAI) Meaning Gateway power supply Solid Micro controller activity Blinking Green Data transmission to the Airzone system Blinking Data reception from the Airzone system Blinking Green Data transmission to the indoor unit Blinking Data reception from the indoor unit... - Page 23 94573 Rungis - France Cormano – Milano - Italia Teléfono: +34 902 400 445 Téléphone : +33 184 884 695 Telefono: +39 02 56814756 Fax: +34 902 400 446 Fax : +33 144 042 114 Fax: +39 02 56816158 http://www.myzone.airzone.es http://www.myzone.airzonefrance.fr http://www.myzone.airzoneitalia.it...
Need help?
Do you have a question about the EASYZONE and is the answer not in the manual?
Questions and answers