
Related Manuals for ICT International STM


Summary of Contents for ICT International STM
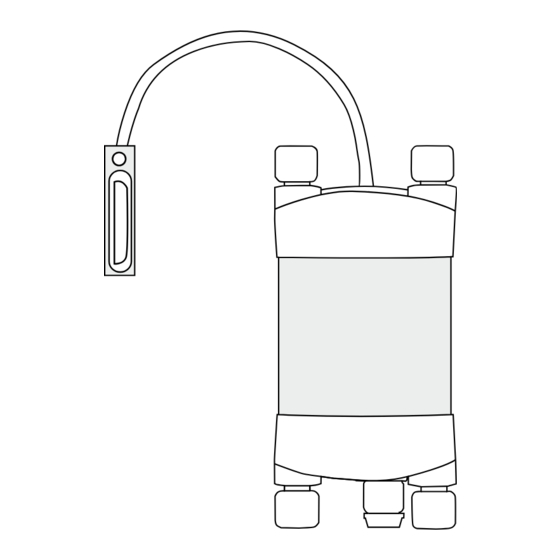
- Page 1 Soil Tension Meter ICT International Solutions for soil, plant & environmental monitoring...
-
Page 2: Table Of Contents
Connecting Power Directly via Solar Panel (Field Operation)......10 3.1.6 Connecting Power via External 12V Battery (Field Operation)......11 Connecting the Sensor to the STM............ 1 2 Install the STM Software & USB Driver..........13 Turn the Instrument On............... 14 Connect to the Instrument..............15 Connect Via USB....................15 7.1.1... -
Page 3: Introduction
The STM Soil Tension Meter is a complete system for collecting and storing data from up to five Pressure Transducers in the field or laboratory. The STM is equipped with an internal battery which provides power to the Data Logger as well as the transducer attached to the Infiltrometer. -
Page 4: System Requirements
11.6” or larger and a default screen resolution of 1366 x 768 (the vertical height of 768 being most important otherwise you can't see the bottom of the software). ICT International Solutions for soil, plant & environmental monitoring... -
Page 5: Charging The Stm Internal Battery
Connecting a Power Supply to the Instrument (pages 6 to 11). The STM has an internal battery which can supply up to 6 hours of continuous use. The STM can be used in the field without an external power supply for at least 6 hours. It is recommended to charge the battery overnight with the CH7 power supply for use in the field the next day. -
Page 6: Connecting A Power Supply To The Instrument
Connecting a Power Supply to the Instrument 3.1.1 Individual Power Supply Connections Important: Do not connect external power until the final step ICT International Solutions for soil, plant & environmental monitoring... -
Page 7: Shared Power Supply For Multiple Instruments
3.1.2 Shared Power Supply for Multiple Instruments ICT International Solutions for soil, plant & environmental monitoring... -
Page 8: Connecting Power Via Usb Cable To A Laptop/Pc
3.1.3 Connecting Power via USB cable to a laptop/PC Note: The STM Soil Tension Meter is non-polarized USB Cable Laptop/PC ICT International Solutions for soil, plant & environmental monitoring... -
Page 9: Connecting Power Directly Via Ch7 Power Supply
3.1.4 Connecting Power Directly via CH7 Power Supply Note: The STM Soil Tension Meter is non-polarized CH7 Power Supply ICT International Solutions for soil, plant & environmental monitoring... -
Page 10: Connecting Power Directly Via Solar Panel (Field Operation)
3.1.5 Connecting Power Directly via Solar Panel (Field Operation) Note: The STM Soil Tension Meter is non-polarized Solar Panel ICT International Solutions for soil, plant & environmental monitoring... -
Page 11: Connecting Power Via External 12V Battery (Field Operation)
3.1.6 Connecting Power via External 12V Battery (Field Operation) Note: The STM Soil Tension Meter is non-polarized External 12V Battery ICT International Solutions for soil, plant & environmental monitoring... - Page 12 Connecting Sensor to the STM The sensor is connected to the logger by inserting the green connector into the appropriate channel in the break–out box supplied with the system. ICT International Solutions for soil, plant & environmental monitoring...
-
Page 13: Install The Stm Software & Usb Driver
The software installation will begin follow the screen prompts until the finished installation screen appears. To install the USB driver choose USB Driver (c) and wait for the installation to complete. The STM software can also be downloaded from the ICT International Software Downloads Page. -
Page 14: Turn The Instrument On
Turn the Instrument On To charge and turn on your STM Soil Tension Meter connect the Instrument to a computer via a USB cable. Alternatively the STM can either be turned on manually by pressing the power button or automatically by connecting an external power supply. -
Page 15: Connect To The Instrument
Connect to the Instrument Connect Via USB Connect the USB cable to the instrument. The STM will automatically be detected by the computer as with any USB device. Double click the ICT Instrument icon on the Desktop to open the software and click the icon “Connect to Instrument”, then click “Find Devices”... -
Page 16: Software Procedure Step 1
7.1.1 Software Procedure Step 1: Click the icon “Connect to Instrument” ICT International Solutions for soil, plant & environmental monitoring... -
Page 17: Software Procedure Step 2
7.1.2 Software Procedure Step 2: You must first choose the connection type “USB” then Click “Find Devices” to search for the instrument. ICT International Solutions for soil, plant & environmental monitoring... -
Page 18: Software Procedure Step 3
Note: The software will display a message to “Please Wait” after which the following screen will be displayed. You must click on device and highlight. After you highlight the device then click “Select Device”. ICT International Solutions for soil, plant & environmental monitoring... -
Page 19: Software Procedure Step 4
7.1.4 Software Procedure Step 4: Note: The following screens will be displayed. ICT International Solutions for soil, plant & environmental monitoring... -
Page 20: Software Procedure Step 5
7.1.5 Software Procedure Step 5: When the software has finished loading the instrument parameters the following screen will be displayed. From here the measurement parameters can be set and the measurement sequence started. ICT International Solutions for soil, plant & environmental monitoring... -
Page 21: Set The Measurement Parameters
8.1.2 Selecting Logging Periods from 1 Minute to 60 Minutes If any parameter from 1 minute to 60 minutes is selected the STM will record a reading at the respective time interval selected. In “Live Mode” the logger will continually take and record readings while ever Live Mode is selected. -
Page 22: Software Procedure Step 2
Data will be recorded on the internal SD card. To stop logging set the Measurement Mode to “Manual”. Click “Start Measurement” box to begin logging To stop logging set the Measurement Mode to “Manual” ICT International Solutions for soil, plant & environmental monitoring... -
Page 23: Selecting Logging Periods Of 60 Seconds Or Less
“Live Logging Interval” window will appear. Use the up/down arrows in the window to select the required logging interval anywhere from 0 to 60 seconds and click done. The logger will now start collecting data at the set interval. ICT International Solutions for soil, plant & environmental monitoring... -
Page 24: Download Data
Windows will prompt you for a file name and location to store the data The file will be stored as a .csv file and the data can be viewed in an exce spreadsheet. ICT International Solutions for soil, plant & environmental monitoring... - Page 25 When the download is complete you will be prompted to delete or rename the file on the SD card in the STM. Note: It is not necessary to delete the data file from the SD card. Instead, it can be renamed and forms an off-site backup should your computer hard drive fail.
Need help?
Do you have a question about the STM and is the answer not in the manual?
Questions and answers