
Related Manuals for Zenith DVT216


Summary of Contents for Zenith DVT216
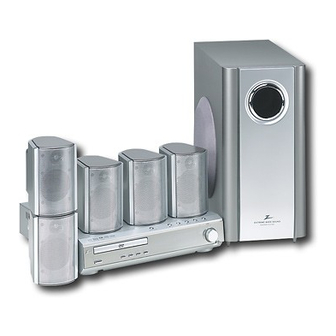
- Page 1 Installation and Operating Guide | Warranty Model Number | DVT216 (Speakers: FE-5620TE/FE-5620WE) | DVD Home Cinema System © Copyright 2002, Zenith Electronics Corporation...
-
Page 2: Safety Precautions
FCC COMPLIANCE: The responsible party for this product’s compliance is: Zenith Electronics Corporation, 2000 Millbrook Drive, Lincolnshire, IL 60069, USA Phone: 1-847-391-7000. otes on copyrights:... -
Page 3: Important Safety Instructions
IMPORTANT SAFETY INSTRUCTIONS CAUTION: PLEASE READ AND OBSERVE ALL WARNINGS AND INSTRUCTIONS IN THIS OWNER’S MANU- AL AND THOSE MARKED ON THE UNIT. RETAIN THIS BOOKLET FOR FUTURE REFERENCE. This set has been designed and manufactured to assure personal safety. Improper use can result in electric shock or fire hazard. -
Page 4: Table Of Contents
Connections ......10-12 TV Connections ......10 Optional Equipment Connections . -
Page 5: Before Use
This unit can play only DVD discs labeled “1” or “ALL”. If you try to play any other discs, the message “Check Regional Code” will appear on the TV screen. Some DVD discs may not have a region code label even though their playback is prohibited by area limits. -
Page 6: Precautions
The picture and sound of a nearby TV, VCR, or radio may be distorted during playback. In this case, position the unit away from the TV, VCR, or radio, or turn off the unit after removing the disc. Keeping the cabinet surface clean Do not use volatile liquids, such as insecticide spray, near the unit. -
Page 7: Front Panel And Display Window
Front Panel and Display Window OPEN/CLOSE button FUNCTION button POWER button and indicator Sound mode Repeat playback indicator mode indicators Title number indicator PLAY/PAUSE indicator Angle icon indicator Disc indicator SKIP/SEARCH (TUNING/SKIP) buttons STOP (MEMORY/CLEAR) button PAUSE button PLAY button ENTER button MONO/STEREO button FM/AM button... -
Page 8: Remote Control Buttons
Remote Control Buttons MUTE buttons FM/AM buttons CD/DVD buttons TEST TONE buttons OPEN/CLOSE buttons NUMERICAL buttons REPEAT buttons MARKER buttons SEARCH buttons SLOW SCAN(+/-) buttons SET UP buttons ARROW buttons For use in highlighting a selection on a GUI menu screen, TITLE and MENU screen. -
Page 9: Rear Panel Overview
AUTO: Select when DVD receiver is connected with Multi system TV. • When the selected System Select switch does not coincide with the system of your TV, normal color picture may not be displayed. • Set System Select switch when the power is turned off. -
Page 10: Connections
– Make sure the DVD Receiver is connected directly to the TV. Select the correct AV input on your TV. – Do not connect your DVD Receiver to TV via your VCR. The DVD image could be distorted by the copy protec- tion system. -
Page 11: Optional Equipment Connections
Connections (Cont’d) Optional Equipment Connections Connect a TV (Monitor) to the MONITOR OUT or S-VIDEO OUT connector. Connect a VCR to the VIDEO 1 jacks. Connect an additional VCR to the VIDEO 2 jacks. Connect the optical output of DVD Receiver (or Digital Device etc) to the OPTICAL IN connector. -
Page 12: Speaker System Connections
Connections (Cont’d) Speaker System Connections Connect the speakers using the supplied speaker cords by matching the colors of the terminals and those of the cords. To obtain the best possible surround sound, adjust the speaker parameters (distance, level, etc.). otes Be sure to match the speaker cord to the appropriate terminal on the com- ponents: + to + and –... -
Page 13: Before Operation
Before Operation Mini Glossary for Sound Mode Allows you to enjoy 5.1(or 6) discrete channels of high quality digital audio from DTS program sources bearing the trademark such as discs, DVD and compact discs, etc. DTS Digital Surround delivers up to 6 channels of transparent audio(which means identical to the origi- nal masters) and results in exceptional clarity throughout a true 360 degree sound field. -
Page 14: Sound Mode
Before Operation (Cont’d) Sound Mode (Except AM) You can enjoy surround sound simply by selecting one of the pre-programmed sound fields according to the program you want to listen to. When PCM indicator is only displayed in the display window: Each time you press the SOUND MODE button, sound modes are selected in the following order;... -
Page 15: Speaker Sound Delay Time Setting
Before Operation (Cont’d) Speaker Sound Delay Time Setting In Dolby Digital or Dolby Pro Logic mode it is assumed that the distance from the listener to each of the speak- ers is equal. If not, then set the delay times of the cen- ter or rear speakers so that the sound will be heard simultaneously by the listener. -
Page 16: General Explanation
Before Operation (Cont’d) Caution: Before using the remote control, press the DVD or TV button to select the device to be operated. General Explanation This manual gives the basic instructions for operating the DVD Receiver. Some DVDs require specific opera- tion or allow only limited operation during playback. -
Page 17: Initial Settings
DVD Player to a standard (analog) television, set Progressive Scan to Off. If you are using the Component Video jacks for connection to a TV or monitor that is compatible with a progressive scan signal, set Progressive Scan to On. Disc Audio... -
Page 18: Parental Control
Disc Audio Disc Subtitle Disc Menu Rating Country Code TV Aspect Menu Language Progressive Scan Unlock Change Select “Rating” on the Setup menu using the buttons. -
Page 19: Radio Operation
Operation with Radio Presetting Radio Stations You can preset 30 stations for FM and AM. Before tun- ing, make sure that you have turned down the volume to the minimum. Press FUNCTION on the front panel repeatedly or FM/AM on the remote control until FM or AM appear in the display window. -
Page 20: Sleep Timer Setup
Operation with Radio (Cont’d) Sleep Timer Setting You can set the DVD receiver to turn off automatically at a specified time. Press SLEEP to set the desired sleep time. The SLEEP indicator and sleep time appears in the dis- play window. Each time you press SLEEP the setting changes in the following order. -
Page 21: Dvd Operation
Operation with DVD Playing a DVD Getting to play Switch on the TV and select the AV input source con- nected to the DVD receiver. When you want to enjoy the sound of discs or from the audio system, turn on the audio system and select the input source connected to the DVD receiver. -
Page 22: Still Picture And Frame-By-Frame Playback
A- appears briefly on the TV screen. 2 Press REPEAT A-B again at your chosen end point. A-B appears briefly on the TV screen, and the repeat sequence begins (a-b repeat appears on the player’s display). 3 To cancel the sequence, press REPEAT A-B. -
Page 23: Zoom
1 During disc playback, press MARKER when playback reaches the spot that you want to memorize. The Marker icon will appear on the TV screen briefly. 2 Repeat step 1 to enter up to nine Marker points on a disc. -
Page 24: Operation With Audio Cd And Mp3 Disc
The DVD Receiver can play MP3 format recordings on CD-ROM, CD-R or CD-RW discs. Before playing MP3 recordings, read the notes of MP3 Recordings on page 26. Insert a disc and close the tray. The menu appears on the TV screen. Program TRACK 1.MP3 TRACK 1 TRACK 2.MP3... -
Page 25: Programmed Playback
Program can contain 32 tracks (Audio CD) or 60 tracks (MP3 disc). Insert the disc and close the tray. The menu is displayed on the TV screen. Press PROGRAM during playback or in the stop mode to enter the Program Edit mode. -
Page 26: Additional Information
To change the video mode, press and hold DISPLAY for 3 seconds during playback of a disc. Changed video mode number is displayed on the TV screen. Check whether video quality is improved. You can repeat above procedure until desired picture quality appears. -
Page 27: Troubleshooting
• The power cord is disconnected. • No disc is inserted. The power is on, but the DVD receiver does not work. • The TV is not set to receive DVD signal No picture. output. • The video cable is not connected securely. - Page 28 Troubleshooting (Cont’d) Symptom Recording is not possi- • The components are connected incorrectly. • The source is selected incorrectly. • The antenna is positioned or connected Radio stations cannot be tuned in. poorly. • The signal strength of the stations is too weak (when tuning in with automatic tuning).
-
Page 29: Language Code List
Language Code List Enter the appropriate code number for the initial settings “Disc Audio”, “Disc Subtitle” and/or “Disc Menu” (See page 17). Code Language Code 6565 Afar 7079 6566 Abkhazian 7082 6570 Afrikaans 7089 6577 Ameharic 7165 6582 Arabic 7168 6583 Assamese 7176... -
Page 30: Country Code List
Country Code List Enter the appropriate code number for the initial setting “Country Code” (See page 18). Code Country Code Country Andorra Eritrea United Arab Emirates Spain Afghanistan Ethiopia Antigua and Barbuda Finland Anguilla Fiji Albania Falkland Islands Armenia Micronesia Netherlands Antilles Faroe Islands Angola... -
Page 31: Specifications
Specifications Power supply Power consumption Mass External dimensions (W x H x D) Operating conditions Operating humidity Laser Signal system Frequency response (audio) Signal-to-noise ratio (audio) Dynamic range (audio) Harmonic distortion (audio) Video input Video output S-video output Component video output Tuning Range Intermediate Frequency Signal-to Noise Ratio... -
Page 32: Warranty
ZENITH ELECTRONICS CORPORATION LIMITED WARRANTY (USA) Zenith will repair or replace your product, at Zenith’s option, if it proves to be defective in material or workmanship under normal use during the warranty period listed below from the date of original consumer purchase.
Need help?
Do you have a question about the DVT216 and is the answer not in the manual?
Questions and answers