
Subscribe to Our Youtube Channel
Related Manuals for GreenWorks VENTURE OVB917 Series


Summary of Contents for GreenWorks VENTURE OVB917 Series
- Page 1 E-BIKE OPERATOR’S MANUAL E-BIKE OPERATOR’S MANUAL BICICLETA ELÉCTRICA OPERATOR’S MANUAL OVB917 www.greenworkstools.com...
-
Page 2: Table Of Contents
English (Original Instructions) Display brightness settings.......14 Introduction......... 2 Unit conversion settings......14 Product description........2 Trip distance reset........15 Intended use..........2 Factory reset..........15 Overview ........... 2 SMARTg home application..16 Symbols on the product......5 California Proposition 65......5 Setup............16 Safety..........5 Maintenance.......16 Safety definitions........ -
Page 3: Introduction
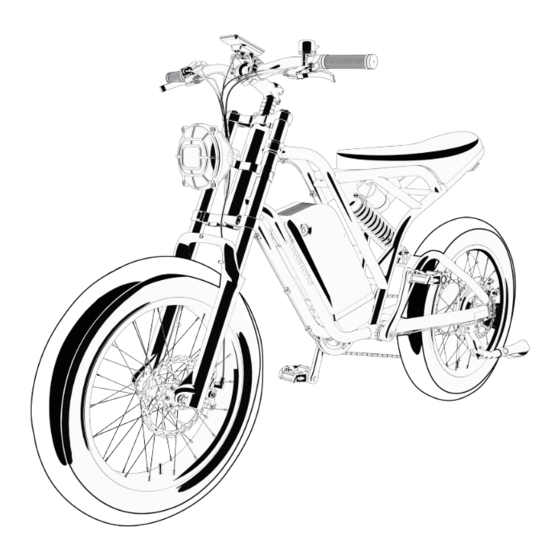
INTRODUCTION ® Thank you for choosing to purchase the greenworks e-bike. Our top priority is to inform you about the potential risks associated with riding an e-bike, to ensure that you have a safe and enjoyable riding experience for many years to come. - Page 4 English (Original Instructions) Front brake lever Rear brake lever Button panel Throttle LCD display Gear shift button (+) Gear shift lever (-) Bell Button panel On/off button Walk-assist button Parameter setting button Headlight button PAS (Pedal-assist sensor) decrease button PAS (Pedal-assist sensor) increase button...
- Page 5 English (Original Instructions) Display 36 37 Battery level Maximum speed Error Average speed Speed Headlight Walk-assist symbol Bluetooth Trip distance Cruise control Odometer PAS level Toolkit 5 Hex keys: M2.5, M3, M4, M5, M6 1 Phillips Screwdriver 3 Wrenches: 10mm, 15mm (2)
-
Page 6: Symbols On The Product
English (Original Instructions) SYMBOLS ON THE PRODUCT Symbol Explanation Important safety precautions. Read instructions thoroughly before operating the product and follow all warnings and safety instructions. Burn hazard. The hub motor will get hot during normal use. Do not touch. Warning: Electric shock hazard. - Page 7 English (Original Instructions) • Do not use this product if the flexible power cord or unfamiliar trails, it is advisable to have a companion output cable is frayed, has broken insulation, or any with you for added safety and support. other signs of damage.
-
Page 8: Save These Instructions
English (Original Instructions) Different materials and components may respond differently to wear and stress fatigue. If a component ASSEMBLY has exceeded its designed lifespan, it may fail unexpectedly and potentially cause harm to the This section describes how to assemble and adjust the rider. -
Page 9: Install The Front Wheel
English (Original Instructions) 4. Place the handlebar onto the stem and make sure it is perpendicular to the bike frame. Note: • The disc brake is on the left side of the bike, in the direction of travel. • Ensure that the front wheel axle is fully inserted into the slot of the front fork. -
Page 10: Operation
English (Original Instructions) WARNING CAREFULLY READ AND UNDERSTAND THE SAFETY CHAPTER AND OPERATION INSTRUCTIONS BEFORE YOU OPERATE THE PRODUCT. BEFORE YOU RIDE 4.1.1 PRE-RIDE CHECKLIST Make sure to check the condition of the product before each ride. Brakes • Ensure front and rear brakes work properly. •... - Page 11 English (Original Instructions) The correct helmet should: 4.1.5 BATTERY INFORMATION • be comfortable Refer to the Battery Operator Manual for information • be lightweight about how to use the battery. • have good ventilation • fit correctly 4.1.6 CONNECT THE BATTERY TO THE PRODUCT Ensure the battery is fully charged before operating.
-
Page 12: Start The Product
English (Original Instructions) 4. Withdraw the key to remove it from the lock. Always make sure the battery cover is securely in position before riding the bike. mile mile START THE PRODUCT 1. Press and hold the on/off button to power on. mile 4. -
Page 13: Shift Gears
English (Original Instructions) • When using walk-assist mode, the bike will move Pedaling be- Push lever to shift through each of the at a constant speed of 2.5 mph (4 km/h). The walk- comes lighter gears (i.e. 5 to 4). assist symbol will be displayed on the screen. -
Page 14: Stop The Product
English (Original Instructions) STOP THE PRODUCT 1. Release the throttle and squeeze the brake lever to stop the product. Note: When coming to a complete stop, place both feet on the ground to balance the product. 2. If ride is complete, press and hold the on/off button to power off. -
Page 15: Display Brightness Settings
English (Original Instructions) mile mile Trip distance 3. Press the parameter setting button to enter parameter modification area (located at the left of should the display). this be on 4. Use the plus/minus buttons to select the desired brightness level. mile/h mile/h Maximum speed... -
Page 16: Trip Distance Reset
English (Original Instructions) 6. Press and hold the parameter setting button for more than two seconds to exit. TRIP DISTANCE RESET The display can record single trip mileage and total mileage. It is able to clear the single trip mileage, but not able to clear total mileage. -
Page 17: Smartg Home Application
English (Original Instructions) 5. After the default settings have been restored, 1. Download the SMARTg Home app on your mobile the device will automatically exit the factory reset device. interface. 2. Register in the SMARTg Home app. SMARTG HOME APPLICATION 3. -
Page 18: Clean The Battery And Battery Charger
English (Original Instructions) CLEAN THE BATTERY AND BATTERY CHARGER WARNING DO NOT CLEAN THE BATTERY OR THE BATTERY CHARGER WITH WATER. • Make sure that the battery and the battery charger and battery compartment are all clean and dry before you insert the battery into the battery charger. -
Page 19: Technical Data
18 months from the shipping Online: date or in-store purchase date. greenworkstools.com/product-registration ® At its own discretion, greenworks can opt to repair, replace, substitute with a comparable item, or issue a 1-855-345-3934 refund for products that are determined to be defective ®... -
Page 20: Items Not Covered By Warranty
Normal deterioration of the exterior finish due to use or exposure. • Any part/product, that has become inoperable ® due to use with any non-greenworks branded parts or batteries/chargers. 11.2 HELPLINE Warranty service is available by calling our toll-free helpline at: 1-855-345-3934.
Need help?
Do you have a question about the VENTURE OVB917 Series and is the answer not in the manual?
Questions and answers