Advertisement
Quick Links
LHG5K
User Guide
Congratulations on the purchase of your high gain aerial.
The aerial is ideal for the reception of all available signals in
strong and medium strength signal areas.
• Tuned to exclude signals from Lte 800 4G and Lte 700 5G
mobile phone transmitters which might cause interference
• F type connection
• Forward Gain 13.9dBi
• Suitable for outdoor or loft installation
• Rugged construction
• Clip-on reflectors for rapid assembly
Assembly and Installation
Please read the General Safety Precautions overleaf before starting your installation
For best results the aerial should be mounted on an outdoor aerial mast
and pointed in the direction of the nearest transmitter*making sure it is in a
position where the transmitter signal will not be obstructed by nearby trees and
buildings. If you are in any doubt about the direction in which the aerial should
be pointing or the orientation of the aerial (horizontal for main transmitter,
vertical for relay transmitter) check your neighbours' aerials. For vertical
mounting rotate the aerial through 90° before attaching to the mast clamp.
Loft mounting is often a viable option in strong/medium signal strength areas
allthough the roof may cause some loss of signal strength.
If mounting on an existing mast, first check that the mast is in good condition
and firmly fixed in position.
1. Rotate and lock the director elements into a vertical position. As shown in Fig. 1
2. The reflector bracket rotates through 90˚. When boxed it is usually in the
horizontal position as it takes up less space. Before attaching the reflectors, the
bracket must be rotated into the vertical position, as shown in Fig. 2a & 2b.
If you need to rotate the bracket push it towards the front of the aerial to
unlock, then rotate clockwise through 90˚ using the arrow as a guide then pull
the bracket back into it's original position.*
3. Connect dipole assembly to the main boom, insert the threaded bolt
through the front hole on the underside of the main boom and the locating
pin in the second hole on the underside of the main boom as shown in
Fig. 3a.
Screw the wing nut supplied to the threaded bolt on the dipole to hold it
firmly in position on the boom.Slide the reflectors
until the studs engage and lock into position as shown in Fig. 3a and Fig.
C
3b. The reflectors can be fitted either way round.
4. Loosen the screws/bolts of the mast clamp and slide it onto the boom behind
the reflectors. Attach the assembled aerial and clamp to the mast Make sure
the aerial is pointing in the direction of the nearest TV transmitter then tighten
the wing nuts until the aerial is securely fixed into position, (see Fig. 4).
Fig. 4
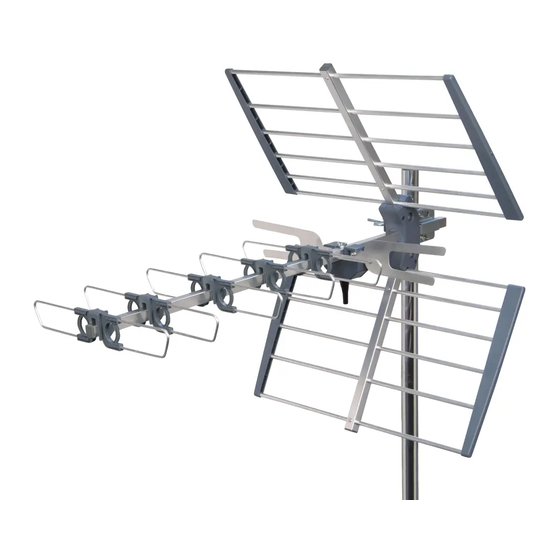
32 Element High Gain
Group K, TV Aerial
A
into the reflector bracket
B
director
elements in
vertical position
mast clamp
assembly
Support: www.labgear.co.uk/support
Fig. 1
Rotate flat director
elements into vertical
Fig. 2a
reflector bracket
back view
rotate 90˚ clockwise
before mounting/
attaching reflectors
Fig. 3a
B
sprung
studs
A
main
threaded
boom
bolt
locating
pin
sprung
dipole
studs
assembly
B
HD
Full HD
position
Fig. 2b
push bracket
back to lock
reflector
bracket in
vertical
position
*Please Note that when the reflector
locating studs have clicked into place the
reflector bracket is locked into position.
If you are unable to push the reflectors in
completely to locate the studs make sure
the reflector bracket has been pushed all
the way back (see Fig, 2b above).
reflector
assembly
reflector
bracket
B
C
engage
stud in
hole
B
Ready
Fig. 3b
C
1
Advertisement

Related Manuals for Labgear LHG5K


Summary of Contents for Labgear LHG5K
- Page 1 32 Element High Gain Group K, TV Aerial LHG5K User Guide Full HD Ready Congratulations on the purchase of your high gain aerial. The aerial is ideal for the reception of all available signals in strong and medium strength signal areas.
- Page 2 For further information, please contact: Waste electrical and electronic products should not be disposed Technical Support: www.labgear.co.uk/support/ of with household waste. Please recycle where facilities exist. Check with your Local Authority for recycling advice. Other Useful Websites for Digital Advice:...
Need help?
Do you have a question about the LHG5K and is the answer not in the manual?
Questions and answers