Advertisement
Table of Contents
Labgear
Labgear
LABHG420 Wideband Digital Aerial
Congratulations on the purchase of your digital outdoor aerial. The aerial is ideal for the
reception of all available signals in strong and medium strength signal areas.
•
Ideal for weak reception areas
•
Tilting mast clamp for easy adjustment
•
Easy dipole assembly
•
Electronic 75Ω balun
•
Connection: F type
Installation Instructions
For optimum results install the aerial using double screened CAI approved
digital coax cable and screened coax outlets. You will need to fit the coax
cable with an F type connector to connect to the aerial balun.
1. Prepare the Coax Cable: Firstly fit the rubber weather boot
provided, to the aerial end of the cable. Strip the end of the
cable as shown in Fig. 1. Once you have stripped the cable,
twist the braid and pull it back on itself, make sure that no
braid is touching the copper core, this will cause a short on
the cable and you will not get any signal.
2. Fitting the F connector (not supplied): Now, simply twist on
an F connector and trim the central conductor.
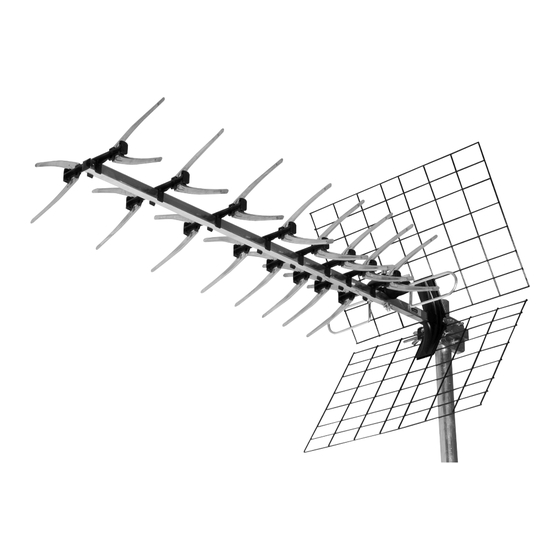
Aerial Assembly
Attach the 8 elements to the boom, the arrow on moulding must
point to the front of the aerial, away from the reflector panels.
Ensure the pin on each element moulding locates in the
appropriate hole in the boom (see opposite).
Unscrew the wing nut from the dipole assembly and attach the
dipole to the boom, securing with the wing nut as shown
opposite. The F socket connector must be pointing down and
the flat blade director should face towards the front of the aerial.
Fig. 1
cut or tear
away foi
l
fold braid back
over sheath
Fig. 2
screw connector
body onto cable
8mm
inner
wire
6.5mm
end of
insulation
should be
flush with
this face
2mm approx.
Advertisement
Table of Contents

Related Manuals for Labgear LABHG420


Summary of Contents for Labgear LABHG420
- Page 1 Labgear Labgear LABHG420 Wideband Digital Aerial Congratulations on the purchase of your digital outdoor aerial. The aerial is ideal for the reception of all available signals in strong and medium strength signal areas. • Ideal for weak reception areas • Tilting mast clamp for easy adjustment • Easy dipole assembly •...
- Page 2 Assemble the two reflector clamps to the boom and secure with the coach bolt and wing nut provided. Slide one reflector panel into the slot until it clicks into place and can not be pulled out. Note:- Ensure panel is centrally mounted. Repeat the same procedure for the second reflector panel. Fit the assembled aerial onto the mast using the mast clamp provided with the aerial, the mast clamp is suitable for mounting on to 25 – 50mm diameter masts. Using the tilting mechanism adjust the aerial to horizontal and tighten hexagonal nuts. Connect coax cable fitted with F plug (coax cable and F plug not supplied), to F socket outlet on dipole (be careful not to over tighten the F connector as this will damage the balun). Ensure the weatherproof boot is fitted to the cable and pushed over the connection. Using PVC insulating tape (not supplied), tape the coax lead to the aerial as shown opposite. Do not allow the cable to touch the aerial boom at any point. Caution When mounting the assembled aerial, always observe safety precautions and use the correct equipment. Unless you are competent in the use of ladders and other access equipment,do not work outdoors at roof height. If in any doubt, refer to a qualified aerial installer. Troubleshooting No picture: Check all connections from aerial to TV. Poor picture: Check all connections from aerial to TV. Check aerial is properly aligned to the correct transmitter. If the aerial has been loft mounted try mounting outside. 08457 573 479 Customer Careline: Make sure new digital coax cable has been used throughout the installation.
Need help?
Do you have a question about the LABHG420 and is the answer not in the manual?
Questions and answers