
Related Manuals for AmScope M150C-I


Summary of Contents for AmScope M150C-I
- Page 1 User Manual of Product 1: AmScope M150C-I 40X-1000X All-Metal Optical Glass Lenses Cordless LED Student Biological Compound Microscope...
- Page 2 150 Series User’s Manual...
-
Page 3: Table Of Contents
150 Series Table of Contents Before Use..................3 Introduction ......................3 Safety Precautions ....................4 Parts ....................5 M150 ........................ 5 Definition of Parts ....................6 Getting Started ................7 Assembly ........................7 Operation ..................8 Setting Up ........................8 Focusing ........................ -
Page 4: Before Use
150 Series Before Use Introduction Congratulations on the purchase of your new AmScope microscope! This manual is designed for the M150 series microscopes. Please be sure to take a few minutes to familiarize yourself with the features and functions of your new AmScope microscope. -
Page 5: Safety Precautions
150 Series Before Use Safety Precautions 1. As the microscope is a precision instrument, always handle it with care, avoiding impact or abrupt movement during transportation. Do not shake the package. 2. Do not place the microscope in direct sunlight or in high heat. Keep it indoors in a dry and clean place with temperatures between 32-100 degrees F (0-40 degrees C), and in maximum relative humidity of 85%. -
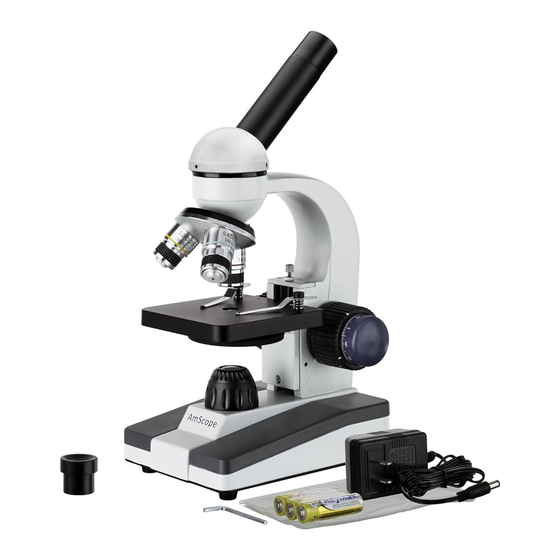
Page 6: Parts
150 Series Parts M150 Eyepiece Ocular Tube Rotating Monocular Head Nosepiece Turret Objectives Limit Stop Stage Clips Stage Disc Diaphragm (Disc Iris) Fine Focusing Knob Coarse Focusing Illuminator Lens Knob... -
Page 7: Definition Of Parts
150 Series Parts Definition of Parts Base Illuminator Lens Directs the light source towards the slide Focusing Knob Used to bring the slide into the sight and focus Disc Iris Diaphragm Controls the amount of light that hits the slide from the base illuminator Dimmer Controls the amount of light that escapes from the base lens Limit Stop Knob... -
Page 8: Getting Started
150 Series Getting Started Assembly 1. First, take the styrofoam container out of the cardboard carton and lay it on its side, paying attention to which side is labeled up. Remove the tape and open the container carefully so as to avoid dropping and damaging the optical items. -
Page 9: Operation
150 Series Operation Setting Up 1. Place the specimen to be studied on a glass slide (or use a prepared slide). Place it on the stage, holding it snugly in place with the metal slide holders (clips) of the mechanical stage. 2. -
Page 10: Setting The Stage's Stop-Limit
150 Series Operation Setting the Stage’s Stop-Limit 1. To adjust the stop limit on the stage, unlock it by unscrewing the lower nut. The stop limit is located at the rear of the stage. 2. Once tension is released on the nut by rotating it counter clockwise, you may adjust the upper thumb screw to move the limit up or down as desired. -
Page 11: Maintenance/Precautions
- After use, cover the microscope with the provided dust cover. - Keep your AmScope microscope in a dry, clean location in order to prevent rust or other damage. - To change batteries with this unit, use the included allen wrench (hexagonal shaped L-tool) to undo the door hex screw on the base. -
Page 12: Specifications
150 Series Specifications 150 Series Specifications Parts Specifications M149 M149A M149B M149C WF Eyepiece WF10X/18mm WF10X/18mm w/ Pointer WF10X/18mm w/ Reticle WF16X/18mm WF20X/18mm WF25X18mm Plan Eyepiece P10X P16X DIN Achromatic Objectives 4X/0.10 10X/0.25 40X(spring)/0.65 60X(spring)/0.85 100X(spring, oil)/1.25 Plan Objectives 40X(spring) 100X(spring, oil) Binocular Sliding, 360 Degree Swiveling 45 Degree Viewing Head... -
Page 13: Optional Accessories
150 Series Specifications Optional Accessories Parts Description Model # Purpose Eyepiece EP5X23 Obtaining 20x, 50x, 200x, and 500x magnification powers EP20X23 Obtaining 80x, 200x, 800x, and 2000x magnifica- tion powers EP25X23 For obtaining 250x and 2500x magnification pow- 10x w/ Pointer EP10X23P For easier identifying of objects 10x w/ Reticle... -
Page 14: Objectives
150 Series Specifications Objectives Type Magnification Numerical Aperture Medium Parfocal Distance (mm) Magnification Marks (N.A.) (Color Ring) DIN Achromatic Objective (195mm) Yellow A20x Light Blue A60X Deep Blue 100X A100X Cedar Oil 45 White Plan Objective Plan 4X PA4X (195mm) Plan 10X PA10X Yellow... -
Page 15: Technical Parameters
150 Series Technical Parameters Electrical System There are two options for electrical systems for this series of microscope. The light source is an LED system. 1. 220V~240V power supply: 220V~240V ±10%, 50Hz This electrical system is CE and GS certified 2. -
Page 16: Technical Terms & Concepts
150 Series Technical Parameters Technical Terms & Concepts Total Magnification Total magnification of a microscope is calculated by the magnification of the objective multiplied by the magnification of the eyepieces. -Ex: (10x Eyepieces) x (4x Objective) = 40x Total Magnification Field of View Linear field of view of the eyepiece divided by the magnification of the objective Numerical Aperture (N.A) -
Page 17: Troubleshooting
150 Series Troubleshooting Common Issues Symptom Cause Remedy OPTICAL ISSUES The nosepiece if misaligned Turn the nosepiece until it clicks into place One side of the field of view is darker Stains or dust has accumulated on the objective, Clean all lenses with lens cleaner or a lint free non- eyepieces, or base lens abrasive cloth Stains, dust, or dirt has accumulated on the speci-... -
Page 18: Common Issues (Continued)
150 Series Troubleshooting Common Issues (Continued) Symptom Cause Remedy OPTICAL ISSUES The color of the image is The brightness adjustment knob is not in the right position Adjust the brightness knob to a higher or lower setting for color not accurate clarity No filter is used or filter is in use Remove color filter if natural light is desired, or insert desired...
Need help?
Do you have a question about the M150C-I and is the answer not in the manual?
Questions and answers