
Related Manuals for HOMCOM 824-048V90


Summary of Contents for HOMCOM 824-048V90
- Page 1 IN221002012V02_FR 824-048V90 220-240V~50-60Hz 45W IMPORTANT, RETAIN FOR FUTURE REFERENCE: READ CAREFULLY ASSEMBLY & INSTRUCTION MANUAL...
-
Page 2: Important Safety Information
READ CAREFULLY BEFORE ATTEMPTING TO ASSEMBLE, INSTALL, OPERATE OR MAINTAIN THE PRODUCT DESCRIBED. PROTECT YOURSELF AND.OTHER BY OBSERVING ALL SAFETY INFORMATION. FAILURE TO COMPLY WITH INSTRUCTIONS COULD RESULT IN PERSONAL INJURY AND/OR PROPERTY DAMAGE! IMPORTANT SAFETY INFORMATION 1. Read all instructions carefully before using the FAN. 2. - Page 3 12. Do not use FAN outdoors. 13. Disconnect the fan from the mains power when not in use, and before servicing or performing any maintenance. WARNING The Main Power Switch and the On/Off switch should not be used as the sole means of disconnecting power.
-
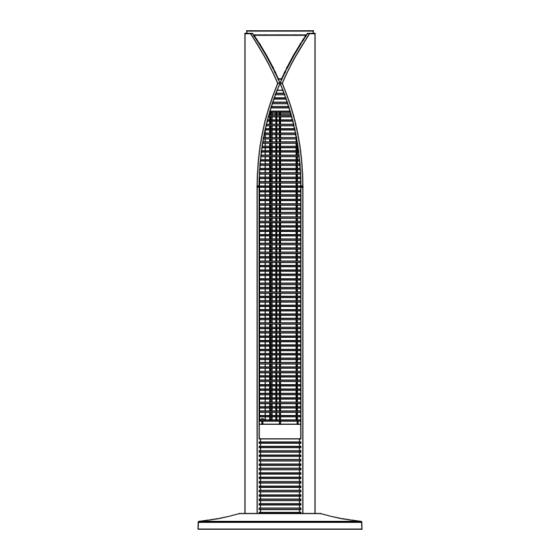
Page 4: Parts Name
To avoid danger of electric shock, unplug WARNING : from outlet when not in use and before cleaning. If the supply cord is damaged, it or it’s must be replaced by the manufactory service agent or a similarity qualified person in order to avoid a hazard. PARTS NAME ASSEMBLY Take out the two parts of the base from packing box. -
Page 5: Remote Control
Put the wire in the recess, then fix the base on the fan body with four screws (included), and turn the screws clockwise (Fig (Fig 2) REMOTE CONTROL 1. Included a button cell battery (the type of battery CR2025). 2. The Remote Control Power button is labeled as such. All the functions performed with the Remote Control work identically to the Manual Controls. - Page 6 POWER Turn the FAN on by pressing the ‘POWER’ button; Turn the FAN off by pressing the ‘POWER’ button again. 3. SPEED You can adjust the fan speed to the desired level: low, medium, or high by pressing ‘SPEED’ . The speed setting is displayed on the LED panel (shown in Fig 5) .
- Page 7 5. TIMER The fan is equipped with a timer that allows you to set its length of operation from 1 hour to 12 hours.The LED Display will turn off if you don’t control the fan in 30 seconds, touch any button to turn on the display.
-
Page 8: Maintenance
(Fig 6) MAINTENANCE This can only be done by an authorized service agent such as your local Sealer dealer or any agent qualified to undertake electrical repairs. 2. If the unit requires external cleaning make sure it is switched off and unplugged from the mains supply. -
Page 9: Consignes De Sécurité Importants
LIRE ATTENTIVEMENT AVANT D'ESSAYER D'ASSEMBLER, D'INSTALLER, DE FAIRE FONCTIONNER OU D'ENTRETENIR LE PRODUIT DÉCRIT. PROTÉGEZ-VOUS ET PROTÉGEZ LES AUTRES EN RESPECTANT TOUTES LES CONSIGNES DE SÉCURITÉ. LE NON-RESPECT DES INSTRUCTIONS PEUT ENTRAÎNER DES BLESSURES CORPORELLES ET/OU DES DOMMAGES MATÉRIELS ! CONSIGNES DE SÉCURITÉ... - Page 10 12. N'utilisez pas VENTILATEUR à l'extérieur. 13. Débranchez le ventilateur de l'alimentation secteur lorsqu'il n'est pas utilisé et avant toute opération d'entretien ou de maintenance. AVERTISSEMENT: L'interrupteur d'alimentation principal et l'interrupteur marche/arrêt ne doivent pas être utilisé comme seul moyen de débrancher l'alimentation. Débranchez toujours le cordon d'alimentation avant d'entretenir ou de déplacer l'appareil.
-
Page 11: Nom Des Pièces
AVERTISSEMENT: Pour éviter tout risque de choc électrique, débranchez la prise lorsqu'elle n'est pas utilisée et avant le nettoyage. Si le cordon d'alimentation est endommagé, il doit être remplacé par le fabricant, son agent de service ou une personne qualifiée en la matière afin d'éviter tout danger NOM DES PIÈCES Panneau de configuration Panneau d'affichage... -
Page 12: Opération
2. Placez le fil dans le renfoncement, puis fixez le socle sur le corps du ventilateur avec quatre vis (incluses) et tournez les vis dans le sens horaire (Fig 2). (Fig 2) TÉLÉCOMMANDE 1. Inclus une pile bouton (Type de pile CR2025). 2. - Page 13 2. POWER: Allumez le VENTILATEUR en appuyant sur le bouton ' POWER' ; Éteignez le ventilateur en appuyant à nouveau sur le bouton ' POWER'. 3. VITESSE : Vous pouvez ajuster la vitesse du ventilateur au niveau souhaité : faible, moyenne ou élevée en appuyant sur « VITESSE ». Le réglage de la vitesse est affiché...
- Page 14 Le ventilateur est équipé d'une minuterie qui vous permet de 5. TIMER régler sa durée de fonctionnement de 1 heure à 12 heures. L'écran LED s'éteindra si vous ne contrôlez pas le ventilateur dans 30 secondes, appuyez sur n'importe quel bouton pour allumer l'écran. 6.
-
Page 15: Entretien
(Fig 6) ENTRETIEN 1. Cela ne peut être fait que par un agent de service autorisé tel que votre revendeur local ou tout agent qualifié pour effectuer des réparations électriques. 2. Si l'appareil nécessite un nettoyage externe, veillez à ce qu'il est éteint et débranché... - Page 16 Si vous avez la moindre question, veuillez contacter notre centre d'assistance à la clientèle. Nos coordonnées sont les suivantes: 0033-1-84166106 aosom@mhfrance.fr Importé par: MH France 2, rue Maurice Hartmann 92130 Issy-les-Moulineaux France Fabriqué en Chine...
Need help?
Do you have a question about the 824-048V90 and is the answer not in the manual?
Questions and answers