Table of Contents
Advertisement
Quick Links
User Manual for Digital Portable Safe
Read all instructions before using this safe.
WARNING
- For security purposes, register pin code as soon as
possible and test registered pin code before closing the
safe door.
- Safe can be opened by either, pin code or
emergency keys.
- Always hold the door with one hand when safe is open.
- Ensure override key remains in lock position at
all times.
- Safe will NOT be locked even when the knob is in the
"Close" position IF the override key is in the
"Unlock" position.
- Avoid leaving safe door open and unattended; it will
allow unauthorized individuals to reprogram the safe,
gaining full access to the safe and the contents.
- Test the Emergency Keys and store them in a secure
place, NOT inside of the safe.
- To maximize the security and performance of the safe,
test registered pin code every 6 months.
A
B
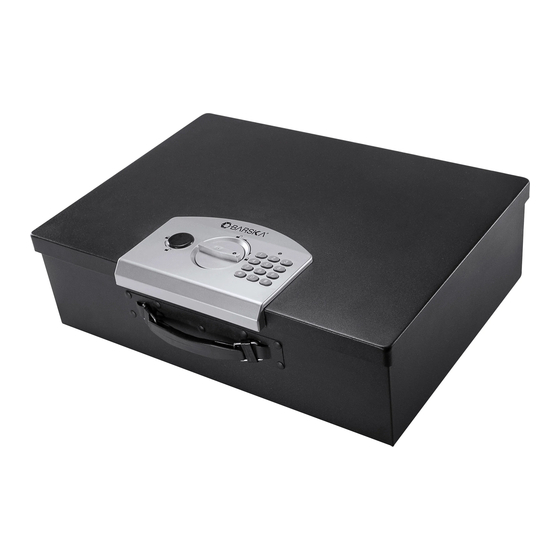
Parts of the Control Panel
A. Override Key and Cover
C. Key Pad
B. Knob
D. Indicator
©2024 BARSKA® | Pomona, CA 91767 | www.barska.com
BC692
H
I
Parts of the Safe
E. Initialization Button
F. Battery Compartment
G. Carrying Handle
Set Up/Override Key
1. Remove the small plastic black cover to expose the override key
2. Insert the key and turn key to the left to unlock
3. Turn knob to the left to unlock safe
4. Turn key to the right to lock, remove key, replace black cover
5. Keep override keys outside of the safe, in a secure place
D
6. Lift safe door to open
Batteries
1. Remove battery cover on the inside of the safe door by pushing
down on the cover in the direction of the arrow to open
2. Insert 4 AA batteries into the battery compartment pay attention
to the polarity of the batteries
3. Replace compartment cover
Low Battery
A steady red light on the indicator means batteries are low
To replace batteries open safe either by pin code or override key
C
and repeat steps 1-4 above. Replace old batteries with new
batteries
Note safe retains last pin code saved
3/24
Registering Pin Code
E
Note: Safe retains only one 3-8 digit pin code
1. Press and hold down the initialization red button on the inside of
the door on the right side of the battery compartment. You will
hear 2 beeps. Release the initialization button
2. Close safe door and make sure override lock is in lock position.
F
Enter your 3-8 digit pin and press the # to confirm. Enter your pin
number again and press # key again.
3. A green light will indicates a successful save of the pin code.
Red light indicates an unsuccessful registration. Follow steps in
Set Up/Override Key Procedures to open safe door and repeat
steps 1 and 2 in this section.
4. Turn knob to the left and lift safe door to open
Note Be sure to write down this code immediately and store in a
safe place
Changing Numeric Pin Code
To change pin code repeat steps above
G
Opening and Closing Safe Door
1. To open safe, input your pin then press #. Turn the knob to the
H. Internal Cable Lock
left and lift the safe door
I. External Cable Slot
Note: After entering pin, you have 5 seconds to turn the knob
before the mechanism re-locks automatically
2. To close safe, close door and turn knob to the right to lock
Lockout
If an incorrect PIN is entered, a red light will flash and the
safe will not open. Entering an incorrect pin 3 times will freeze the
system for 20 seconds
Installing and Removing the Steel Cable
Included with the safe is a steel cable. That be attached to any
stationary item for increased security
On the inside of the safe is the internal cable lock. Adjacent to the
lock is the external cable slot with cover (See item H and I). Gently
lift cover of the external cable slot to expose slot
Installing the Cable
1. Push and hold down internal cable lock lever
2. Insert metal end of the cable into the cable slot and release the
internal cable lock lever
3. Slightly tug on the cable to ensure that the cable is securely
attached to the safe. If cable slips out, repeat steps 1-3
Removing the Cable
1. Push and hold down internal cable lock lever
2. Gently tug on the steel cable to free it from the slot
3. Release the internal cable lock lever
4. Store cable in a safe place
See reverse side for more information
Advertisement
Table of Contents

Related Manuals for Barska AX11910


Summary of Contents for Barska AX11910
- Page 1 3. Release the internal cable lock lever A. Override Key and Cover C. Key Pad B. Knob D. Indicator 4. Store cable in a safe place See reverse side for more information ©2024 BARSKA® | Pomona, CA 91767 | www.barska.com BC692 3/24...
- Page 2 BARSKA product. Any warranties which are implied and which cannot be disclaimed shall be limited in duration to a term of one year from the date of original retail purchase.
Need help?
Do you have a question about the AX11910 and is the answer not in the manual?
Questions and answers