
Related Manuals for Megger AVO 850


Summary of Contents for Megger AVO 850
- Page 1 ® Register TRMS Digital Multimeter megger.com/register with TFT colour LCD Support megger.com/support User Guide English...
- Page 2 T +44 (0)1304 502101 F +44 (0)1304 207342 www.megger.com Megger Ltd reserves the right to alter the specification of its products from time to time without notice. Although every effort is made to ensure the accuracy of the information contained within this document it is not warranted or represented by Megger Ltd.
- Page 3 Limited described in this user guide is in compliance with Directive 2014/53/EU. Other equipment manufactured by Megger Instruments Limited described in this user guide is in compliance with Directives 2014/30/EU and 2014/35/EU where they apply. The full text of Megger Instruments EU declarations of conformity are available at the following internet address: megger.com/company/about-us/eu-dofc www.megger.com...
-
Page 4: Table Of Contents
4.2.1 V AC voltage measurements 4.2.2 V DC voltage measurement 4.2.3 V AC + DC measurements 4.2.4 Milli-Volts voltage measurements Frequency measurements Resistance, continuity, capacitance and diode testing 4.4.1 Resistance measurements 4.4.2 Continuity check 4.4.3 Diode test 4.4.4 Capacitance measurements Temperature measurements AVO®850 www.megger.com... - Page 5 7.2.4 Setting time format Display settings 7.3.1 Setting date and time 7.3.2 Battery saver auto power off (APO) 7.3.3 Foreground and background 7.3.4 Set font Meter info Bluetooth 8. Maintenance General maintenance Cleaning Battery 8.3.1 Battery status Maintenance www.megger.com AVO®850...
- Page 6 11.2 Repair and warranty 11.3 Instrument repair and spare parts 11.4 Returning and instrument for repair 11.5 Calibration, service and spare parts 11.6 Approved repair companies 12. Decommissioning 12.1 WEEE Directive 12.2 Battery disposal 13. Worldwide sales offices AVO®850 www.megger.com...
-
Page 7: Introduction
Read the ensuing safety regulations attentively before using this device. Company web site Occasionally an information bulletin may be issued via the Megger web site. This may concern new accessories, new usage instructions or a software update. Please occasionally check on the Megger web site for anything applicable to your Megger instruments. -
Page 8: Safety Warnings And Standards
„ „ Test leads and prods must be in good order, and free from defects e.g. broken or cracked insulation. „ UK Safety Authorities recommend the use of fused test leads when measuring voltage on high energy systems. AVO®850 www.megger.com... -
Page 9: Installation Category Definitions
Icon Description Warning: High voltage, risk of electric shock Caution: Refer to user guide UK conformity. This equipment complies with current UK legislation EU conformity. Equipment complies with current EU directives AC measurement www.megger.com AVO®850... - Page 10 Spent batteries should be disposed of by a qualified recycler or hazardous materials handler per local regulations. Contact your authorized Megger Service Centre for recycling information. The terminal(s) must not be connected to a circuit point at which the voltage with respect to earth ground exceeds (in this case) 1000 VAC or VDC AVO®850...
-
Page 11: Input Protection Limits
Analogue bar graph IP40 (waterproof and dust-proof) rating „ „ Designed and tested to withstand a 2 m (6.6 ft) drop Li-ion rechargeable battery „ AC Adapter and charger „ „ Bluetooth interface and Megger IOS and Android App www.megger.com AVO®850... -
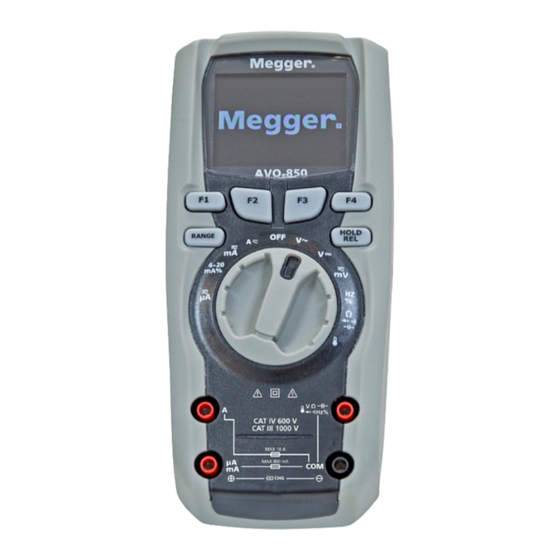
Page 12: Instrument Overview
CAT IV 600 V CAT III 1000 V MAX 10 A µA MAX 800 mA Item Description Item Description 50 000 counts Terminals 320 x 240 TFT colour LCD Softkeys Tilt stand Function switch Fuse and battery cover AVO®850 www.megger.com... -
Page 13: Softkeys
Input for 0 A to 10.00 A current Input for voltage, continuity, resistance, diode test, capacitance, frequency and temperature µA mA Input terminal. Common input terminal. Input for 0 A to 500 mA current Return terminal for all measurements www.megger.com AVO®850... -
Page 14: Display
Minus sign - a negative reading Beeper is enabled (not associated with the continuity beeper) Digital displays measurement Battery charge level The range the Meter is in and the Units of measure ranging mode (auto or manual) AVO®850 www.megger.com... -
Page 15: Rotary Switch
AC, DC amps measurements up to 5000 uA V AC AC voltage measurements V DC DC and AC+DC voltage measurements mV AC/DC DC(AC) milli-volts measurements Hz % Frequency measurements Ohms Resistance, diode test, capacitance and continuity Diode measurements Continuity Capacitance Temperature Temperature measurements www.megger.com AVO®850... -
Page 16: Operation
(Consult chapter 9. Battery and fuse replacement on page 50.) Use the proper terminals, switch position, and range for your measurement. „ „ Never place the probes in parallel with a circuit or component when the leads are plugged into the current terminals. AVO®850 www.megger.com... -
Page 17: Ma % Measurements
µA/mA terminal 4. The results will be displayed Auto range 06:32pm The meter will display loop current as a % -0.04 0 mA = -25% 4 mA = 0% 20 mA = 100% 24 mA = 125% MODE SAVE www.megger.com AVO®850... -
Page 18: Dc Current Measurements
5. Press the softkey F2 (MODE) to cycle through -50 -40 -30 -20 -10 40 50 GRAPH MODE SAVE setting until the display shows the DC current icon ® (Ad) in top right hand side HOLD RANGE 6. Turn off the power 7. Break the circuit AVO®850 www.megger.com... -
Page 19: Ac Current Measurements
µA/mA terminal. 4. For current measurements 4.1. up to 10 A AC CAT IV 600 V CAT III 1000 V lnsert the red test lead 4 mm plug into the MAX 10 A µA MAX 800 mA A terminal www.megger.com AVO®850... - Page 20 RANGE 6. Turn off the power 7. Break the circuit 8. Insert the meter probes in series with the circuit 9. Turn on the power 10. The results will be displayed Auto range 06:32pm 0.000 GRAPH MODE SAVE AVO®850 www.megger.com...
-
Page 21: Voltage Measurement
3. Insert red test lead 4 mm plug into the positive V terminal CAT IV 600 V CAT III 1000 V MAX 10 A µA MAX 800 mA 4. Touch the black test probe tip to the negative side of the circuit www.megger.com AVO®850... -
Page 22: Dc Voltage Measurement
3. Insert the red test lead 4 mm plug into the V terminal CAT IV 600 V CAT III 1000 V MAX 10 A µA MAX 800 mA 4. Touch the black test probe tip to the negative side of the circuit AVO®850 www.megger.com... -
Page 23: Ac + Dc Measurements
µA MAX 800 mA 4. Press softkey F2 (MODE) to indicate “AC+DC” on -500 -300 -100 GRAPH MODE SAVE the display ® HOLD RANGE 5. Touch the black test probe tip to the negative side of the circuit www.megger.com AVO®850... -
Page 24: Milli-Volts Voltage Measurements
CAT IV 600 V CAT III 1000 V Auto range 06:32pm MAX 10 A -0.04 µA MAX 800 mA 4. Press softkey F2 (MODE) to switch between mV DC -500 -300 -100 GRAPH MODE SAVE and mV AC ® HOLD RANGE AVO®850 www.megger.com... -
Page 25: Frequency Measurements
CAT III 1000 V MAX 10 A µA MAX 800 mA 4. Touch the black test probe tip to the negative side of the circuit 5. Touch the red test probe tip to the positive side of the circuit www.megger.com AVO®850... -
Page 26: Resistance, Continuity, Capacitance And Diode Testing
CAT III 1000 V MAX 10 A µA MAX 800 mA Insert the red test lead 4 mm plug into the Ω terminal CAT IV 600 V CAT III 1000 V MAX 10 A µA MAX 800 mA AVO®850 www.megger.com... -
Page 27: Continuity Check
MAX 10 A µA MAX 800 mA Insert the red test lead 4 mm plug into the positive continuity ( ) terminal Ω CAT IV 600 V CAT III 1000 V MAX 10 A µA MAX 800 mA www.megger.com AVO®850... -
Page 28: Diode Test
MAX 10 A µA MAX 800 mA 3. Insert the red test lead 4 mm plug into the positive Diode ( ) terminal CAT IV 600 V CAT III 1000 V MAX 10 A µA MAX 800 mA AVO®850 www.megger.com... - Page 29 Auto range 06:32pm NOTE : 0.800 The voltage will typically indicate 0.400 to 3.200 V A reverse voltage will indicate “OL” Shorted devices will indicate near “OV” An open device will indicate “OL” in both polarities SAVE MODE www.megger.com AVO®850...
-
Page 30: Capacitance Measurements
5. Touch the black test probe tip to the negative side of the circuit 6. Touch the red test probe tip to the positive side of the circuit 7. The results will be displayed Auto range 06:32pm 20.00 SAVE MODE AVO®850 www.megger.com... -
Page 31: Temperature Measurements
SAVE temperature units (°C or °F), displayed in top right ® hand side HOLD RANGE 5. Place probe tip at heat source to be measured 6. The results will be displayed Auto range 06:32pm ºC 40.5 SAVE MODE www.megger.com AVO®850... -
Page 32: Default Display
FAST SLOW CANCEL 2.3. Press softkey F4 (CANCEL) to exit graph display and return to normal measurement mode 3. To stop capturing press softkey F4 (STOP) Auto range 06:32pm Rate: 0.2 s -2.6000 mV DC Range: 500 STOP AVO®850 www.megger.com... -
Page 33: Capturing Minimum And Maximum Values
5. Press softkey F4 (CLOSE) to exit the MIN MAX 0.2660 record session without saving the collected data 0.3493 Average 0.2636 0.2548 SAVE CLOSE NOTE : To save the MIN MAX screen data, the MIN MAX session must be ended by pressing the softkey F1 (STOP). www.megger.com AVO®850... -
Page 34: Capturing Peak Values
2. To pause the display for any function, HOLD press HOLD/REL button RANGE Auto range 06:32pm 3. Press softkey F3 (SAVE) to save results to memory 0.0430A 4. Press close return measure Reference 0.3493 0.2636 SAVE GRAPH MODE Auto range 06:32pm HOLD 0.2823 SAVE CLOSE AVO®850 www.megger.com... -
Page 35: Save Functions
1. Press the softkey F2 (UP) or softkey F3 (DOWN) to Auto range 06:32pm cycle through the menu to highlight the icon on the Save Record Delete Setup screen labelled Record View C 2. Press softkey F1 (ENTER) to select View M View R Info ENTER DOWN CANCEL www.megger.com AVO®850... - Page 36 F4 (CLOSE) to cancel and exit ENTER DOWN CLOSE NOTE : The session will continue until the allocated memory is used, the batteries expire, the function switch is moved, or the session is terminated by pressing the softkey F4 (STOP) AVO®850 www.megger.com...
-
Page 37: Delete
4. Softkey F1 (OK) to delete the data you have selected Auto range 06:32pm Save Record Delete Setup 5. Softkey F1 (OK) to confirm or softkey F4 (CANCEL) to cancel View C View M View R Info Delete all Measurements: ENTER DOWN CANCEL www.megger.com AVO®850... -
Page 38: Viewing Graph Data
1. Press the softkey F2 (UP) or softkey F3 (DOWN) to Auto range 06:32pm cycle through the menu to highlight the icon on the Save Record Delete Setup screen labelled View M View C View M View R Info ENTER DOWN CANCEL AVO®850 www.megger.com... -
Page 39: Viewing Trend Data
5. Press the softkey F1 (DELETE) to delete the data 6. Press the softkey F4 (BACK) to move the move cursor along the data points 00.00 00.10 00.20 00.30 00.40 331.99Mv 05:26:25pm DELETE >> BACK www.megger.com AVO®850... -
Page 40: Info
Mode - Releated to the rotary 4. To close press softkey F4 (CLOSE) swtich function. Fno. Save - Accesses the memory managment menu for saving measurment, setting up recording sessions, or viewing and deleting stored measurements from memory. DOWN CLOSE AVO®850 www.megger.com... -
Page 41: Setup Options
1. Press the softkey F2 (UP) or softkey F3 (DOWN) to Auto range 06:32pm Reset highlight Reset Save Record Delete Setup Format Display 2. Press the softkey F1 (ENTER) to open the list Meter Info Bluetooth View C View M View R Info DOWN CANCEL ENTER www.megger.com AVO®850... -
Page 42: Format
Reset all meter settings to factory defaults? NOTE : Calibrate is intended for service and CANCEL CALIBRATE repairs from authorised for Megger Instruments distributor or repair centre’s. Consult chapter 11. Calibration, Repair and Warranty on page 58 Format The format options sets the beeper and digital formats. -
Page 43: Numeric Format
DOWN CLOSE 2.1. Press softkey F1 (MM/DD/YY) Auto range 06:32pm Format 2.2. Press softkey F2 (DD/MM/YY). Beeper 2.3. To cancel and not make any changes press Numeric Format Date Format softkey F4 (CANCEL) Time Format CANCEL MM/DD/YY DD/MM/YY www.megger.com AVO®850... -
Page 44: Setting Time Format
1. Press the softkey F2 (UP) or softkey F3 (DOWN) to Auto range 06:32pm Reset highlight Display Save Record Delete Setup Format Display 2. Press the softkey F1 (ENTER) to open the list Meter Info Bluetooth View C View M View R Info ENTER DOWN CANCEL AVO®850 www.megger.com... -
Page 45: Setting Date And Time
Set Time: 08:29:00 pm Auto Power Off: 00 value Foreground: Background: Select Font: 0 4.3. When done softkey F1 (OK) to confirm the values when done 4.4. To cancel and not make any changes press >> CANCEL softkey F4 (CANCEL) www.megger.com AVO®850... -
Page 46: Battery Saver Auto Power Off (Apo)
3.1. When done softkey F1 (OK) to confirm the Set Time: 08:29:00 pm Auto Power Off: 00 values when done Foreground: Background: Select Font: 0 3.2. To cancel and not make any changes press softkey F4 (CANCEL) DOWN CLOSE AVO®850 www.megger.com... -
Page 47: Set Font
2. Press the softkey F1 (ENTER) to open the list Meter Info Bluetooth View C View M View R Info DOWN CANCEL ENTER 3. The display will show the is serial number and Auto range 06:32pm Meter Info firmware version Firmware Version : V1.10 CLOSE www.megger.com AVO®850... -
Page 48: Bluetooth
4. If Bluetooth is turned ON the display will display Auto range 06:32pm message “Turn OFF Bluetooth?” 4.1. Press softkey F1 (OK) to turn off 4.1. Press softkey F4 (Cancel) to cancel and not change Turn off Bluetooth? CANCEL AVO®850 www.megger.com... -
Page 49: Maintenance
Remove the input test leads before you clean the instrument. „ „ Use only specified replacement parts. „ Have an approved technician repair the instrument. Use only specified replacement fuses. „ „ Replace a blown fuse with exact replacement only for continued protection against arc flash. www.megger.com AVO®850... -
Page 50: Battery And Fuse Replacement
1. Turn the muiltimeter off and remove the test leads from the terminals 4~20 µA 2. Extend the tilt stand to expose the battery door 3. Turn the battery-door latch until the unlock symbol aligns with the arrow AVO®850 www.megger.com... -
Page 51: Test The Fuses
✔ <200 Ω ✔ <2 Ω CAT IV 600 V CAT IV 600 V CAT III 1000 V CAT III 1000 V MAX 10 A MAX 10 A µA ✖ µA MAX 500 mA MAX 500 mA ✖ www.megger.com AVO®850... -
Page 52: Li-Ion Battery Charge
1. Turn the instrument off and remove the test leads from the terminals 4~20 µA 2. lnsert the socket into the instruments Input ports and the adapter connected to the switch socket 3. Then Insert the adapter into power supply A charge symbol will display AVO®850 www.megger.com... -
Page 53: Specifications
Average responding multimeters are calibrated to read correctly only on sine waves, and they will read inaccurately on non-sine wave or distorted signals. True rms meters read accurately on either type of signal www.megger.com AVO®850... -
Page 54: Electrical Specifications
* When using the relative mode (REL Q) to compensate for offsets. 10.1.3 (AC+DC) <1 kHz <5 kHz 0.0001 V 50 V 0.001 V (±1.2% + 20) (±3.0% + 20) 500 V 0.01 V 1000 V 0.1 V AVO®850 www.megger.com... -
Page 55: Resistance
500 µA 0.01 µA 5000 µA 0.1 µA (±0.8% +5) (±3% + 5) 50 mA 0.001 mA 500 mA 0.01 mA 10 A 0.001 A All AC current ranges are specified from 5% of range to 100% of range www.megger.com AVO®850... -
Page 56: Capacitance
0.01 Hz - (±0.5% reading) 0.001 kHz Sensitivity: 2 V rms 10.1.11 Duty cycle Range Resolution Accuracy 0.1 to 99.90% 0.01% (±1.2% reading + 2 digits) Pulse width: 100 µs – 100 ms, Frequency: 5 Hz to 150 kHz AVO®850 www.megger.com... -
Page 57: Safety
(10 MHz to 300 GHz); and EN 50663: 2017 Generic standard for assessment of low power electronic and electrical equipment related to human exposure restrictions for electromagnetic fields (10 MHz - 300 GHz). www.megger.com AVO®850... -
Page 58: Calibration, Repair And Warranty
11.1 Limited warranty This Megger product will be free from defects in material and workmanship for three years from the date of purchase. This warranty does not cover fuses, disposable batteries, or damage from accident, neglect, misuse, alteration, contamination, or abnormal conditions of operation or handling. -
Page 59: Calibration, Service And Spare Parts
Megger products. See the last page of this User Guide for Megger contact details. To find your local Authorised Service Centre email Megger on ukrepairs@megger.com and give details of your location. 11.6... -
Page 60: Decommissioning
12.1 WEEE Directive The crossed out wheeled bin symbol placed on Megger products is a reminder not to dispose of the product at the end of its life with general waste. Megger is registered in the UK as a Producer of Electrical and Electronic Equipment. The Registration No is WEE/ HE0146QT. -
Page 61: Worldwide Sales Offices
Worldwide sales offices 13. Worldwide sales offices Sales Office Telephone Email +44 (0)1 304 502101 UKsales@megger.com USA – Dallas +1 214 333 3201 USsales@megger.com USA – Valley Forge +1 214 333 3201 USsales@megger.com USA – Dallas +1 214 333 3201 USsales@megger.com... - Page 62 +44 (0)1 304 502101 +46 08 510 195 00 uksales@megger.com seinfo@megger.com Megger Valley Forge Megger USA - Dallas Megger USA - Fort Collins Phoenixville, PA USA Dallas, TX USA Fort Collins, CO USA +1 610 676 8500 +1 214 333 3201 +1 970 282 1200 USsales@megger.com...
Need help?
Do you have a question about the AVO 850 and is the answer not in the manual?
Questions and answers