EK-Quantum Vector2 StrixTUF RTX 4090 D-RGB User Manual
White upgrade kit
Hide thumbs
Also See for Vector2 StrixTUF RTX 4090 D-RGB:
- User manual (23 pages) ,
- Manual (21 pages) ,
- Quick start manual (16 pages)
Advertisement
Quick Links
Advertisement

Related Manuals for EK-Quantum Vector2 StrixTUF RTX 4090 D-RGB


Summary of Contents for EK-Quantum Vector2 StrixTUF RTX 4090 D-RGB
- Page 1 EK-Quantum Vector² StrixTUF RTX 4090 D-RGB - White Upgrade Kit USER GUIDE...
- Page 2 Please note the installation of the product is intended to be undertaken by an adequately trained and experienced person. You are installing the product at your own risk. If you are not properly trained or experienced or feel unsure about the installation procedure, please refrain from installing the product yourself and contact our tech support for assistance.
-
Page 3: Table Of Contents
TABLE OF CONTENTS COMPATIBILITY BOX CONTENTS PREPARING THE WATER BLOCK FOR UPGRADE NSTALLING THE REPLACEMENT COMPONENTS TESTING THE LOOP SUPPORT AND SERVICE SOCIAL MEDIA - 3 -... -
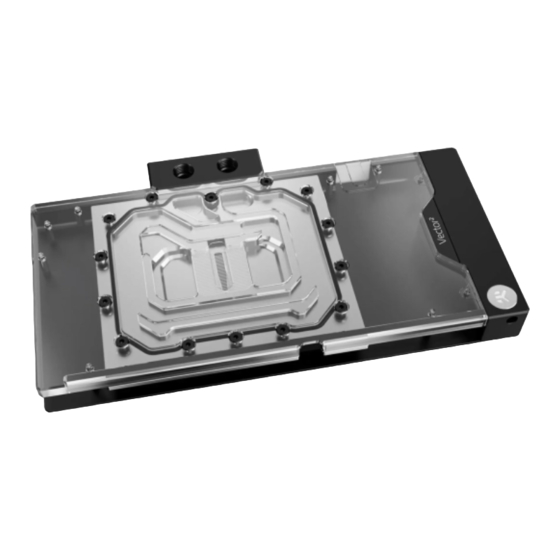
Page 4: Compatibility
COMPATIBILITY - EK-Quantum Vector² Strix/TUF RTX 4090 D-RGB - Nickel + Plexi water block BOX CONTENTS EAN: 106929 4090 Backplate (Silver) 1 pc Stickout (White edition) 1 pc M2.5x4 AX1 Screw (11 pcs) M2.5x6 AX1 Screw (1 pc) M2.5x8 AX1 Screw (1 pc) Thermal Pad F 1.0 mm (6 pcs) -
Page 5: Preparing The Water Block For Upgrade
M2.5 x 8 AX1n material to lay the graphics card on. STEP 1 If the EK-Quantum Vector water block is already installed, disconnect the D-RGB LED strip connector, drain the cooling system, detach the cooling tubes, and carefully remove the GPU-Water Block from your PC’s motherboard PCI Express expansion slot. - Page 6 STEP 4 To remove the Stickout, unscrew two (2) M3 x 8 DIN7991 screws. Store the removed screws for later use. M3 x 8 DIN7991 Move Stickout to the side, together with the LED strip and its housing channel. Carefully detach the LED strip from its channel and push it STICKOUT through the stand-out opening.
- Page 7 STEP 5 To remove the FC Terminal, remove the magnetic cower and unscrew three (3) M4 x 20 DIN7984 screws using a 2.5 mm allen key. Store the removed screws for later use. For this step, you will need: Allen Key 2.5 mm M4 x 20 DIN7984 MAGNETIC COWER Remove two (2) terminal O-rings, as they will be replaced with new...
-
Page 8: Nstalling The Replacement Components
NSTALLING THE REPLACEMENT COMPONENTS STEP 1 Insert two (2) O-rings and make sure that they stay in the slots. O-RING Secure the FC Terminal (White edition) with three (3) M4 x 20 DIN7984 screws using a 2.5 mm allen key. Place the magnetic cover back in place. - Page 9 (White edition) 1 pc (2 pcs) STEP 3 For further instructions regarding aplaying thermal pads, the installation of the GPU PCB, and reassembly, please follow the Installation Manual of the EK-Quantum Vector² Strix/TUF RTX 4090 D-RGB ABP Set. https://www.ekwb.com/shop/ek-quantum-vector2-strix-tuf-rtx- STEP 2 4090-d-rgb-abp-set-nickel-plexi...
-
Page 10: Testing The Loop
TESTING THE LOOP To make sure the installation of EK components was successful, we recommend you perform a leak test for 24 hours. When your loop is complete and filled with coolant, connect the pump to a PSU outside of your system. Do not connect power to any of the other components. -
Page 11: Support And Service
SUPPORT AND SERVICE In case you need assistance or wish to order spare parts or a new mounting mechanism, please contact: https://www.ekwb.com/customer-support/ SOCIAL MEDIA EKWaterBlocks @EKWaterBlocks ekwaterblocks EKWBofficial ekwaterblocks - 11 -...
Need help?
Do you have a question about the Vector2 StrixTUF RTX 4090 D-RGB and is the answer not in the manual?
Questions and answers