Table of Contents
Advertisement
Quick Links
Advertisement
Table of Contents

Subscribe to Our Youtube Channel
Related Manuals for Alesis PRIME


Summary of Contents for Alesis PRIME
- Page 1 PRIME Drum Module User Guide...
-
Page 2: Table Of Contents
Table of Contents (1.0) Introduction ................5 (1.1) About this User Guide ..............5 (1.2) Box Contents ..................5 (1.3) Support ....................6 (1.4) Setup ....................6 (1.4.1) Connection Diagram ..................7 (2.0) Features .................. 8 (2.1) Top Panel ................... 8 (2.2) Rear Panel .................. - Page 3 (3.4) Mixer Mode Overview ..............30 (3.5) Backing Track Mode Overview ..........37 (3.6) Trigger Edit Mode Overview ........... 40 (3.6.1) Trigger Zones ....................43 (3.6.2) Crosstalk ...................... 43 (3.6.2.1) Learn XTalk ......................... 44 (3.6.3) Hi-Hat Setup ....................46 (3.6.4) Trigger Input Tweaks ................47 (3.6.4.1) KD (Kick) ........................
- Page 4 (6.0) Appendix ................66 (6.1) Technical Specifications ............66 (6.2) Trademarks & Licenses ............... 67...
-
Page 5: (1.0) Introduction
4-post heavy-duty rack system (1.1) About this User Guide This manual will help you get familiar with using your PRIME drum module. For consistency, the terminology throughout is based on electronic drum kit nomenclature. We also used specific formatting to indicate particular topics of significance: Important/Note: Important or helpful information on a given topic. -
Page 6: (1.3) Support
For additional product support, visit support.alesis.com. (1.4) Setup Your PRIME drum module runs the powerful BFD software sound engine with tons of editing capabilities, easily accessible from the 10.1” touchscreen. Editing is made easy, following the steps below. -
Page 7: (1.4.1) Connection Diagram
(1.4.1) Connection Diagram Items not listed in Introduction > Box Contents are sold separately. Note: Refer to the Assembly Guide and Box Contents sheet included with your purchase for full kit setup instructions. Computer Audio Smartphone Interface Power Drive Speakers SD Card MIDI Keyboard... -
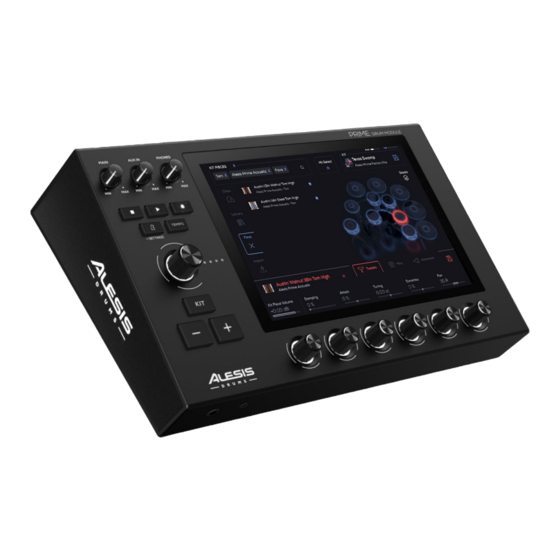
Page 8: (2.0) Features
Touch the display (and use the hardware controls) to control the interface. See the following Operation section to learn more about using PRIME drum module’s interface. Main Turn this knob to adjust the level of the Main Outputs. Aux In Turn this knob to adjust the level of the Aux Inputs. - Page 9 Click Press this button to turn the click on or off. Press and hold this button to view the click settings listed below. To change the settings, tap the area to highlight the field and turn the Main Encoder. • BPM: Use the Tempo button to set the BPM in this mode (20-999.) •...
- Page 10 Main Encoder Turn and press this encoder to change kits, edit on-screen parameters, etc. Kit Button Press this button to toggle between the Kit Mode/Menu screen and whatever the last selected Mode/Menu window screen that was selected. • Kit Browser: The Kit Browser is a kind of home page that lets you select kits but also navigate to other “Modes.”...
- Page 11 10. +/- Buttons The +/- buttons select the primary items in each mode. Please see each mode’s operation section for more details. Small Encoders Turn these 360° potentiometers to adjust the various parameters found at the bottom of the touchscreen display. Additionally, when multiple banks of parameters are available above the Small Encoders, swipe left/right on the touchscreen to change the banks.
-
Page 12: (2.2) Rear Panel
7. Trigger Inputs (1/4” TRS [6.35 mm]) Note: Refer to the included Assembly Guide for more assistance on connecting Strata PRIME kit drums and cymbals. Connect cables here to receive signals from drum and cymbal triggers, and a hi- hat pedal. - Page 13 Press this button to power the PRIME drum module on or off. When powering PRIME off, the system will ask if you want to save your changes (see image below). Do not disconnect the power cable while the module is still shutting down.
-
Page 14: (2.3) Front Panel
1 1 1 2 (2.4) Bottom Panel Module Mount Connect the included module mount to PRIME’s bottom panel using the supplied 4 screws to secure to the rack. Use M5x14 mm Phillips head screws only. Do not use longer screws. -
Page 15: (3.0) Operation
Important: To start using the PRIME drum module, first make sure you have properly set up the drum kit and connected the trigger cables to the PRIME drum module. See the Assembly Guide and Box Contents sheet included with your purchase for more details. - Page 16 All Kit list items contain a playlist number, a kit name, a library name, and an options button. These components are detailed below. Playlist Number: A sequential number of the kit in the playlist. 2. Kit Name: Displays the name of the kit. 3.
- Page 17 Trigger Edit: Use this mode to customize the drum kit to your playing style. 5. Settings: Use this menu to configure the PRIME drum module’s overall operation.
-
Page 18: (3.1.1) Kit Browser Functions
(3.1.1) Kit Browser Functions To scroll through kits or edit on-screen parameters, turn the Main Encoder. To immediately load the next or previous kit, use the +/– buttons. To toggle between the main Kit menu and other active modes, press the Kit button. Adding a Kit to a Playlist: In the main Kit Browser, scroll to find a Kit from the Factory Kits using the Encoder. - Page 19 Reverting a User Kit: In the main Kit Browser, tap the Playlist icon to access the Playlist feature. 2. Tap the list of User Kits. 3. Tap the 3 vertical dots at the end of the User kit. 4. Select Revert to go back to the way the kit was since loading the kit.
-
Page 20: (3.2) Kit Edit Mode Overview
(3.2) Kit Edit Mode Overview To open Kit Edit Mode, press the Kit button and then tap Kit Edit on the left edge of the screen. Search The Search Bar shows the contents of the Browser List. There can only be four different types of filters in the search bar at one time: •... - Page 21 Note: When a Kit Piece is highlighted in the search results window, you can tap from left to right on the highlighted Kit Piece to hear the different velocity/dynamics of the Kit Piece. This is useful if you want to hear how a Kit Piece will play at different dynamics.
- Page 22 7. Kit Display This shows a visual representation of the Strata Prime Kit. Tap on any of the kit pieces in the UI to select that drum or cymbal pad for editing its assigned kit piece sound. 8. Hit Select This feature gives the ability to hit a drum/cymbal/pedal attached to that trigger input and the drum module focus will change to that Trigger Slot.
- Page 23 10. Preset Kit Save Save the current Kit Piece as a duplicate in a user library of choice. 11. Stacks Browse and layer Articulations on top of the main Kit Piece, and directly to the individual Trigger Slots. 12. Kit Pieces Number Shows the number of Kit Pieces available from the filtered Search results.
- Page 24 14. Mics This shows the individual mic channels, which are adjusted using the Small Encoders, and how much of the channel is sent to the Mixer. • Kit Piece Volume: The overall volume of the loaded Kit Piece (-INF – 0.00 – +6.00 dB).
- Page 25 15. Advanced This shows more advanced tone and sample playback settings that can be adjusted using the Small Encoders. • Kit Piece Volume: The overall volume of the loaded Kit Piece (-INF – 0.00 – +6.00 dB). • Vel to Damp: The louder the drum sound is, the more the sound will be dampened (-I00 –...
-
Page 26: (3.3) Kit Edit Mode Functions
Tom 4 representing pads cymbals Drum Ride connected to PRIME’s trigger inputs. Below is a table showing the Trigger Slots, the available Trigger Zones, and which Trigger Zone is auditioned/played when the graphic is tapped. Trigger Slot Trigger Zone 1... -
Page 27: (3.3.1) Changing Kit Pieces For A Trigger Slot
(3.3.1) Changing Kit Pieces for a Trigger Slot To change a Kit Piece within a Trigger Slot, use one of these three options: Via Main Encoder While in Kit Edit mode, select the Trigger Slot you would like to change by either tapping on the Kit display or by using the Hit Select feature. -
Page 28: (3.3.2) Saving And Reverting Kits
(3.3.2) Saving and Reverting Kits To save a Kit to your User Library, tap the Save button at the top right corner of the Kit Edit page. Alternatively, tap the Options icon and then select Save As to save a copy of the current Preset Kit to your User Library. -
Page 29: (3.3.6) Importing Samples
(3.3.6) Importing Samples The PRIME drum module allows you to import your audio files and assign them to any slot of your Kit. To import a file from a device: Tap the Import option. 2. Scroll with the Encoder to search for samples and Kit Pieces on a connected USB drive or inserted SD card. -
Page 30: (3.4) Mixer Mode Overview
Here you can use the touchscreen to adjust the volume balance of your kit, apply effects, and route your sounds to various outputs of the PRIME drum module. To open Mixer Mode, press the Kit button and then tap Mixer on the left edge of the screen. - Page 31 2. Cymbal Mics This grouping of the cymbal trigger slots shows the corresponding mixer channel. • Hi-hat • Ride • Cym1 (Cymbal 1) • Cym2 (Cymbal 2) • Cym3 (Cymbal 3) • Cym4 (Cymbal 4) Hi-hat, Ride, Cymbals 1-4 Parameters Parameter Description Value Range...
- Page 32 3. Ambience & FX This has the grouping of the Reverb and Effects Sends for the Drums Mix, Assign 3/4, and Assign 5/6. Reverb: This channel includes 3 insertable Effects that can be added to the Reverb channel. The amount of Kit Piece audio being set to this channel is controlled via the Small Encoder controlling the Reverb Amount value.
- Page 33 4. Ins & Outs This section routes the Drum Mix, Aux In, Main L/R, Assign 3/4, and Assign 5/6 to the Main L/R, Assign 3/4, or Assign 5/6 outputs. 5. Mute Press to mute a Reverb/Effects/AmbMix slot mixer channel. 6. Solo Press to solo a mixer channel.
- Page 34 8. Output Routing You can select from Main L/R (this default setting receives all channels), Assign 3/4, or Assign 5/6. To route audio from different outputs: In the Mixer page “groups” of mixer channels, tap on the tabs to select a different mixer channel group.
- Page 35 9. Insert FX Slots To assign an Insert effect to a channel, tap the + button to open the effect select screen. Once in the Effect Select screen you will see the list of available effects. You can select an effect by tapping the + or by tapping the effect’s name.
- Page 36 To adjust an effect’s parameters: In the Mixer window tap the effect in the Effect Slot you would like to change. 2. Once an effect has been selected it will be highlighted in red, and its parameters will be shown above and will be controllable by the six Small Encoders. If additional parameter pages for an effect are available, there will be page indicators above the parameters.
-
Page 37: (3.5) Backing Track Mode Overview
(3.5) Backing Track Mode Overview Backing Track Mode lets you record, play, save, and load audio files. Use this mode to practice your drumming and play along to your favorite music, or record your performance. To open Backing Track Mode, press the Kit button and then tap Backing Track on the left edge of the screen. - Page 38 To load an audio track: Select and load a kit from the Kit Browser. 2. Enter Backing Track mode and tap the Browse button to load an audio track from a source (external USB drive or SD storage). Select Drums Mix from the Headphone Monitor dropdown list to monitor the audio.
- Page 39 To rename an audio track, click the pencil icon and use the keyboard that appears to rename your recording. To delete an audio track, click the trash can icon and use the keyboard that appears to rename your recording.
-
Page 40: (3.6) Trigger Edit Mode Overview
(3.6) Trigger Edit Mode Overview To open Trigger Edit Mode, press the Kit button and then tap Trigger Edit on the left edge of the screen. Search Tap the magnifying glass icon to bring up the keyboard and enter the name of the trigger preset you are searching for. - Page 41 7. Hit Select Selects a Trigger Slot on-screen by hitting the trigger connected to that trigger input. When set to Latch Mode, toggle this setting on or off by tapping the button. When set to Momentary Mode, press and hold this button to enable Hit Select. 8.
- Page 42 13. Advanced Shows more advanced trigger settings for the trigger inputs. See the section Trigger Input Advanced Settings for more details. 14. Save Save a copy of the current trigger preset to your User Library, or revert changes you have made since loading.
-
Page 43: (3.6.1) Trigger Zones
When striking a trigger causes another trigger to sound unexpectedly, it is referred to as crosstalk (or XTalk). This is a normal part of all electronic drum kits, and Alesis has created a new easy and automatic method for removing it. -
Page 44: (3.6.2.1) Learn Xtalk
(3.6.2.1) Learn XTalk The Crosstalk Elimination page is accessed by tapping Learn XTalk in Trigger Edit mode. This allows you to quickly filter out vibrations across the drum kit which can cause unwanted triggering. Only one Trigger Slot can be programmed at a time. XTalk Filter Turn this on or off to enable or disable crosstalk filtering. - Page 45 To remove crosstalk: From the Kit Browser, go to Trigger Edit Mode. 2. Select Learn XTalk and follow the on-screen instructions. Trigger Zone 3. Hit all of the Trigger Zones on the selected Trigger Input a few times. For best results, avoid hitting other triggers. The Trigger Zone info will be shown as well as the Trigger Meter and Peak Marker for the Trigger Slot.
-
Page 46: (3.6.3) Hi-Hat Setup
(3.6.3) Hi-Hat Setup The hi-hat controller mounts on a normal hi-hat stand underneath the cymbal pad, and tracks the relative position of the cymbal as you move the hi-hat pedal. The PRIME drum module will detect the position of the pedal. -
Page 47: (3.6.4) Trigger Input Tweaks
(3.6.4) Trigger Input Tweaks This section of the Trigger Edit menu allows you to fine-tune each of the trigger input’s response based on your style of playing. See the trigger input parameters below that can be adjusted using the Small Encoders. (3.6.4.1) KD (Kick) Parameter Description... -
Page 48: (3.6.4.2) Sd (Snare), T1-T4 (Toms), Aux
(3.6.4.2) SD (Snare), T1-T4 (Toms), Aux Parameter Description Value Range Curve This determines how a sound’s volume is affected by Linear how hard you strike it—that is, how responsive the trigger’s dynamics are to changes in your playing. Log 1 Log 2 Log 3 Log 4... -
Page 49: (3.6.4.3) Hh (Hi-Hat), C1 - C4 (Cymbals)
(3.6.4.3) HH (Hi-Hat), C1 – C4 (Cymbals) Parameter Description Value Range Curve This determines how a sound’s volume is affected by Linear how hard you strike it—that is, how responsive the trigger’s dynamics are to changes in your playing. Log 1 Log 2 Log 3 Log 4... -
Page 50: (3.6.5) Trigger Input Advanced Settings
(3.6.5) Trigger Input Advanced Settings This section of the Trigger Edit menu has advanced parameters to fine-tune each of the trigger input’s responses based on your style of playing. See the parameters below that can be adjusted using the Small Encoders. Note: Some parameters have multiple pages. -
Page 51: (3.6.5.2) Sd (Snare), T1 - T4 (Toms), Aux
(3.6.5.2) SD (Snare), T1 – T4 (Toms), Aux Parameter Description Value Range Scan Time This specifies the detection time for the trigger signal. 0.4 – 15.0 ms Increasing this will increase latency/delay, so the factory presets are set low, and it is not recommended to change them. -
Page 52: (3.6.5.3) Hh (Hi-Hat)
(3.6.5.3) HH (Hi-Hat) Parameter Description Value Range Scan Time This specifies the detection time for the trigger 0.4 – 15.0 ms signal. Increasing this will increase latency/delay, so the factory presets are set low, and it is not recommended to change them. If you are programming a new trigger, settings that are too low will yield very unpredictable dynamics, and difficulty getting loud hits. - Page 53 Parameter Description Value Range Choke Time Sets the minimum time you must grab and hold 1 – 200 ms the edge of a cymbal in order for it to register a cymbal choke/mute. Lower values will make it easier to choke, but may also cause unintended chokes from your drumstick.
-
Page 54: (3.6.5.4) R (Ride), C1 - C4 (Cymbals)
(3.6.5.4) R (Ride), C1 – C4 (Cymbals) Parameter Description Value Range Scan Time This specifies the detection time for the trigger 0.4 – 15.0 ms signal. Increasing this will increase latency/delay, so the factory presets are set low, and it is not recommended to change them. -
Page 55: (3.6.6) Stacks
(3.6.6) Stacks The Stacks allows you to layer up to three extra sounds/articulations on top of the main Kit Piece sound. You can also browse and load individual sounds or articulations (for example, Ludwig 14x5 Snare Rimshot) directly to an individual Trigger Zone (such as Snare Center or Snare Rim). - Page 56 To create layered kit pieces (multiple sounds stacked on each other): From Kit Edit Mode, tap the Stacks option. 2. Tap to enable to Hit Select function. 3. Hit a drum to jump to that trigger input. 4. Tap a Stack number and select the Articulation you want to assign to that stack from the browser list.
- Page 57 3. Velocity Threshold Tap to open and set the MIDI Velocity value with the slider (0-127). 4. Fade The Stack will begin playback starting at the set MIDI Velocity Threshold and change the audio playback volume dynamically up to 127. If the slider is set to 0 (leftmost), the audio playback is unchanged from the original state.
- Page 58 8. Main Kit Piece Articulation Volume Use the touch slider to adjust the volume of the Articulation assigned to the main Kit Piece (-INF – 0.00 – +6.00 dB). For example, if you want to assign a cowbell layer to the snare rim and only want the cowbell to sound (not mixed with the original rim sound), turn this slider all the way down.
-
Page 59: (3.7) Usb Recording
(3.7) USB Recording If you connect a USB cable (sold separately) from the PRIME drum module’s rear panel USB-B Port to a USB port on your computer, you’ll be able to use your DAW software to record your performance (audio and MIDI data) from the PRIME drum module. -
Page 60: (4.0) Settings
PRIME’s Serial Number, as well as the Control Surface number. This menu also allows you to update PRIME’s firmware and perform a factory reset. Press the Up arrow in the bottom-left corner to see Credits, Legal Info, and Version Info. -
Page 61: (4.2) Wi-Fi
To connect PRIME to your local Wi-Fi network, tap the ON button at the top of the screen. Then, tap the local network that you would like to connect to. Tap the CONNECT button and enter the password for the network when prompted. -
Page 62: (4.4) Midi
(4.4) MIDI These settings determine how the PRIME drum module sends and receives MIDI information to and from external devices. MIDI Input MIDI Channel: This setting determines the MIDI channel(s) that PRIME will receive MIDI messages. Tap this field and turn the Main Encoder to select from channels 1–16, or All. -
Page 63: (4.5) Hardware
(4.5) Hardware Screen Screen Dimming: This setting determines how long it will take the screen to dim when it is untouched. Tap this field and select from Never, 1, 2, 5, or 10 minutes. Screen Brightness: This setting determines the brightness of the screen. Select Day (Bright) or Night (Dim). -
Page 64: (4.6) General
(4.6) General Collect Usage Statistics: Check this box to allow your usage statistics to be sent to us occasionally to improve the PRIME experience. Kit Edit Browsing Sample Import Auditioning: Select which output to use when auditioning kits. Select from Headphones, Main, Out 3,4, or Out 5,6. -
Page 65: (5.0) Troubleshooting
Out 1/2, Headphones, Assign Out 3/4, or Assign Out 5/6). My hi-hat pedal behaves in an opposite manner. • Connect the hi-hat pedal first, and then power on PRIME. My pad is triggering even when no pads are hit. •... - Page 66 (6.0) Appendix (6.1) Technical Specifications Trigger Inputs Type: Balanced 1/4” TRS or unbalanced 1/4” TS 1/4” (6.35 mm) Frequency Response: 20 Hz – 20 kHz (+0.2 dB) Dynamic Range: 111 dB (A-weighted) Signal-to-Noise Ratio: 110 dB (1 kHz, +4 dBu, A-weighted) THD+N: 0.003% (1 kHz, +4 dBu, -1 dBFS) Max Input Level: +20 dBu Input Impedance: 1 MΩ...
- Page 67 (6.2) Trademarks & Licenses Alesis is a trademark of inMusic Brands, Inc., registered in the U.S. and other countries. The Bluetooth word mark and logos are registered trademarks owned by Bluetooth SIG, Inc., and any use of such marks by Alesis is under license.
- Page 68 Manual Version 1.0...
Need help?
Do you have a question about the PRIME and is the answer not in the manual?
Questions and answers
can I set a user kit as a default that will load when turning on prime module?