Advertisement
The Melnor Two Zone AquaTimer allow you freedom and flexibility in watering your lawn and garden.
Battery Installation
Before you begin using your Melnor Two Zone AquaTimer, you will need to install four AA batteries. On the lower back of your AquaTimer is a small battery door with a tab. Push down on the tab and the door will slide off easily. Pull out the black battery holder that is inside the unit. Insert four AA batteries into the battery holder. Push the battery holder back into the unit and snap the battery door securely into place. As soon as the batteries are in the holder, you will hear the valves activate.
There is a small light at the bottom center of your AquaTimer, under which are written the words "Low Battery". The Low Battery light will flash when the charge in the batteries is low, and the valve(s) will close automatically, preventing over watering. The timer will cease operation until fresh batteries are installed.
Programming Your Unit

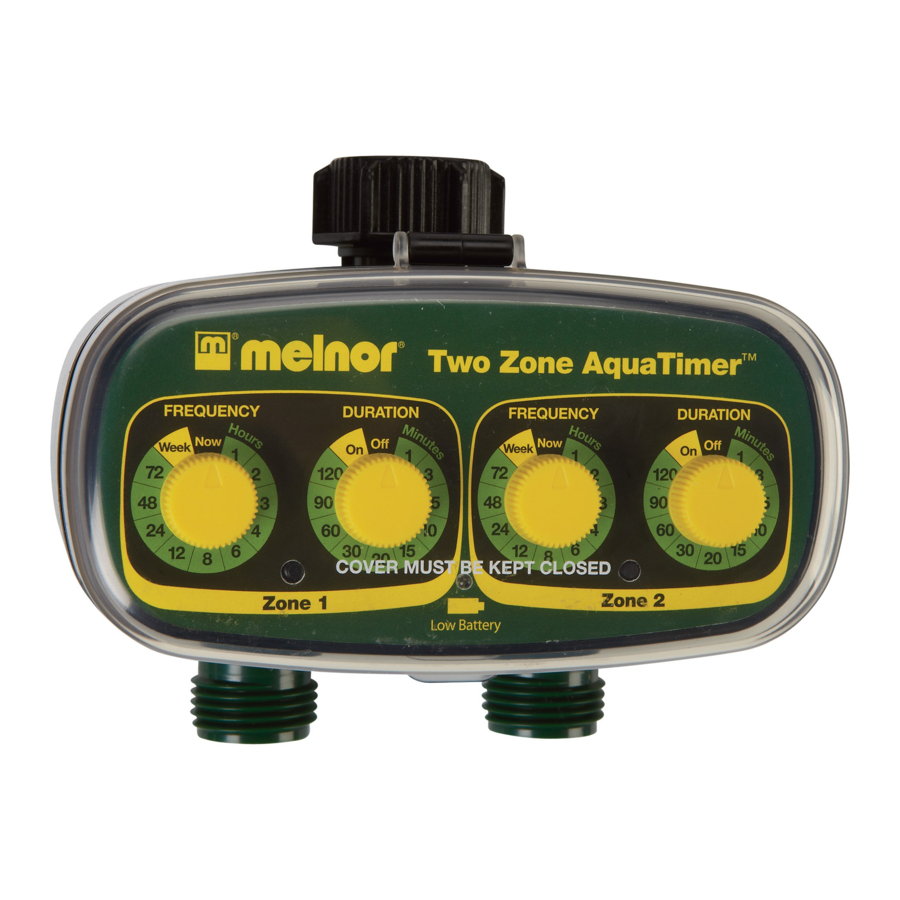
Your Melnor Two Zone AquaTimer has two valves, which makes it possible for you to automatically water two separate areas (or "zones") of your lawn or garden on two different watering schedules. Each zone is controlled by a Frequency knob and a Duration knob. The knobs can be rotated in either direction.
Each zone can be programmed independently. The first step is to set the watering frequency (How often do you want to water?). There are pre-set timing increments on the unit's Frequency knob from as often as once an hour to as little as once a week. Turn the yellow Frequency knob for Zone 1 and line up its arrow with the number on the green circle surrounding the knob that represents your desired watering frequency. You have just set the frequency of Zone 1.
The second step in programming your AquaTimer is setting the Duration (How long do you want to water?). There are pre-set increments on the unit's Duration knob starting with one minute per watering session going up to as long as 120 minutes per session. Turn the yellow Duration knob for Zone 1 so that its arrow is lined up with the number on the green circle surrounding the knob that represents the length of time for which you want the water to run. You have now set the duration of Zone 1.
Your AquaTimer will begin watering with the next scheduled watering cycle. Example: If you program the Frequency to 12, the AquaTimer will begin watering 12 hours after you program it and every 12 hours after that.
To program Zone 2, follow the same two steps that you have just completed for Zone 1. The two zones can be set for different frequencies and durations.
Your AquaTimer can be programmed while it is either attached or unattached to the faucet.
Installing the Device
At the top of your AquaTimer is what is known as a "coupler". Use the coupler to attach your timer to the outdoor faucet. Once you have attached the AquaTimer to the faucet, open the faucet valve and leave it open. At the bottom of your AquaTimer, there are two connectors onto which you can attach two hoses.
Manual On/Off
Your Melnor Two Zone AquaTimer allows you to water manually without removing your AquaTimer from the faucet. To turn on your AquaTimer, simply rotate the desired Duration knobs to the On position. Turn it back to the Off position when the watering is complete. You also can rotate the Duration knobs to the Off position if you want to cancel the current program. You might want to suspend the program if it rains, for example. If you do that, you will need to rotate the knobs back to the desired Duration to resume its programmed time.
Operating Tips
- Turn off the faucet if your AquaTimer will not be used for an extended period of time.
- Use only fresh alkaline batteries.
- Do not use rechargeable batteries.
- Replace the batteries at the beginning of each watering season.
- Remove the batteries at the end of each watering season or if your AquaTimer will not be used for an extended period of time.
- Do not expose your AquaTimer to temperatures at or below 32°F (0°C).
- To avoid damage to the faucet connection, do not tug on a hose while it is attached to your AquaTimer.
- Inside the coupler at the top of your AquaTimer is a filter washer. Clean the filter washer regularly to prevent clogging.
Frequently Asked Questions
Why the Low Battery light is flashing
The Low Battery light will flash to indicate that the charge in the batteries is low. Change the batteries.
Why the current program(s) will not run
The faucet might be off. Check to make sure the faucet is turned on.
Can I turn off the watering if it is going to rain?
Yes, you can turn off the watering by rotating the Duration knob to the Off position. Be sure to turn it back to the desired Duration time when you want to resume the program.
How do I create a new program?
Rotate the Frequency knob to Now and the Duration knob to Off. Follow the steps described under the section titled "Programming Your Unit".
Can I change the watering duration after a program has been set?
Yes, rotate the Duration knob to the desired duration. If the valve is currently open, it will close and then run the new duration at the next programmed time.
Delayed Watering
You can delay the first watering cycle of each watering zone by up to 12 hours by using the small button at the bottom middle of each zone area. Press the delay button 1 time for each hour you wish to delay the first start time. The "Low Battery" light will illuminate when you press the button. The maximum delay is 12 hours.
For example, if you are programming at 4:00 in the afternoon and you want your timer to water every 12 hours, but you want the first watering of the day to start at 6:00 a.m., press the Delay button two times. Without the delay, the first cycle would have occurred 12 hours after the timer is programmed (4:00 a.m.). The delay feature changes that to 6:00 a.m. The timer will then water every 12 hours after that.
Now Feature
If you would like to water immediately for a set amount of time, your AquaTimer can help. Turn the Frequency knob to "Now" and then set the Duration knob to indicate how long you want the water to run. For example, if you want to water your lawn or garden immediately and want the water to run for three minutes, turn the Frequency knob to Now and turn the Duration knob to 3. The valve will open and then automatically close after three minutes.
Designed for outdoor use only.
Designed for clean water use only.
Designed for residential use only.

Documents / ResourcesDownload manual
Here you can download full pdf version of manual, it may contain additional safety instructions, warranty information, FCC rules, etc.
Advertisement


Need help?
Do you have a question about the Two Zone AquaTimer and is the answer not in the manual?
Questions and answers