Sena R1 EVO User Manual
Smart cycling helmet
Hide thumbs
Also See for R1 EVO:
- User manual (32 pages) ,
- Quick start manual (19 pages) ,
- Quick start manual (17 pages)
Table of Contents
Advertisement
Quick Links
Advertisement
Table of Contents

Related Manuals for Sena R1 EVO


Summary of Contents for Sena R1 EVO
- Page 1 SENA R 1 EVO SMART CYCLING HELMET USER’S GUIDE Version 2.1.0 ENGLISH...
- Page 2 TABLE OF CONTENTS ABOUT THE R1 EVO SMART CYCLING HELMET 5 1.1 General Information 1.2 Product Details 1.3 Package Contents 1.4 Wearing the Helmet 1.4.1 How to Wear The Helmet 1.4.2 Helmet Fitment Check 1.5 Visor Installation GETTING STARTED: BLUETOOTH SYSTEM 2.1 Downloadable Sena Software...
- Page 3 6.3 Mic Enable/Disable (Default: Enable) 6.4 Channel Setting (Default: 1) 6.4.1 Using the Button 6.4.2 Using the Sena Cycling App LED TAILLIGHT 7.1 Using the SENA Button 7.2 Using the Sena Cycling App FUNCTION PRIORITY AND FIRMWARE UPGRADES 8.1 Function Priority 8.2 Firmware Upgrades...
- Page 4 TABLE OF CONTENTS CONTINUED CONFIGURATION SETTING 9.1 Bluetooth Configuration Setting 9.2 Software Configuration Setting 9.2.1 Headset Language 9.2.2 Voice Prompts (Default: Enable) 9.2.3 Advanced Noise Control™ (Always on) 10. TROUBLESHOOTING 10.1 Fault Reset 10.2 Factory Reset 11. MAINTENANCE AND CARE...
-
Page 5: General Information
It is important for you to understand everything communicated in them before your first ride. If you do not, please contact your authorized Sena Retailer with any questions you may have. Failure to follow any of the provided instructions or warnings could void your warranty, and most importantly, could result in severe personal injury or death. -
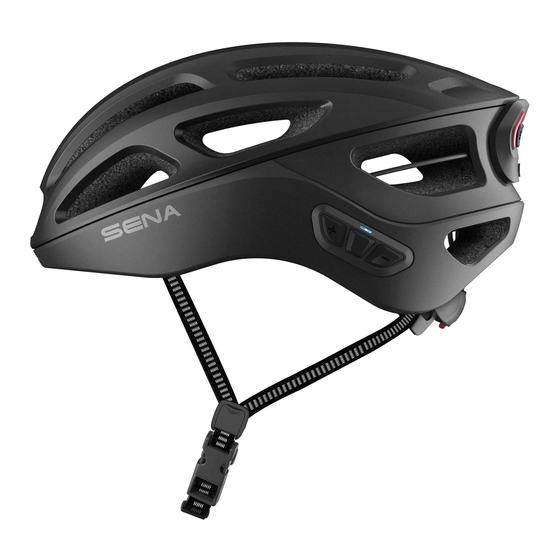
Page 6: Product Details
1 ABOUT THE R1 EVO SmART CyCling HElmET 1.2 Product Details Bluetooth System's Buttons (-) Button Blue/Red/green lED lights microphone Center Button (+) Button Speakers SEnA Button Fault Reset Button DC Power Charging & Firmware Upgrade Port 1.3 Package Contents R1 EVO Helmet USB Power &... -
Page 7: Wearing The Helmet
1.4.1 How to Wear The Helmet For proper use, the helmet must sit level on the head and low on the forehead. The Sena helmet uses a simple, quick-release buckle system that, once adjusted, can be buckled and unbuckled without changing the adjustment. - Page 8 If after adjustment the helmet does not fit properly, do not use the helmet. Return it to the retailer or Sena. R1 EVO Smart Cycling Helmet | 8...
- Page 9 1 ABOUT THE R1 EVO SmART CyCling HElmET 1.4.2 Helmet Fitment Check With the retention system knob turned clockwise until comfortably tight and the chinstrap buckled under the chin and back against the throat, grab the helmet with both hands and try to remove it by rolling the helmet forward and backward as far as you can.
-
Page 10: Visor Installation
1 ABOUT THE R1 EVO SmART CyCling HElmET 1.5 Visor Installation To protect your eyes from the sun or other bright lights, you can use the visor. 1. Peel off the cover of the adhesive tape of the hook fastener of visor. -
Page 11: Downloadable Sena Software
2.1 Downloadable Sena Software 2.1.1 Sena Cycling App By simply pairing your phone with your Bluetooth system, you can use the Sena Cycling App for quicker, easier set up and management. Sena Cycling • Download the Sena Cycling App on Google Play Store Store. -
Page 12: Button Function
Audible prompt 2.4 Powering On and Off Powering On Powering Off HOLD 2.5 Charging Charging the Bluetooth System Depending upon the charging method, the Bluetooth system will be fully charged in about 3 hours. R1 EVO Smart Cycling Helmet | 12... -
Page 13: Checking The Battery Level
• Please make sure to take off your helmet while charging. The Bluetooth system automatically turns off during charging. • Any 3rd party USB charger can be used with Sena products if the charger is approved by either the FCC, CE, IC, or other locally approved agencies. -
Page 14: Volume Adjustment
2 GETTING STARTED: BLUETOOTH SYSTEM 2.7 Volume Adjustment Volume is set and maintained independently at different levels for each audio source, even when the Bluetooth system is rebooted. Volume up Volume down R1 EVO Smart Cycling Helmet | 14... -
Page 15: Phone Pairing
1. Press and hold the Center Button and the (+) Button for 1 second. Blinking HOLD “Phone pairing” 2. Select R1 EVO in the list of Bluetooth devices detected. If your Bluetooth mobile phone asks for a PIN, enter R1 EVO 0000. - Page 16 • The phone pairing mode lasts for 3 minutes. • To cancel phone pairing, tap the Center Button. 3.1.2 Pairing When the R1 EVO is Turned Off 1. While the Bluetooth system is off, press and hold the Center Button and the (+) Button until the LED flashes red and blue alternately and you hear a voice prompt, “Phone pairing.”...
- Page 17 1. Press and hold the Center Button for 10 seconds. HOLD “Configuration menu” 2. Tap the (+) Button. Blinking “Second mobile phone pairing” 3. Select R1 EVO in the list of Bluetooth devices detected. If your Bluetooth Bluetooth device asks for a PIN, R1 EVO enter 0000. Device B...
-
Page 18: Mobile Phone Usage
This feature increases the quality so that the audio will be crisp and clear during phone call conversations. Note: Refer to the manufacturer of your Bluetooth device that will be connected to the Bluetooth system to see if it supports HD Voice. R1 EVO Smart Cycling Helmet | 18... -
Page 19: Bluetooth Stereo Music
5. STEREO MUSIC 5.1 Bluetooth Stereo Music Play/Pause Music Volume Up/Down HOLD Next Track Previous Track HOLD HOLD R1 EVO Smart Cycling Helmet | 19... -
Page 20: What Is Mesh Intercom
Mesh Intercom allows users to connect and communicate with nearby users without the need to pair each Bluetooth system together. The working distance between each R1 EVO in Mesh Intercom can be up to 900 meters (0.5 miles) in open terrain. In open terrain, the Mesh can be extended up to 3.6 km (2.0 miles) between a minimum of 6 users. - Page 21 6 MESH INTERCOM 6.2 Starting Mesh Intercom When Mesh Intercom is enabled, the R1 EVO will automatically connect to nearby R1 EVO users and allow them to talk to each other. Mesh Intercom On Mesh Intercom Off “Mesh intercom on”...
- Page 22 • If you do not press any button within for approximately 10 seconds in a specific channel, the channel will be automatically saved. • The channel will be remembered even if you turn off the R1 EVO. 6.4.2 Using the Sena Cycling App You can select the channel through the Sena Cycling App.
- Page 23 LED On and Solid Night Flash Day Flash LED Off Note: Do not tap the button continuously. 7.2 Using the Sena Cycling App You can control the LED Taillight through the Sena Cycling App. R1 EVO Smart Cycling Helmet | 23...
-
Page 24: Function Priority
A lower priority function is always interrupted by a higher priority function. Firmware Upgrades The Bluetooth system supports firmware upgrades. You can upgrade the firmware using the Sena Device Manager. Click Here to Visit sena.com R1 EVO Smart Cycling Helmet | 24... -
Page 25: Software Configuration Setting
Factory Reset Execute Exit Configuration Execute Software Configuration Setting You can change the settings of the Bluetooth system through the Sena Device Manager or the Sena Cycling App. Sena Cycling Sena Device Manager R1 EVO Smart Cycling Helmet | 25... - Page 26 You can disable Voice Prompts by software configuration settings, but the following voice prompts are always on. - Bluetooth system configuration settings menu, battery level indicator 9.2.3 Advanced Noise Control™ (Always on) The background noise is reduced during an intercom conversation. R1 EVO Smart Cycling Helmet | 26...
-
Page 27: Troubleshooting
When the Bluetooth system is not working properly, you can easily reset the unit: 1. Locate the pinhole reset button below Sena logo at the back side of the helmet. 2. Gently insert a paper clip into the hole and press the Fault Reset Button for 1 second with light pressure. -
Page 28: Maintenance And Care
The protective capability of your helmet will diminish over time, dependent upon many factors such as dents, dings, and exposure to pollution, harmful chemicals and long term exposure to the sun. Sena recommends that helmets be replaced after five years. - Page 29 ® Bluetooth capabilities. The Bluetooth word mark and logos are owned by the Bluetooth ® SIG, Inc. and any use of such marks by Sena is under license. iPhone ® and iPod touch are registered trademarks of Apple Inc. ®...
Need help?
Do you have a question about the R1 EVO and is the answer not in the manual?
Questions and answers