Advertisement
Quick Links
Advertisement

Related Manuals for 5K PILATES FD2303


Summary of Contents for 5K PILATES FD2303
- Page 1 FD2303 Pilates Reformer W/ Tower Assembly Instruction & User Manual...
-
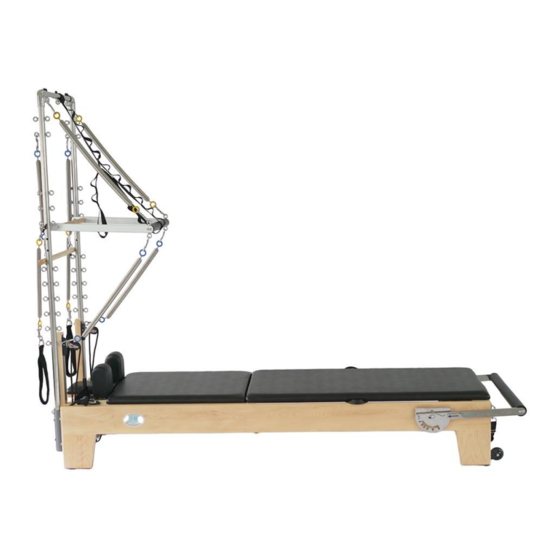
Page 2: Product Introduction
2 yellow light resistance(19lb) l Size: 90 ̎ 27 ̎ 15 ̎ (228.5 68.5 39CM) l Net weight: 282lb(128kg) l Gross Weight: 412lb(187kg) l Pack size: 99 ̎ 31 ̎ 21 ̎ (251.8 79.3 53.5CM) l Packaging: Plywood Box FD2303 Reformer Map:... -
Page 3: Before Assembly
Before Assembly Unpacking the FD2303 reformer,you will receive the frame and all needed accessories as below. l Frame: l Accessories:... - Page 4 Assembly Procedure(Part 1) Start assemble each accessories with following steps. l Step 1: Install Rope Riser The star nut is inserted into the rope riser and then into hollow at the end of the bed.you can adjust the rope at different height through the ropeway.
- Page 5 l Step 3: Install The Jumpboard First, adjust hand lever to the third gear, this is very important, then the stainless steel face toward yourself, vertically down, and then fixed with nuts. Use the jumpboard must have a hand bar as a support. Fig9 Fig10 Fig11...
- Page 6 Fig15 Fig16 l Step 5: Attaching The Ropes Thread one end of the rope into the rope pulley, extending into the rope holder and buckle, and place the silent straps & ropes on the rope holder. Fig17 Fig18 Fig19 l Step 6: Hang The Silent Foot Strap Fig20 Fig21 Fig22...
- Page 7 l Step 7: Working With Springs The reformer bed is fitted with 6 springs in 3strengths to offer a wide range of possible resistances. red=strongX2,blue=mediumX2,yellow=light X2 the springs can be used in any combination, although when using the reformer for asymmetric exercises. In addition, the spring has three rows of hangers, which you can hang in any row to achieve the effect of your practice. ...
- Page 8 Warning: In the process of use, if you find any screws loose, please be sure to fix the screws again first. l Step 9: Moving Your Reformer This Reformer bed has two wheels, which is made for easy handling. When you need to move it, please lift the tail and move it easily against the wheel.
- Page 9 Fig1 Fig2 Fig3 l Step 2: Build The Tower Shelf Find 2 long steel pipes, 1 short steel pipe, 2 screws, connect the two long steel pipes to the short steel pipe, align the holes, and then use a screwdriver to fix all the screws.Finally, insert the shelf into the aluminum tube and fix the 6 screws with a screwdriver.
- Page 10 Fig6 Fig7 Fig8 l Step 3: Install The U-push Rod Pick up the latch, hold down the end of the latch with your thumb, align the hole of the U-bar and the hole of the steel pipe, insert it, and then relax your thumb. Fig9 Fig10 Fig11...
- Page 11 First, you can take two long blue springs and hang them on the top hook of the bar, and then take two long yellow springs and hang them on the bottom hook of the bar.Then picked up two short blue springs and hung them on the hook above the pole, with a stick attached to each end of the spring.
-
Page 12: Periodic Maintenance
l Step 5: Put up Safety Line Fig13 Fig14 l Step 6: Put a Tile Version Push the slide bed to the end of the reformer bed first and gently place the tile version on the reformer bed. Fig15 Fig16 Fig17 Periodic Maintenance Always check the apparatus before first use and again affer each... - Page 13 Frame The main material of the FD2303 is a special grade maple, maple is characterized by high hardness, high appearance level and strong stability. The wood has been polished at least six times and coated with a thick layer of wood wax oil, which effectively protects the wood from air corrosion. But you should...
- Page 14 l Loops &Handles Check all stitching for wear or damage and replace immediately as needed. l Ropes Check for wear and replace if worn or frayed. l Feet Level Check that the reformer is level and all the feet are in contact with the ground as this will affect stability.
- Page 15 Safety rope Before using the safety rope, please ensure that the safety rope is not broken. Congratulations! You are now ready to use your FD2303 Reformer. We hope that you can enjoy using your new Reformer. Have a good time!...
- Page 16 Secure the carriage with at least one spring when your Reformer is not in use, do not get on the carriage when there are no springs attached unless you deliberately want to do this. When standing on the reformer always put your first foot an the satnding platform and then the other on the carriage.when getting off the reformer from standing take your foot off the carriage first and then step down off the standing platform.
- Page 17 Do not allow children to use or be around equipment without adult supervision. If standing the equipment for storage, be sure it is kept in a safe place, on level ground and away from children.
Need help?
Do you have a question about the FD2303 and is the answer not in the manual?
Questions and answers