Table of Contents
Advertisement
Download the app
& activate product
Warning notices: Before using this product, please read this manual carefully and keep it for future reference.
The design and specifications are subject to change without prior notice for product improvement. Consult
with your dealer or manufacturer for details.
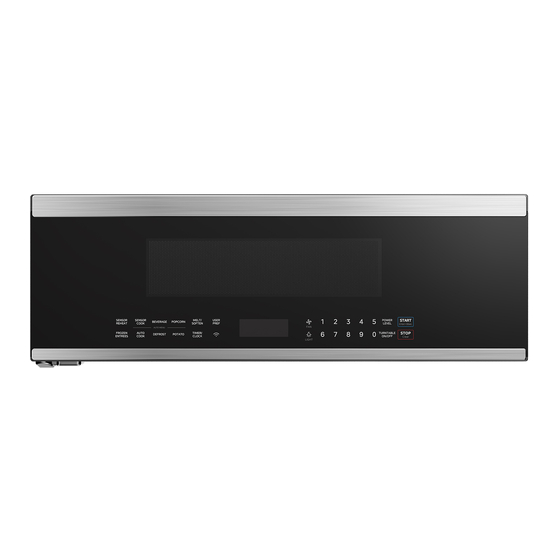
The diagram above is just for reference. Please take the appearance of the actual product as the standard.
OVER THE RANGE MICROWAVE
USER MANUAL
MMO12S3AST
Advertisement
Table of Contents

Related Manuals for Midea MMO12S3AST


Summary of Contents for Midea MMO12S3AST
- Page 1 OVER THE RANGE MICROWAVE USER MANUAL MMO12S3AST Download the app & activate product Warning notices: Before using this product, please read this manual carefully and keep it for future reference. The design and specifications are subject to change without prior notice for product improvement. Consult with your dealer or manufacturer for details.
-
Page 2: Table Of Contents
THANK YOU LETTER Thank you for choosing Midea! Before using your new Midea product, please read this manual thoroughly to ensure that you know how to operate the features and functions that your new appliance offers in a safe way. -
Page 3: Safety Instructions
SAFETY INSTRUCTIONS SAFETY INSTRUCTIONS Intended Use The following safety guidelines are intended to prevent unforeseen risks or damage from unsafe or incorrect operation of the appliance. Please check the packaging and appliance on arrival to make sure everything is intact to ensure safe operation. If you find any damage, please contact the retailer or dealer. - Page 4 PRECAUTIONS TO AVOID POSSIBLE EXPOSURE TO EXCESSIVE MICROWAVE ENERGY a. Do not attempt to operate this oven with the door open since open door operation can result in harmful exposure to microwave energy. It is important not to defeat or tamper with the safety interlocks.
- Page 5 IMPORTANT SAFETY INSTRUCTIONS When using electrical appliances basic safety precautions should be followed, including the following: WARNING To reduce the risk of burns, electric shock, fire, injury to persons or exposure to excessive microwave energy: • Read all instructions before using the appliance. •...
- Page 6 facility for examination, repair, or adjustment. • Do not cover or block any openings on the appliance. • Do not store this appliance outdoors. Do not use this product near water - for example, near a kitchen sink, in a wet basement, near a swimming pool, or similar location.
- Page 7 LIQUID. To reduce the risk of injury to persons: - Do not overheat the liquid. - Stir the liquid both before and halfway through heating it. - Do not use straight-sided containers with narrow necks. - After heating, allow the container to stand in the microwave oven for a short time before removing the container.
- Page 8 GROUNDING INSTRUCTIONS This appliance must be grounded. In the event of an electrical short circuit, grounding reduces the risk of electric shock by providing an escape wire for the electric current. This appliance is equipped with a cord having a grounding wire with a grounding plug. The plug must be plugged into an outlet that is properly installed and grounded.
- Page 9 • A short power-supply cord is provided to reduce the risks resulting from becoming entangled in or tripping over a longer cord. • Longer cord sets or extension cords are available and may be used if care is exercised in their use. •...
- Page 10 RADIO INTERFERENCE • Operation of the microwave oven may cause interference to your radio, TV or similar equipment. • When there is interference, it may be reduced or eliminated by taking the following measures: - Clean door and sealing surface of the oven - Reorient the receiving antenna of radio or television.
- Page 11 UTENSILS CAUTION Personal Injury Hazard Tightly-closed utensils could explode. Closed containers should be opened and plastic pouches should be pierced before cooking. See the instructions on “Materials you can use in microwave oven or to be avoided in microwave oven." There may be certain non-metallic utensils that are not safe to use for microwaving.
- Page 12 Materials You Can Use In Microwave Oven Utensils Remarks Follow manufacturer’s instructions. The bottom of browning Browning dish dish must be at least 3/16 inch (5mm) above the turntable. Incorrect usage may cause the turntable to break. Microwave-safe only. Follow manufacturer's instructions. Do Dinnerware not use cracked or chipped dishes.
-
Page 13: Specification
SPECIFICATION MODEL MMO12S3AST 120 V~ 60 Hz POWER SUPPLY RATED INPUT (Microwave) 1500 W RATED OUTPUT (Microwave) 1000 W EN-12... -
Page 14: Product Overview
PRODUCT OVERVIEW Control Panel NOTE You can also control the oven by app control and voice control. App control: Download the SmartHome first, then connect the app with your oven by the insert of SmartHome APP connection guide. Voice control: Ensure that there is an Alexa or Google speaker in your home, and then microwave oven and speakers are connected to the home wireless network, then connect them by the insert of Alexa &... -
Page 15: Product Installation
PRODUCT INSTALLATION Important Safety Instructions This product requires a three-prong grounded outlet. The installer must perform a ground continuity check on the power outlet box before beginning the installation to ensure that the outlet box is properly grounded. If not properly grounded, or if the outlet box does not meet electrical requirements noted (under ELECTRICAL REQUIREMENTS), a qualified electrician should be employed to correct any deficiencies. - Page 16 Ensure proper ground exists before use The power cord of this appliance is equipped with a three-prong (grounding) plug which mates with a standard three-prong (grounding) wall receptacle to minimize the possibility of electric shock hazard from this appliance. You should have the wall receptacle and circuit checked by a qualified electrician to make sure the receptacle is properly grounded.
- Page 17 Parts Included HARDWARE PACKET PART QUANTITY Wood Screws ( ⁄ " x 2") Toggle Bolts (and wing nuts) ⁄ " x 3") Self-Aligning Machine Screws ⁄ "-28 x 3 ⁄ ") Nylon Grommet (for metal cabinets) You will find the installation hardware contained in a packet with the unit. Check to make sure you have all these parts.
- Page 18 Exhaust adaptor Glass Tray Turntable Ring Tools You Will Need Tape measure #1 Phillips screw driver Hole saw Electric drill Stud finder or hammer 3/16", 1/2", 5/8" drill bit Level Filler wood blocks for recessed bottom cabinets Duct and masking tape Scissors Tin snips EN-17...
- Page 19 Mounting Space Mounting Space ¼ " Min 1 3.8" Max Clearance (35 cm) 13 .8" MAX . (35 cm) Cabinet " (61cm) min. Backsplash Cabinet 1. The space between the cabinets must be 30" (76.2 cm) wide and free of obstructions. 2.
- Page 20 Small Hardware Bag Exhaust Adapter Filters and Turntable Ring below glass tray Glass Tray 2. Fold back all 4 carton flaps fully against carton sides. Then carefully roll the oven and carton over onto the top side. The oven should be resting in the Styrofoam. Carton Styrofoam 3.
- Page 21 B. FINDING THE WALL STUDS Wall Studs Center 1. Find the studs, using one of the following methods: A. Stud finder – a magnetic device which locates nails. B. Use a hammer to tap lightly across the mounting surface to find a solid sound. This will indicate a stud location.
- Page 22 Plate position-beneath framed recessed cabinet bottom 1/4" Minimum clearance to Cooktop Draw a vertical line on the wall at the center of the 30" space. Tape the Rear Wall Template onto the wall matching the centerline and touching the bottom cabinet frame. Plate position-beneath recessed bottom cabinet with front overhang 1/4"...
- Page 23 D. ALIGNING THE WALL PLATE 3/8" TO EDGE Horizontal Line Hole A Area E Horizontal Line Draw a horizontal line on wall at the bottom of “Rear Wall Template”. 1. Draw a vertical line on the wall at the center of the 30" wide space. 2.
- Page 24 NOTE: This microwave is shipped assembled for Recirculating. Select the type of ventilation required for your installation and proceed to that section. A. RECIRCULATING (NON-VENTED DUCTLESS) See page 24 Models are shipped for recirculating exhaust. Some have a models disposable charcoal filter installed to help remove smoke and odors.
- Page 25 C. OUTSIDE TOP EXHAUST (VERTICAL DUCT) Adaptor in Place for Outside Top Exhaust See page 39 NOTE: Read the pages 31-34 only if you plan to vent your exhaust to the outside. If you plan to recirculate the air back into the room, proceed to page 24-26. A.
- Page 26 A1. ATTACH THE MOUNTING PLATE TO THE WALL Attach the plate to the wall using toggle bolts. At least one wood screw must be used to attach the plate to a wall stud. NOTE: If the cabinet depth including the cabinet doors is more than 13" then the unit must be spaced out from wall using adequate materials supporting 150 Ibs to allow proper top vent air exhaust/intake.
- Page 27 NOTE: Before tightening toggle bolts and wood screw, make sure the bottom of the mounting plate touch the bottom of the cabinet when pushed flush against the wall and that the plate is properly centered under the cabinet. CAUTION: Be careful to avoid pinching fingers between the back of the mounting plate and the wall.
- Page 28 1. Place the microwave in its upright position, with the top of the unit facing up. 2. Check to see that the blower plate and cover plate are correctly installed on the unit. A4. MOUNT THE MICROWAVE OVEN FOR EASIER INSTALLATION AND PERSONAL SAFETY, WE RECOMMEND THAT TWO PEOPLE INSTALL THIS MICROWAVE OVEN.
- Page 29 3. Insert a self-aligning screw through top center cabinet hole. Temporarily secure the oven by turning the screw at least two full turns after the threads have engaged. (It will be completely tightened later.) Be sure to keep power cord tight. Be careful not to pinch the cord, especially when mounting flush to bottom of cabinet.
- Page 30 A5. INSTALLING OR CHANGE THE CHARCOAL FILTER (Some Models) NOTE: The charcoal filter is factory installed in some models. Refer to the Use and Care to see if yours is factory installed and for replacement information. For models without the recirculation filter access door,follow these steps to replace or install a charcoal filter.
- Page 31 Installation Instructions For External Exhaust Ducting NOTE: 1 ⁄4 If you need to install ducts, note that the total duct length of 3 " x 10" (8.2 x 25.4 cm) rectangular or 5" (12.7 cm)diameter/ 6" (15.2 cm) diameter round duct should not exceed 140 equivalent feet (42.7 m).
- Page 32 45° Elbow 5 Ft. (1.5 m) Ft. or m Roof Cap 24 Ft. (7.3 m) Ft. or m Straight Duct 6" (15.2 cm) Round or 3 1 ⁄4 " x 10" 1 Ft. (0.3 m) Ft. or m (8.2 x 25.4 cm Rectangular) Total Ductwork Ft.
- Page 33 * IMPORTANT: If a rectangular-to-round transition adaptor is used, the bottom corners of the damper will have to be cut to fit, using the tin snips, in order to allow free movement of the damper. OUTSIDE BACK EXHAUST (EXAMPLE ONLY) The following chart describes an example of one possible ductwork installation.
- Page 34 B. OUTSIDE BACK EXHAUST (Horizontal Duct) INSTALLATION OVERVIEW B1. Prepare Rear Wall B2. Remove Blower Plate B3. Attach Mounting Plate to Wall B4. Prepare Top Cabinet B5. Adjust Blower B6. Mount the Microwave Oven IMPORTANT NOTES: 1. Make sure the screws for the blower motor and blower plate are securely tightened when they are reinstalled.
- Page 35 1. Read the instructions on the REAR WALL TEMPLATE. 2. Tape it to the rear wall. 3. Cut the opening, following the instructions of the REAR WALL TEMPLATE. B2. REMOVE BLOWER PLATE Remove and save the screws that hold the blower plate to the microwave. Lift off the blower plate.
- Page 36 To use toggle bolts: Spacing for Toggles More Than Wall Thickness Toggle Wings Mounting Toggle Plate Bolt Wall Bolt End 3. Place the mounting plate against the wall and insert the toggle wings into the holes in the wall to mount the plate. NOTE: Before tightening toggle bolts and wood screw, make sure the bottom of the mounting plate touch the bottom of the cabinet when pushed flush against the wall and that the...
- Page 37 B5. ADAPTING MICROWAVE AIR DIRECTOR FOR OUTSIDE BACK EXHAUST 1. Carefully pull out the air director. Before: Openings Facing Forward Air Director 2. Rotate the air director counterclockwise 180° Before Rotation After Rotation 3. Remove the knockout plate in the back of the unit with snips. (For some models) Knockout Plate: Snip all 12 webs on the knockout panel and remove the...
- Page 38 5. Secure the blower plate to the microwave with the original screws. Blower Plate Cover Plate Back of Microwave 6. Attach the exhaust adaptor to the rear of the oven by sliding it into the guides at the top center of the back of the oven. Adaptor Back of Microwave...
- Page 39 NOTE: If your cabinet is metal, use the nylon grommet around the power cord hole to prevent cutting of the cord. NOTE: We recommend using filler blocks if the cabinet front hangs below the cabinet bottom shelf. IMPORTANT: If filler blocks are not used, case damage may occur from overtightening screws.
- Page 40 5. Insert 2 self-aligning screws through outer top cabinet holes. Turn two full turns on each screw. 6. Tighten the outer two screws to the top of the microwave oven. (While tightening screws, hold the microwave oven in place against the wall and the top cabinet.) 7.
- Page 41 IMPORTANT NOTES: 1. Make sure the screws for the blower motor and blower plate are securely tightened when they are reinstalled. This will help to prevent excessive vibration. 2. Make sure the motor wiring has been properly routed and secured, and that the wires are not pinched.
- Page 42 NOTE: Before tightening toggle bolts and wood screw, make sure the bottom of the mounting plate touch the bottom of the cabinet when pushed flush against the wall and that the plate is properly centered under the cabinet. CAUTION: Be careful to avoid pinching fingers between the back of the mounting plate and the wall.
- Page 43 C3. ADAPTING MICROWAVE AIR DIRECTOR FOR OUTSIDE TOP EXHAUST 1. Remove the four screws that hold the blower plate to the microwave. Take off the cover plate after removing the center screw. Cover Plate Blower Plate Back of Microwave 2. Carefully pull out the air director. Before: Openings Facing Forward Air Director...
- Page 44 4. Place the air director back into the opening. AFTER: Air Director Openings Facing Back 5. Replace blower plate with the screws removed Step 1. Make sure the screws are tight. Back of Microwave 6. Attach the exhaust adaptor to the top of the blower plate by sliding it into the guides of the blower plate.
- Page 45 C4. CHECK FOR PROPER DAMPER OPERATION Blower Plate Exhaust Adaptor Damper Back of Microwave 1. Make sure tape securing damper is removed and damper pivots easily before mounting microwave. 2. You will need to make adjustments to assure proper alignment with your house exhaust duct after the microwave is installed.
- Page 46 NOTE: When mounting the microwave oven, thread power cord through hole in bottom of top cabinet. Keep it tight throughout Steps 1. Lift microwave, tilt 1–3. Do not pinch cord or it forward, and hook lift oven by pulling cord. slots at back bottom edge onto four lower tabs of mounting...
- Page 47 4. Attach the microwave oven to the top cabinet. Insert 2 self-aligning screws through outer top cabinet holes. Turn two full turns on each screw. 6. Tighten the outer two screws to the top of the microwave oven. (While tightening screws, hold the microwave oven in place against the wall and the top cabinet.) 7.
- Page 48 C7. CONNECTING DUCTWORK House Duct 1. Extend the house duct down to connect to the exhaust adaptor. 2. Seal exhaust duct joints using furnance duct tape for high temperature applications. Before You Use Your Microwave 1. Make sure the microwave oven has been installed according to instructions. EN-47...
- Page 49 2. Remove all packing material from the microwave oven. 3. Install turntable ring and glass tray in cavity. 4. Plug power cord into a seperate and dedicated 15- to 20-amp electrical outlet. Ensure proper ground exists before use 5. Replace house fuse or turn breaker back on. EN-48...
- Page 50 6. Read the User Manual. 7. KEEP USER MANUAL FOR THE LOCAL INSPECTOR’S USE. EN-49...
-
Page 51: Operation Instructions
OPERATION INSTRUCTIONS Setting The Clock In standby mode. • In intitial power up state, if the clock has not been set, suppose you want to set the current time to 10:59. Touch : Display Shows: Setting Kitchen Timer The maximum value of timer is 99:99. In standby or cooking mode. - Page 52 Microwave In standby, clock or timer mode. • Suppose you want to cook for 2 minutes at 90% power Touch : Display Shows: MICRO. MICRO. Time counting down POWER CHART PRESS POWER LEVEL DISPLAY POWER LEVEL x 1 100% PL-HI POWER LEVEL x 2 or 9 PL-90 POWER LEVEL x 3 or 8...
- Page 53 Popcorn In standby, clock mode. • Suppose you want to cook 3.0 oz popcorn. Touch : Display Shows: PRESS AGAIN FOR OPTIONS / PRESS START Time counting down (2 seconds later) Press POPCORN pad Amount 3.3 oz 3.0 oz Potato In standby, clock or timer mode.
- Page 54 Press SENSOR COOK Food Amount Frozen Veggies 6-16 oz Fresh Veggies 4-16 oz Chicken 7-18 oz Fish 7-18 oz Frozen Pizza 6-12 oz Frozen Lasagna 6-32 Oatmeal 2-4 eggs Omelet 40-80 g Soup 1-2 cups (250ml/cup) Beverage In standby or clock mode. •...
- Page 55 Sensor Reheat The weight of these menus cannot be adjust; (Dinner Plate, Soup / Sauce, Casserole / Lasagna) In standby or clock mode. • Suppose you want to cook the soup sauce . Touch : Display Shows: PRESS AGAIN FOR OPTIONS / PRESS START PRESS AGAIN FOR OPTIONS / PRESS START Press SENSOR REHEAT Food...
- Page 56 PRESS START Time counting down (2 seconds later) Press MELT/SOFTEN pad Food Amount Melt Butter 1/2 stick Melt Chocolate 2/4/8 oz Soften Ice Cream 1 Pint/1.5 Quart (3 Pint) Soften Cream Cheese 3/8 oz Auto Cook The weight of these menu can be set. Scrambled Eggs, Hot Cereal, Frozen Pizza •...
- Page 57 The weight of these menu cannot be set. Fudge Brownies, Garlic Shrimp, Stuffed Mushrooms, Asiago Red Potatoes, Roasted Vegetable Medley, Lemon Shrimp Risotto • Suppose you want to cook the fudge brownies. Touch : Display Shows: PRESS AGAIN FOR OPTIONS / PRESS START PRESS AGAIN FOR OPTIONS / PRESS START PRESS AGAIN FOR OPTIONS / PRESS START Time counting down...
- Page 58 Weight Defrost In standby, clock or timer mode. • Suppose you want to set the defrost weight for 1.2 lb. Touch : Display Shows: PRESS AGAIN FOR OPTIONS / DEFR. DEFR. DEFR. Time counting down (2 seconds later) NOTE The vaild range of the weight is 0.1~6.0 lbs. Time Defrost In standby, clock or timer mode.
- Page 59 Speedy Cooking NOTE If the oven door didn't be opened and closed or the time of door closed was more than 5 minutes once the oven firstly plugged into outlet, "FOOD" will appear, so you can open then close the door firstly before operate the oven.
- Page 60 Vent Fan The pad controls the 2-speed vent fan. If the vent fan is OFF, the first touch of the vent pad will turn the fan on HIGH, second touch LOW and third touch OFF. Touch : Display Shows: Light The pad controls the 2-luminance light.
- Page 61 Inquring Function If the clock or timer has been set, the corresponding time will display for 2 seconds by pressing "TIMER/CLOCK" in the cooking state. USER PREF Setting USER PREF x1 Volume Low/Med/High/Off USER PREF x2 Weight lb/kg Clock Display Off/On USER PREF x3 Demo Mode USER PREF x4...
- Page 62 Weight (lbs / kg) If the unit is "KG", switch to "Lb". In standby mode: Touch : Display Shows: PRESS AGAIN FOR OPTIONS / PRESS START NOTE You can switch the unit to "KG" by operating step 1~2 again. Clock Display O /On In "clock display on"...
- Page 63 NOTE You can set "demo off" by operating step 1~2 again. Connect The Network Press and hold " " for 3 seconds till a beep sounds, the display will show "AP" and wireless network icon will flash. If connection is successful, oven will return to standby mode and the ireless network icon will keep on.
-
Page 64: App Setup And Operation
APP SETUP AND OPERATION Quick Start Guide Download the app & activate product EN-63... -
Page 65: Trouble Shooting
TROUBLE SHOOTING Check your problem by using the chart below and try the solutions for each problem. If the microwave oven still does not work properly, contact the nearest authorized service center. TROUBLE POSSIBLE CAUSE POSSIBLE REMEDY • Electrical cord for oven is •... -
Page 66: Trademarks, Copyrights And Legal Statement
Midea may constitute trademark infringement or unfair competition in violation of relevant laws. This manual is created by Midea and Midea reserves all copyrights thereof. No entity or individual may use, duplicate, modify, distribute in whole or in part this manual, or bundle or sell with other products without the prior written consent of Midea. -
Page 67: Data Protection Notice
European Economic Area. Further information are provided on request. You can contact our Data Protection MideaDPO@midea.com. To exercise your rights such as right to object your Officer via personal date being processed for direct marketing purposes, please contact us via MideaDPO@midea.com. - Page 68 PN:16170000A99024...
Need help?
Do you have a question about the MMO12S3AST and is the answer not in the manual?
Questions and answers
What is the grease filter size