
Related Manuals for X10 VANGUARD VK77A


Summary of Contents for X10 VANGUARD VK77A
- Page 1 ™ ANGUARD ROFESSIONAL AMERA YSTEM VK77A ODEL NCLUDES ANGUARD AMERA (CR15A) EMOTE ONTROL OWNER’S MANUAL (Please keep for future reference) (XC21A)
-
Page 2: Table Of Contents
You can operate the camera through walls using the supplied remote control. The camera uses X10’s 2.4 Gigahertz wireless technology to transmit live video through walls to a television up to 100 feet away. If you prefer a secure video connection, you can use a video cable to connect the camera directly to your TV. -
Page 3: Basic Camera Setup
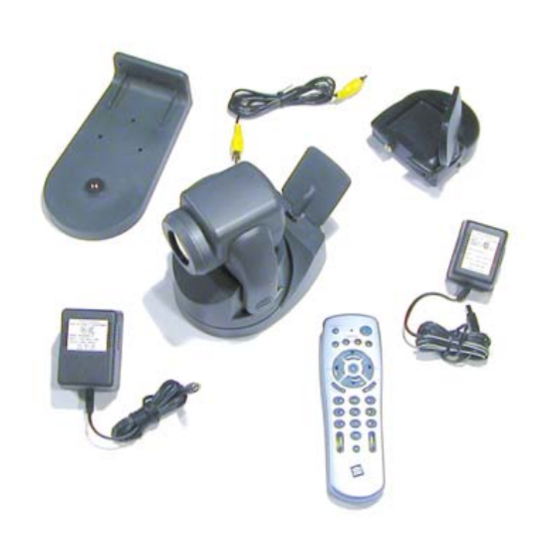
ASIC AMERA ETUP Your Vanguard Camera is ready to go out of the box! Follow these steps for a quick setup of your new camera. Unpack these items. You should have: the camera and its power supply; the camera remote; the camera mounting bracket, and the screws to install the bracket. - Page 4 Basic Camera Setup Insert batteries into the remote. Remove the battery cover and put four (4) AAA batteries into the camera remote. Make sure to match the batteries to the + and – marks inside the battery case. Basic Camera Setup Connect the wireless video receiver to power.
- Page 5 Basic Camera Setup Basic Camera Setup Connect the video receiver to your TV. Turn on the video receiver. Connect the video cable into the video-out jack on the video receiver Make sure the power switch on the video receiver is set to “ON.” and into the video-in jack on your TV.
- Page 6 Turn on your TV. Turn on your TV and select its video input. Use the Video or Select buttons on your TV remote control, or try channel 0 and then Channel Down. The camera’s picture should appear. Basic Camera Setup Fine tune the antennas.
-
Page 7: Basic Camera Operation
ASIC AMERA PERATION Once you have the camera set up, you’re ready to start using it. It’s easy to get started. Here’s how you use the remote to control the camera: Select the camera Press C1 to select the camera. Move the camera Use the arrow buttons to turn the camera left... -
Page 8: Secure Video Connection Setup
You can store up to nine positions in your camera. Here’s how: 1. Press and release C1. 2. Press and hold the Setup button on your remote control until the C1 button lights green. 3. Move the camera to the position you want to store. Press Autofocus to set the focus for that position. -
Page 9: Clearing Positions
Remote Control Features Clearing Stored Positions You can delete all stored positions. Here’s how: 1. Press and release C1. 2. Press and hold Setup until the C1 button lights green. 3. Press Center. 4. Press Setup again. Focus Controls In addition to the auto focus feature, you can control the focus of the camera manually. -
Page 10: Picture Orientation
2. Set the mode switch on the bottom of that camera to Program. 3. Press C2 on your remote control to set this camera to C2. 4. Set the mode switch back to Transmit Enable. -
Page 11: Advanced Setup Options
Put the mode switch back to Transmit Enable (or Transmit Disable if you are using the secure video connection). To learn how to use the remote to control your X10 lights, see page 39. Changing Unit Codes for Buttons C1, C2, C3, and C4 The Vanguard Remote comes set to control cameras set to units 1 through 4. -
Page 12: Advanced Onscreen Menu Options
Advanced Setup Options Recording with a VCR Whether you have set up your camera to use the wireless receiver or the secure video connection, you can configure your Vanguard Camera so that you can record its video signal on your VCR. It’s easy: 1. - Page 13 Advanced Onscreen Menu Options Iris Settings Iris settings control the amount of light let into the Vanguard camera. Changing these settings affect how bright your picture will be, and how the camera reacts to changes in lighting conditions. Your options are: ·...
- Page 14 Sensitivity controls adjust how the camera works in low light conditions. · FREEZE: Freezes the Field or the Frame in a still mode until you select Off, or until you move the camera with the remote control. · AGC Levels: Selects the base level of gain control used when automatic gain control is on.
- Page 15 Advanced Onscreen Menu Options Automatic Picture Control Automatic Picture Control (APC) changes the geometry of the picture produced by the camera. These changes are slight and it can be hard to notice how the picture is different. · H-GAIN: The Horizontal Gain setting adjusts the horizontal (left to right) line of the picture.
- Page 16 Advanced Onscreen Menu Options Picture Reversal You can set the Vanguard Camera to reverse, either horizontally, vertically the picture it produces. Or you can do both. · H. REV: Reverses the picture horizontally, or from left to right. Set this to “ON”...
- Page 17 Advanced Onscreen Menu Options Onscreen Camera Label (ID) The Vanguard Camera can display a title or label for the camera on screen. This can be useful when you have more than one camera and want to identify them easily. · Select characters from the available list to set the title you want to use. ·...
- Page 18 Advanced Onscreen Menu Options · MARK: Selecting Mark ON puts a cross-hairs mark on the screen. Follow the step on page 23 to bring Select MARK with the Right Arrow. up the onscreen menu. Then use the Then select OFF or ON with the Up Down arrow to select past the last and Down arrows.
-
Page 19: Troubleshooting
Vanguard remote control until the green light stays on. Then, press Sweep (0), and Setup again. This will turn off the label. Repeat these same steps to turn the label on again. For more help with setup please visit: http://www.x10.com/support Bottom of receiver Troubleshooting... -
Page 20: Home Control
Code 16). Note: when using buttons C1, C2, C3, and C4 to control cameras, they will also turn on X10 modules set to A1, A2, A3, and A4. To turn these modules off, use the procedure described above. Home Control 3. - Page 21 (1) year from the original date of purchase at retail. X10 agrees to repair or replace, at its sole discretion, a defective X10 product if returned to X10 within the warranty period and with proof of purchase.
Need help?
Do you have a question about the VANGUARD VK77A and is the answer not in the manual?
Questions and answers