Table of Contents

Related Manuals for ATOMSTACK R2 V2


Summary of Contents for ATOMSTACK R2 V2
- Page 1 English R2 V2 Roller Installation Manual Note: The picture is for reference only, subject to the real thing. F03-0229-0AA1 Please scan the two-dimensional code for more information. Versions:A...
-
Page 2: Packing List
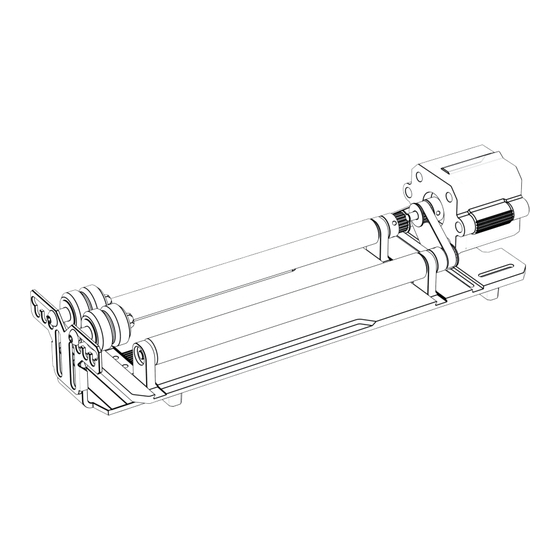
Packing List English R2 V2 Roller Installation Manual Note: The picture is for reference only, subject to the real thing. F03-0229-0AA1 Please scan the two-dimensional code for more information. Versions:A Roller body*1Pcs Bracket*1Pcs Heightened feet*4Pcs Instruction manual Y-axis motor cable*1Pcs... - Page 3 Installation Guide Step 1: Roller Motor Roller block Roller Roller block Base...
- Page 4 Installation Guide Step 2: Choose different gears to install according to the engraved items Gear 1: 10mm≤ d ≤20mm Gear 2: 30mm≤ d ≤40mm Gear 3: 40mm≤ d ≤50mm Gear 4:50mm≤ d ≤80mm...
- Page 5 Installation Guide Step 3: Heightening feet installation 1. When you need to work with the roller to engrave or cut wide surface objects, you need to install the heightening foot. The laser engraver can be raised to engrave or cut taller objects by installing heightening foot accessories. Engraving Machine Rollers 1.2 Heightened feet...
- Page 6 Installation Guide Step 4: Adjust Gear 3.1 Select different gears according to the engraved items. 3.2 Move the roller to the appropriate gear and tighten the screw. 3.4 Adjust the bracket installation: choose different gears according to the 3.3 Move the motor to tighten the belt and tighten the screws at engraved special-shaped items, and move the bracket to a suitable position.
- Page 7 Installation Guide Step 5: Wiring Instructions Connect to port 6P Connection 4p When using the rollers, pull the switch to the bottom...
- Page 8 Use LightBurn 1. Add "Enable Rotary" to main window 1.1 Click "Settings" on the toolbar 1.2 In the settings window, turn on the "Show rotary enable on main window" button, and click OK. Show rotary enable on main window Enable Rotary...
- Page 9 Use LightBurn 2. Open the Rotary Setup window and set the parameters 2.1 Open the Rotary Setup window: Click "Laser Tools" on the toolbar and then click "Rotary Setup" Rotary Setup 2.2 Set the correct parameters in the Rotary Setup window: As shown in the figure Steps: (1) Select the rotary type: Roller Type (2) Turn on "Enable Rotary"...
- Page 10 2.3 Set the motor step General settings for roller and chuck rotation parameters: In the top menu bar [Edit] drop-down menu [Machine Settings], modify the parameter [Y Steps per mm (s101)] and change the default value of 100 to 80. Note: Pay attention when the engraving is finished.
- Page 11 Use LightBurn 3. Import the pattern you want to engrave, set the size of the pattern, and set the engraving power and speed. 4. You can click "Frame" to preview the position of the pattern to be engraved, and then move the laser head to the expected position.
-
Page 12: Customer Service
Customer service: For detailed warranty policy, please visit our official website: www.atomstack.com For technical support and service, please email support@atomstack.com Manufacturer: Shenzhen AtomStack Technologies Co.,Ltd Address: 17th Floor, Building 3A, Phase II, Intelligent Park, No. 76, Baohe Avenue, Baolong Street, Longgang District, Shenzhen, Guangdong, China... - Page 13 Deutsch R2 V2 Roller Installationshandbuch Hinweis: Das Bild ist nur als Referenz, vorbehaltlich der realen Sache. F03-0229-0AA1 Bitte scannen Sie den zweidimensionalen Code für weitere Informationen. Versions:A...
- Page 14 Packliste English R2 V2 Roller Installation Manual Note: The picture is for reference only, subject to the real thing. F03-0229-0AA1 Please scan the two-dimensional code for more information. Versions:A Rollenkörper * 1 Stück Halterung * 1 Stück Erhöhte Füße*4Pcs Bedienungsanleitung Motorkabel Y-Achse * 1 Stück...
- Page 15 Installationsanleitung Schritt 1: Walze Motor Rollenblock Walze Rollenblock Basis...
- Page 16 Installationsanleitung Schritt 2: Wählen Sie verschiedene Zahnräder aus, die Sie entsprechend den eingravierten Elementen einbauen Getriebe 1: 10mm≤ d ≤20mm Getriebe 2: 30mm≤ d ≤40mm Getriebe 3: 40mm≤ d ≤50mm Getriebe 4:50mm≤ d ≤80mm...
- Page 17 Installationsanleitung Step 3: Installation von Erhöhungsfüßen 1. Wenn Sie mit der Walze arbeiten müssen, um Objekte mit breiter Oberfläche zu gravieren oder zu schneiden, müssen Sie den Erhöhungsfuß installieren. Der Lasergravierer kann angehoben werden, um höhere Objekte zu gravieren oder zu schneiden, indem Fußzubehör angebracht wird.
- Page 18 Installationsanleitung Schritt 4: Gang einstellen 3.1 Wählen Sie verschiedene Gänge je nach den eingravierten Elementen. 3.2 Bringen Sie die Rolle in den entsprechenden Gang und ziehen Sie die Schraube fest. 3.4 Einstellen der Halterung: Wählen Sie verschiedene Gänge entsprechend den 3.3 Bewegen Sie den Motor, um den Riemen zu spannen, und ziehen Sie die eingravierten Sonderformen und bringen Sie die Halterung in eine geeignete Position.
- Page 19 Installationsanleitung Schritt 5: Verdrahtungsanweisungen Verbinden Sie sich mit Port 6P Anschluss 4p Wenn Sie die Rollen verwenden, ziehen Sie den Schalter nach unten...
- Page 20 LightBurn verwenden 1. Hinzufügen von "Rotary aktivieren" zum Hauptfenster 1.1 Klicken Sie auf "Einstellungen" in der Symbolleiste. 1.2 Aktivieren Sie im Einstellungsfenster die Schaltfläche "Drehfunktion im Hauptfenster anzeigen", und klicken Sie auf OK. Show rotary enable on main window Enable Rotary...
- Page 21 LightBurn verwenden 2. Öffnen Sie das Fenster Rotary Setup und stellen Sie die Parameter ein 2.1 Öffnen Sie das Fenster "Rotary Setup": Klicken Sie auf "Laser Tools" in der Werkzeugleiste und dann auf "Rotary Setup". Rotary Setup 2.2 Stellen Sie die richtigen Parameter im Fenster Rotary Setup ein: Wie in der Abbildung gezeigt Schritte: (1) Wählen Sie den Rotationstyp: Rollentyp...
- Page 22 2.3 Einstellen des Motorschritts Allgemeine Einstellungen für Rollen- und Futterdrehparameter: Ändern Sie in der oberen Menüleiste [Bearbeiten] im Dropdown-Menü [Maschineneinstellungen] den Parameter [Y-Schritte pro mm (s101)] und ändern Sie den Standardwert von 100 auf 80. Hinweis: Achten Sie darauf, wenn die Gravur fertig ist. Setzen Sie hier den Parameter 80 auf den Standardwert 100 zurück...
- Page 23 LightBurn verwenden 3. Importieren Sie das Muster, das Sie gravieren möchten, legen Sie die Größe des Musters fest und stellen Sie die Gravurleistung und -geschwindigkeit ein. 4. Sie können auf "Rahmen" klicken, um eine Vorschau der Position des zu gravierenden Musters anzuzeigen, und dann den Laserkopf an die erwartete Position bewegen.
-
Page 24: Atención Al Cliente
Website: www.atomstack.com Für technische Unterstützung und Service, senden Sie bitte eine E-Mail an support@atomstack.com Hersteller: Shenzhen AtomStack Technologies Co.,Ltd Adresse: 17. Stock, Gebäude 3A, Phase II, Intelligent Park, Nr. 76, Baohe Avenue, Baolong Street, Bezirk Longgang, Shenzhen, Guangdong, China... - Page 25 Anglais Manuel d'installation du R2 V2 Roller Note : L'image est pour référence seulement, sous réserve de la chose réelle. Veuillez scanner le F03-0229-0AA1 code bidimensionnel pour plus d'informations. Versions:A...
-
Page 26: Liste De Colisage
Liste de colisage English R2 V2 Roller Installation Manual Note: The picture is for reference only, subject to the real thing. F03-0229-0AA1 Please scan the two-dimensional code for more information. Versions:A Corps de rouleau * 1 Pcs Support * 1 Pcs Pieds surélevés*4Pcs... -
Page 27: Guide D'installation
Guide d'installation Étape 1 : Rouleau Moteur Blocage des rouleaux Rouleau Blocage des rouleaux Base... - Page 28 Guide d'installation Étape 2 : Choisissez les différents engrenages à installer en fonction des éléments gravés. Engrenage 1: 10mm≤ d ≤20mm Engrenage 2: 30mm≤ d ≤40mm Engrenage 3: 40mm≤ d ≤50mm Engrenage 4:50mm≤ d ≤80mm...
- Page 29 Guide d’installation Step 3: Installation de pieds rehausseurs 1. Lorsque vous devez travailler avec le rouleau pour graver ou couper des objets de grande surface, vous devez installer le pied rehausseur. Le graveur laser peut être soulevé pour graver ou couper des objets plus hauts en installant des accessoires de pieds Machine à...
- Page 30 Guide d'installation Étape 4 : Ajustement de la vitesse 3.1 Sélectionnez différents engrenages en fonction des éléments gravés. 3.2 Déplacez le rouleau sur l'engrenage approprié et serrez la vis. 3.4 Ajustement de l'installation du support : choisissez différents engrenages en 3.3 Déplacez le moteur pour tendre la courroie et serrez les vis au fonction des éléments gravés de forme spéciale, et déplacez le support à...
- Page 31 Guide d'installation Étape 5 : Instructions de câblage Connexion au port 6P Connexion 4p Lors de l’utilisation des rouleaux, tirez l’interrupteur vers le bas...
- Page 32 Utilisez LightBurn 1. Ajouter "Activer le Rotary" à la fenêtre principale 1.1 Cliquez sur "Paramètres" dans la barre d'outils. 1.2 Dans la fenêtre des paramètres, activez le bouton "Afficher la possibilité de rotation sur la fenêtre principale", puis cliquez sur OK. Show rotary enable on main window Enable Rotary...
- Page 33 Utilisez LightBurn 2. Ouvrez la fenêtre de configuration du Rotary et définissez les paramètres suivants 2.1 Ouvrez la fenêtre de configuration de la rotation : Cliquez sur "Laser Tools" dans la barre d'outils, puis sur "Rotary Setup". Rotary Setup 2.2 Réglez les paramètres corrects dans la fenêtre de configuration du Rotary : Comme indiqué...
- Page 34 2.3 Définir l’étape du moteur Paramètres généraux pour les paramètres de rotation du rouleau et du mandrin : Dans le menu déroulant [Modifier] de la barre de menu supérieure [Paramètres de la machine], modifiez le paramètre [Y Pas par mm (s101)] et changez la valeur par défaut de 100 à 80. Remarque : Faites attention lorsque la gravure est terminée.
- Page 35 Utilisez LightBurn 3. Importez le motif que vous souhaitez graver, définissez la taille du motif, puis réglez la puissance et la vitesse de gravure. 4. Vous pouvez cliquer sur "Frame" pour prévisualiser la position du motif à graver, puis déplacer la tête laser à la position prévue. Il est recommandé...
-
Page 36: Service Clientèle
Service clientèle : Pour une politique de garantie détaillée, veuillez consulter notre site officiel : www.atomstack.com. Pour le soutien technique et le service, veuillez envoyer un courriel à support@atomstack.com. Fabricant : Shenzhen AtomStack Technologies Co.,Ltd Adresse : 17ème étage, Bâtiment 3A, Phase II, Intelligent Park, No. 76, Baohe Avenue,... - Page 37 Italiano Manuale di installazione del rullo R2 V2 Roller Nota: l'immagine è solo per riferimento, soggetto alla cosa reale. Per maggiori informazioni, F03-0229-0AA1 scansionare il codice bidimensionale. Versions:A...
-
Page 38: Lista Di Imballaggio
Lista di imballaggio English R2 V2 Roller Installation Manual Note: The picture is for reference only, subject to the real thing. F03-0229-0AA1 Please scan the two-dimensional code for more information. Versions:A Corpo del rullo * 1 pz Staffa * 1 pz... -
Page 39: Guida All'installazione
Guida all'installazione Fase 1: rullo Motore Blocco a rulli Rullo Blocco a rulli Base... - Page 40 Guida all'installazione Fase 2: scegliere diversi ingranaggi da installare in base agli elementi incisi Ingranaggio 1: 10mm≤ d ≤20mm Ingranaggio 2: 30mm≤ d ≤40mm Ingranaggio 3: 40mm≤ d ≤50mm Ingranaggio 4:50mm≤ d ≤80mm...
- Page 41 Guida all'installazione Step 3: Installazione dei piedini di sollevamento 1. Quando è necessario lavorare con il rullo per incidere o tagliare oggetti di ampia superficie, è necessario installare il piedino di sollevamento. L'incisore laser può essere sollevato per incidere o tagliare oggetti più alti installando accessori per i piedi. Macchina per incisione Rulli Piedi sollevati...
- Page 42 Guida all'installazione Fase 4: Regolazione della marcia 3.1 Selezionare diversi ingranaggi in base agli elementi incisi. 3.2 Spostare il rullo sull'ingranaggio appropriato e serrare la vite. 3.4 Regolazione dell'installazione della staffa: scegliere diversi ingranaggi in base 3.3 Spostare il motore per tendere la cinghia e stringere le viti nella agli elementi di forma speciale incisi e spostare la staffa in una posizione adeguata.
- Page 43 Guida all'installazione Passo 5: Istruzioni per il cablaggio Connessione alla porta 6P Connessione 4p Quando si utilizzano i rulli, tirare l'interruttore verso il basso...
- Page 44 Utilizzare LightBurn 1. Aggiungere "Abilita rotazione" alla finestra principale 1.1 Fare clic su "Impostazioni" nella barra degli strumenti. 1.2 Nella finestra delle impostazioni, attivare il pulsante "Mostra abilitazione rotazione nella finestra principale" e fare clic su OK. Show rotary enable on main window Enable Rotary...
- Page 45 Utilizzare LightBurn 2. Aprire la finestra Impostazione rotante e impostare i parametri 2.1 Aprire la finestra Impostazione rotativa: Fare clic su "Strumenti laser" nella barra degli strumenti e quindi su "Impostazione rotativa". Rotary Setup 2.2 Impostare i parametri corretti nella finestra Rotary Setup: Come mostrato nella figura Passi: (1) Selezionare il tipo di rotante: Tipo di rullo (2) Attivare "Abilita rotazione".
- Page 46 2.3 Impostare il passo del motore Impostazioni generali per i parametri di rotazione del rullo e del mandrino: nella barra dei menu in alto [Modifica] menu a discesa [Impostazioni macchina], modificare il parametro [Y Passi per mm (s101)] e modificare il valore predefinito da 100 a 80. Nota: prestare attenzione quando l'incisione è...
- Page 47 Utilizzare LightBurn 3. Importare il modello che si desidera incidere, impostare le dimensioni del modello e la potenza e la velocità di incisione. 4. È possibile fare clic su "Cornice" per visualizzare l'anteprima della posizione del modello da incidere, quindi spostare la testa laser nella posizione prevista.
-
Page 48: Servizio Clienti
Servizio clienti: Per una politica di garanzia dettagliata, si prega di visitare il nostro sito ufficiale: www.atomstack.com Per il supporto tecnico e l'assistenza, inviare un'e-mail a support@atomstack.com. Produttore: Shenzhen AtomStack Technologies Co.,Ltd Indirizzo: 17° piano, edificio 3A, fase II, Intelligent Park, n. 76, Baohe Avenue,... - Page 49 Español Manual de instalación del rodillo R2 V2 Roller Nota: La imagen es sólo para referencia, sujeto a la cosa real. Por favor, F03-0229-0AA1 escanee el código bidimensional para obtener más información. Versions:A...
-
Page 50: Lista De Embalaje
Lista de embalaje English R2 V2 Roller Installation Manual Note: The picture is for reference only, subject to the real thing. F03-0229-0AA1 Please scan the two-dimensional code for more information. Versions:A Manual Cuerpo del rodillo * 1 pieza Soporte * 1Pcs... -
Page 51: Guía De Instalación
Guía de instalación Paso 1: Rodillo Motor Bloque de rodillos Rodillo Bloque de rodillos Base... - Page 52 Guía de instalación Paso 2: Elegir diferentes marchas para instalar según los elementos grabados Engranaje 1: 10mm≤ d ≤20mm Engranaje 2: 30mm≤ d ≤40mm Engranaje 3: 40mm≤ d ≤50mm Engranaje 4:50mm≤ d ≤80mm...
- Page 53 Guía de instalación Step 3: Instalación de pies de elevación 1. Cuando necesite trabajar con el rodillo para grabar o cortar objetos de superficie ancha, debe instalar el pie de elevación. El grabador láser se puede elevar para grabar o cortar objetos más altos mediante la instalación de accesorios de pie de elevación. Máquina de grabado Rodillos Pies elevados...
- Page 54 Guía de instalación Paso 4: Ajustar la marcha 3.1 Seleccione diferentes marchas en función de los elementos grabados. 3.2 Coloque el rodillo en la marcha adecuada y apriete el tornillo. 3.4 Ajuste de la instalación del soporte: elija diferentes marchas de acuerdo con los 3.3 Mueva el motor para tensar la correa y apriete los tornillos en elementos grabados de forma especial, y mueva el soporte a una posición adecuada.
- Page 55 Guía de instalación Paso 5: Instrucciones de cableado Conéctese al puerto 6P Conexión 4p Cuando use los rodillos, tire del interruptor hacia abajo...
- Page 56 Utilice LightBurn 1. Añadir "Activar Rotary" a la ventana principal 1.1 Haga clic en "Configuración" en la barra de herramientas 1.2 En la ventana de configuración, activa el botón "Mostrar activación de giro en la ventana principal" y haz clic en Aceptar. Show rotary enable on main window Enable Rotary...
- Page 57 Utilice LightBurn 2. Abra la ventana Configuración de Rotary y ajuste los parámetros 2.1 Abra la ventana "Rotary Setup": Haga clic en "Laser Tools" en la barra de herramientas y luego en "Rotary Setup" Rotary Setup 2.2 Establezca los parámetros correctos en la ventana Configuración de Rotary: Como se muestra en la figura Pasos a seguir: (1) Seleccione el tipo rotativo: Tipo de Rodillo...
- Page 58 2.3 Ajuste el paso del motor Ajustes generales de los parámetros de rotación de rodillos y mandriles: En el menú desplegable [Editar] de la barra de menú superior [Ajustes de la máquina], modifique el parámetro [Pasos Y por mm (s101)] y cambie el valor predeterminado de 100 a 80. Nota: Preste atención cuando termine el grabado.
- Page 59 Utilice LightBurn 3. Importa el patrón que deseas grabar, ajusta el tamaño del patrón y configura la potencia y la velocidad de grabado. 4. Puede hacer clic en "Encuadre" para previsualizar la posición del patrón a grabar y, a continuación, mover el cabezal láser a la posición esperada.
- Page 60 Atención al cliente: Para obtener información detallada sobre la política de garantía, visite nuestro sitio web oficial: www.atomstack.com. Para asistencia técnica y servicio, envíe un correo electrónico a support@atomstack.com Fabricante: Shenzhen AtomStack Technologies S.L Dirección: 17th Floor, Building 3A, Phase II, Intelligent Park, No. 76, Baohe Avenue, Baolong Street, Longgang District, Shenzhen, Guangdong, China Código postal: 518172...
Need help?
Do you have a question about the R2 V2 and is the answer not in the manual?
Questions and answers