Table of Contents
Advertisement
Quick Links
Advertisement
Table of Contents

Related Manuals for ITS Telecom KELLER CellaCast PX8 Series


Summary of Contents for ITS Telecom KELLER CellaCast PX8 Series
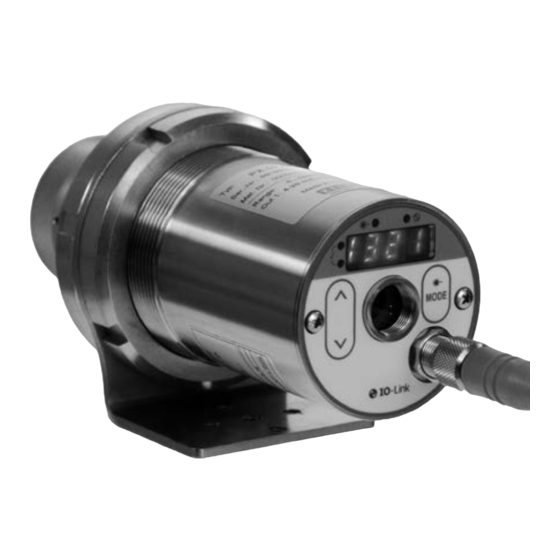
- Page 1 Pyrometer CellaCast PX 8x 1109371 12/2020...
-
Page 3: Explanation Of Symbols
Quick Start Guide CellaCast PX 8x Pyrometer CellaCast PX 8x Quick start guide 1 General This manual gives you brief information on how to properly install the pyrometer of the PX 8x series. Detailed information can be downloaded from our website www.keller.de/its/. 2 Explanation of symbols Important notes in this manual are marked with a symbol. -
Page 4: Mechanical Installation
Quick Start Guide CellaCast PX 8x 1: Ideal measuring point 5 Mechanical installation The distance should be adjusted in that way, that the pouring stream is wide enough to fill up at least 30 % of the measurement area. Reduce the distance, if the pouring stream covers less than 30 % of the measurement area. -
Page 5: Electrical Connection
Quick Start Guide CellaCast PX 8x 6 Assembly fibre optic cable One end of the optical fibre has a nameplate showing the serial number of the corresponding basic pyrometer. This is the end which must be screwed onto the pyrometer. For proper connec- tion, the arrow on the nameplate of the fibre optic cable and the arrow on the pyrometer should point toward each other. - Page 6 Quick Start Guide CellaCast PX 8x 8 Focussing If the pyrometer is mounted in a cooling or protective housing, remove the pyrometer from the protective fitting. For easier focusing, hold the pyrometer parallel to the cooling or protective fitting. Pyrometer with through-the-lens sighting: When aiming the pyrometer with through-the-lens sighting to a target, both the targeted object and the target marker (distinctly marked circled or rectangle spot in the viewfinder) must appear in sharp focus simultaneously.
- Page 7 Quick Start Guide CellaCast PX 8x To protect the laser against overload, an over temperature is provided. At temperatures above 60 °C, the laser switches of an can no longer be activated. To check, whether the laser is acti- vated, the parameter LED lights up. In normal operation, the laser is switch off.
- Page 8 Quick Start Guide CellaCast PX 8x 9.1 Setting the sampling time at the PX 83 On delivery the pyrometer is parameterized on a discontinuous pouring stream. If the pouring times are < 5 seconds the measuring time needs to be adapted. The time delay (time after detection of the pouring stream up to the start of the measurement) and the measurement time must be less than the minimum pouring time.
- Page 9 Quick Start Guide CellaCast PX 8x Two-colour channel [Qu] -> ATD function [Q . A td] Parameter Function Default Time delay [s] [T . D EL] Sampling time [s] 15 s (T . A CT) ► Press [Mode] to access the main menu >...
- Page 10 Quick Start Guide CellaCast PX 8x Ratio correction Temperature difference [°C] Experience has shown that the following settings apply as a first approximation - grey pig iron 101 - spheroidal graphite iron 104 However, these values may differ in practice. After changing the emissivity ratio, carry out a new control measurement.
-
Page 11: Troubleshooting
Quick Start Guide CellaCast PX 8x The IODDs required for configuring the IO-Link device as well as detailed information on process data setup, diagnostic functions and parameter addresses are available in the download area at www.keller.de/its. ATTENTION For IO-Link operation, a 3-wire shielded cable port Class A (Type A) must be used. - Page 12 Quick Start Guide CellaCast PX 8x Packing The packages used are made of carefully selected, environmentally compatible materials and are thus recyclable. Please ensure that they are disposed of in an ecologically sound manner. Disposal of the old device Old electrical and electronic devices frequently still contain valuable mate- rials.
- Page 16 Copyright prohibits the reproduction or distribution of this instruction manual, in- cluding text, photographs or images contained herein, in whole or in part, for any purpose whatsoever, without prior consent of the author. This applies to any form of mechanical or electronic reproduction as well as to electronic transmission in any form through any medium.
Need help?
Do you have a question about the KELLER CellaCast PX8 Series and is the answer not in the manual?
Questions and answers