Table of Contents
Advertisement
Quick Links
Advertisement
Table of Contents

Summary of Contents for Pegasus Astro FOCUSCUBE V3
- Page 1 FOCUSCUBE V3 PRODUCT MANUAL Version 01-Dec-2023 Pegasus Astro – FocusCube v3...
- Page 2 FocusCube v3 VERSION HISTORY Version # Implemented By Revision Date Reason Evans Souglakos 01/12/2023 Initial Document Page 2 of 20 Pegasus Astro – FocusCube v3...
-
Page 3: Table Of Contents
COMMAND SOCKET VIA TCP PORT ................18 STANDALONE OPERATION..................... 18 UPGRADABLE FIRMWARE ..................... 19 DIMENSIONS ........................19 RECOMMENDATIONS ....................... 19 TECHNICAL SPECIFICATION..................20 ENVIRONMENT ........................20 WARRANTY.......................... 20 SUPPORT ..........................20 Page 3 of 20 Pegasus Astro – FocusCube v3... -
Page 4: Introduction
Thank you for purchasing the Pegasus Astro FocusCube v3! PURPOSE The FocusCube v3 is our cutting-edge solution for achieving fast, reliable, and precise focusing of your telescope in the ever-evolving field of astrophotography. In an era where fast optics and advanced camera devices are essential, maintaining accurate focus is paramount. -
Page 5: Device Care
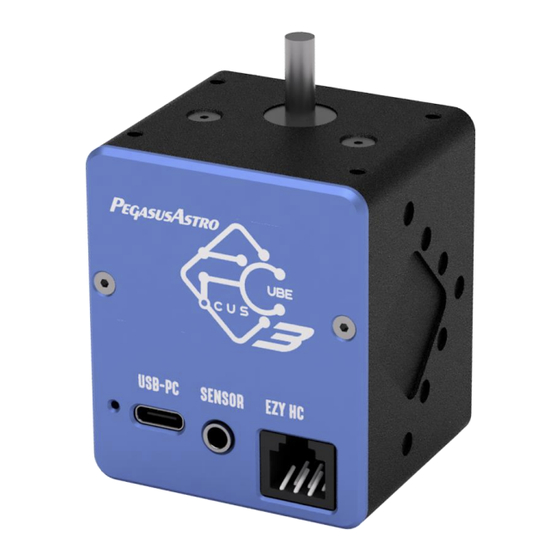
Red LED operation indication (as dim as possible) • USB-PC connector (accepts a USB type C cable) • Temperature Sensor socket (3.5mm mini stereo connector) • EZY-HC Hand Controller Socket (RJ12) Page 5 of 20 Pegasus Astro – FocusCube v3... -
Page 6: Feature List
Web Browser Access: Control via web browser on any device, making it OS-independent. ▪ ASCOM Alpaca Support: Seamless integration with popular software. ▪ Firmware Upgradability: Future-proof with software updates. ▪ Optional External Hand Controller: Ideal for visual observers who prefer manual control. Page 6 of 20 Pegasus Astro – FocusCube v3... -
Page 7: Installation
Assemble the L bracket by using the supplied 2 pcs of M3x8mm screws. ▪ Bond the L bracket with the FocusCube v3 device. Use the 4 pcs of M3x8mm screws to connect the enclosure on the bracket. Do not overtight them as you need to adjust the final position of the motor. - Page 8 Tighten the two grub screws (one on each side) of the coupler to firmly lock the motor shaft in the coupler. To do that you need to rotate the motor axis. A quick way is to connect to FocusCube v3 hotspot and with your mobile phone to access the web dashboard where you can control the motor.
- Page 9 Adjust the motor up or down to align it with the focuser’s shaft and then tight well the set screws on the motor side ▪ Ensure the secure attachment of all mounting brackets. With this, the hardware installation of the FocusCube v3 is completed. Page 9 of 20 Pegasus Astro – FocusCube v3...
-
Page 10: Operation
FocusCube v3 OPERATION I. Initial Connection: USB Cable: Carefully insert the USB type C cable into the designated port on the FocusCube v3 and connect the other end to your computer. II. Device Boot-up: 3. Upon connecting the USB-C cable, the device will commence its boot sequence. Observe the LED indicator, which will perform three rapid blinks before transitioning to a steady, solid red illumination. -
Page 11: Usb Connectivity
1.5-meter USB-C cable, ensuring a hassle-free setup right out of the box. Additionally, the same USB cable serves a dual purpose by not only connecting the FocusCube v3 but also supplying power to the device. It delivers a robust current of up to 900mA to the stepper motor, ensuring efficient and reliable operation. -
Page 12: Ezy Hc Connector
EZY Focus Hand Controller; other connections are not supported. Plug the EZY Focus Hand Controller anytime with the provided straight 6-pin cable. FocusCube v3 will identify the hand controller and provide all required information to the display. You can unplug and plug the hand controller at your request. -
Page 13: Reset Watchdog
WIFI HOTSPOT FocusCube v3 has a Wi-Fi Access point (hotspot) at 2.4 GHz. The hotspot is enabled by default. The SSID name is compiled from the prefix FocusCube3_ and the unique device ID e.g. 0043c88c. -
Page 14: Considerations About Wi-Fi Channels To Improve Network Connection
For security reasons, the web dashboard has a simple authentication process and requires a username and aa password upon login. The dashboard password is always the Wi-Fi hotspot password. Default credentials are: admin Username 12345678 Password (always same as hotspot password) Page 14 of 20 Pegasus Astro – FocusCube v3... - Page 15 This feature is operating system-independent and functions seamlessly alongside USB control. The web dashboard offers full control of the device, configuration of backlash, and motor position along with statistics and information about FocusCube v3. Page 15 of 20 Pegasus Astro – FocusCube v3...
-
Page 16: Ascom 6
ASCOM Alpaca but also monitoring from any device with a web browser such as a smartphone. To use ASCOM Alpaca make sure that the FocusCube v3 is connected to your WiFi network or you use its hotspot feature and you are connected to it. - Page 17 After that, the generated driver will be automatically renamed to FocusCube3 (Alpaca). You are ready to go. You can use the FocusCube3 driver on your selected imaging software. The below screenshot is an example from NINA using the Alpaca FocusCube3 driver. Page 17 of 20 Pegasus Astro – FocusCube v3...
-
Page 18: Command Socket Via Tcp Port
The only difference is that you need to provide the access point password before any interaction with the device. In the below example, we send the default password “12345678” and receive an AUTHOK reply. After that, we can communicate and control the device. In case the password is wrong the FocusCube v3 will close the connection. -
Page 19: Upgradable Firmware
We highly recommend the selection and use of high-quality, shorter-length USB cables to ensure optimal power, connectivity, and data transfer reliability. ▪ Avoid the practice of looping USB or power cables, as this can introduce communication issues and disrupt the seamless operation of your equipment. Page 19 of 20 Pegasus Astro – FocusCube v3... -
Page 20: Technical Specification
The customer is responsible for shipping the product to our designated return address for either repair or replacement. For more information please read: https://pegasusastro.com/returns SUPPORT For any issues, questions or feedback and recommendations please contact us via email: support@pegasusastro.com Page 20 of 20 Pegasus Astro – FocusCube v3...
Need help?
Do you have a question about the FOCUSCUBE V3 and is the answer not in the manual?
Questions and answers