Joerns Oxford Mini 140 Service Manual
Classic mobile lifts
Hide thumbs
Also See for Oxford Mini 140:
- User instruction manual (144 pages) ,
- User instruction manual (172 pages)
Table of Contents
Advertisement
Quick Links
Advertisement
Table of Contents

Related Manuals for Joerns Oxford Mini 140


Summary of Contents for Joerns Oxford Mini 140
- Page 1 Service Manual Classic Mobile Lifts Mini 140 Midi 180 Major 200 Maxi 180...
- Page 2 Oxford ® Classic Mobile Lifts Contents Pages 3 - 5 Inspection Criteria for Oxford Classic Mobile Lifts Pages 6 - 9 Testing of Oxford Classic Mobile Lifts Pages 10 - 23 Service and Maintenance Schedule for Oxford Classic Mobile Lifts Page 24 Fault Finding on Oxford Classic Mobile Lifts Page 25...
-
Page 3: Inspection Criteria
Classic Mobile Lifts Inspection Criteria Joerns Healthcare Ltd recommends a thorough inspection and test of Oxford Classic mobile lifts and their lifting accessories, slings etc. are carried out every six months. The examination and test should be conducted according to the recommendations and procedures below. Joerns Healthcare Ltd recommends only authorised service dealers should carry out maintenance, inspection and certified testing. -
Page 4: Leg Adjustment
Oxford ® Classic Mobile Lifts Leg Adjustment Operate the foot pedal and check the legs open and close correctly. Check the legs lock into place when in both the open and closed positions. Check the legs are parallel to each other in the closed position. Check for wear and security of the linkages and lubricate as necessary with a light mineral based grease or food grade spray lubricant. -
Page 5: Charging Unit
Oxford ® Classic Mobile Lifts Check for wear on the upper and lower mounting bosses. Any excessive movement or play in the actuator mounting must be investigated. Lubricate the upper mounting fulcrum pin and the lower clevis pin with a light mineral based grease or food grade spray lubricant. - Page 6 Oxford ® Classic Mobile Lifts Testing Load Testing (Electrical Variants Only) The load test should be carried out in accordance with the manufacturers test procedures and the directive detailed in EN ISO 10535:2006 - Annex B - Periodic Inspection B1 - see excerpt below. It is strongly recommended that an authorised service dealer carry out the test.
- Page 7 The information can be found in Schedule 1 (page 59) in the LOLER L113 publication. Joerns Healthcare Ltd has prepared a Thorough Examination Report that includes all the required information and a copy can be found later in this manual.
- Page 8 Horizontal Boom Test This is not a requirement of BS EN ISO 10535 but is required by users and specified by Joerns Healthcare. With the release valve closed, pump up the unit until the boom is horizontal. Fully open the release valve.
- Page 9 LOLER requires certain information to be included on the report given to a customer after a thorough examination. The information can be found in Schedule 1 (page 59) in the LOLER L113 publication. Joerns Healthcare Ltd has prepared a Thorough Examination Report that includes all the required information and a copy can be found later in this manual.
-
Page 10: Service And Maintenance
Oxford ® Classic Mobile Lifts Service & Maintenance Tools Required • Calibration Handset • Circlip pliers • No. 2 pozi drive screwdriver (for the battery mounting bracket securing screws) • 3mm hex key (for the control box securing screw) • 4mm hex key (for the foot pedal mechanism) 5mm hex key (for the boom to mast pivot, front castors and for leg actuator retainer bolt Electric leg •... - Page 11 Oxford ® Classic Mobile Lifts Examine the sling strap retainers. Check the plastic discs are fitted and move smoothly on the central shafts. Check the plastic discs for damage. Check the screw through the central shafts for tightness. If any discrepancies are identified, the hoist must be taken out of service until remedial action is performed.
- Page 12 Oxford ® Classic Mobile Lifts 15 IMPORTANT: Side suspenders are often used in conjunction with the lift spreader bar. These may be stored away from the lift. It is important that side suspenders are checked for wear. Side suspenders are made from 9.5mm material. Reduction in diameter by wear at the suspension point or the hooks should not exceed 1mm before replacement.
- Page 13 12 Lubricate the fulcrum pin using a light mineral based grease or food grade spray lubricant. 13 Replace the fulcrum pin through the actuator and boom bracket. 14 Fit a new circlip to the fulcrum pin. NOTE: Joerns Healthcare recommends the following: • NEVER reuse circlips. • ALWAYS use circlip pliers for fitting.
- Page 14 11 Fit replacement self adhesive screw cover to the heads of the M8 x 20mm counter sunk screws. NOTE 1: Joerns Healthcare recommends the following: • NEVER fit a new fulcrum pin or sleeve to a worn or damaged boom.
- Page 15 13 Fit a new circlip to the fulcrum pin. NOTE 1: It is most important that fulcrum pins are re-assembled carefully. Check to ensure complete security. NOTE 2: Joerns Healthcare recommends: • NEVER reuse circlips. • ALWAYS use circlip pliers for fitting.
-
Page 16: Smart Monitor
Emergency stop switch identified by up and down arrows. Smart Monitor Please refer to the following document for service and maintenance guidance: Oxford Smart Monitor Engineer’s Service & Installation Manual (Document no.294000.10380) Contact Joerns Healthcare on +44 (0)344 811 1158 should you require a copy. - Page 17 Oxford ® Classic Mobile Lifts Cross-Member To perform a service inspection of the cross-member, it is recommended the mast and boom assembly is first removed. Unscrew the mast locking knob completely from the cross-member. The mast and boom assembly can then be lifted out of the mast socket on the cross-member. Inspect the mast locking knob for damage and/or wear, paying particular attention to the threads which engage with the mast.
- Page 18 Oxford ® Classic Mobile Lifts Re-Assembly of the Leg Opening Mechanism to the Cross-Member (Non-Electric Leg Variants) Lubricate all acetyl wear washers, the leg opening mechanism and both ends of the left and right tie rods with a light mineral based grease or food grade spray lubricant. Position the acetyl wear washer on the cross-member mounting spigot.
- Page 19 Oxford ® Classic Mobile Lifts Leg Opening (Electric Leg Variants) Operate the leg opening and closing from the handset and confirm the legs operate correctly in both directions. Confirm the legs lock correctly when the open/close button is released. Confirm the leg actuator mounting bracket is firmly attached to the mast (2 off 4mm Hex drive screws). Confirm the screws are tightened to 10Nm.
- Page 20 Oxford ® Classic Mobile Lifts 21 Dismantle the left and right hand tie rods from the leg opening mechanism using a 6mm Hex key, taking care not to lose the white Acetyl washers (2 off on each tie rod end). 22 Examine the washers for wear and/or damage.
- Page 21 Oxford ® Classic Mobile Lifts Leg Opening Actuator (Electric Leg Variants Only) The actuator is a sealed unit and should require no maintenance. Check for correct operation when opening and closing the legs. Confirm power cut-out at the ends of travel, both open and closed. Listen for unusual noise which may indicate imminent breakdown.
- Page 22 Oxford ® Classic Mobile Lifts Legs / Leg Pivot Pins Check the leg pivots are retained securely and that the legs pivot freely. Any stiffness must be investigated. Also check that there is no excessive play in the leg pivots. Any excessive play must be investigated.
-
Page 23: Front Castors
Oxford ® Classic Mobile Lifts Rear Castors Check the rear castors are firmly fixed to the legs. Remove any loose castors using a 6mm hex key and a 17mm socket attached to a socket wrench. Make sure the castors swivel and the wheels rotate freely. If the free rotation of any castor is affected by thread, hairs or fibres the castor should be replaced as these are non-serviceable components. - Page 24 Oxford ® Classic Mobile Lifts Fault Finding: Electric Variants • Problem - Hoist not working Possible Fault Remedy Emergency stop switch activated. Can be identified by an LED panel that will have a blank display. Turn the red emergency stop switch clockwise and release.
-
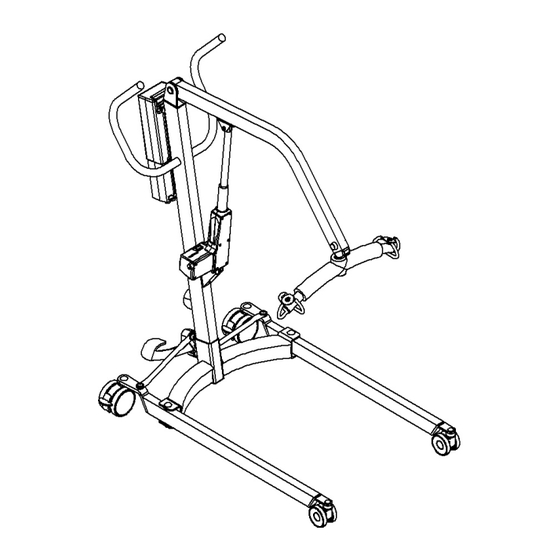
Page 25: Torque Settings
Oxford ® Classic Mobile Lifts Torque Settings The torque here is 25Nm Torque for the rear castors is 35Nm Torque for the front castors is 25Nm The torques here are 70Nm Control box The torque for mounting screw each screw shown here is The torque for The torques here... - Page 26 Name & Address …………..……………………………........……………………………………….. Date of Report………………....…………. ………………………………………........Joerns Healthcare Limited Drakes Broughton Business Park, Worcester Road, Drakes Broughton, Pershore, Worcestershire, WR10 2AG (T) +44 (0)844 811 1156 (F) +44 (0)844 811 1157 www.joerns.co.uk • email: info@joerns.co.uk 0615/LOLERTEST Rev C...
- Page 27 Oxford ® Classic Mobile Lifts Notes:...
- Page 28 Joerns Healthcare Limited Drakes Broughton Business Park, Worcester Road, Drakes Broughton Pershore, Worcestershire, WR10 2AG United Kingdom (T) 0344 811 1158 www.joerns.co.uk • email: info@joerns.co.uk © 2021, Joerns Healthcare • 6120052 Rev H • DCO21-0066...
Need help?
Do you have a question about the Oxford Mini 140 and is the answer not in the manual?
Questions and answers