Advertisement
8M0107462
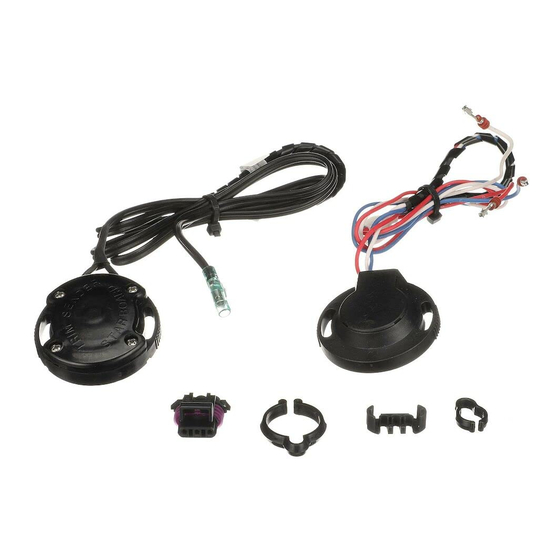
SMARTCRAFT TRIM POSITION SENSOR
AND ANALOG SENDER KIT
IMPORTANT: This document guides our dealers, boatbuilders, and company service personnel in the proper installation or
service of our products. If you have not been trained in the recommended servicing or installation procedures for these or
similar Mercury Marine products, have the work performed by an authorized Mercury Marine dealer technician. Improper
installation or servicing of the Mercury product could result in damage to the product or personal injury to those installing or
operating the product. Always refer to the appropriate Mercury Marine service manual for component removal and installation
instructions.
NOTE: After completing installation, place these instructions with the product for the owner's future use.
NOTE: Digital Throttle and Shift (DTS) models with SmartCraft transoms that use a Mercury analog gauge interface (AGI) kit
do not need an analog trim position sender to provide analog trim gauge input.
Sterndrive Models Covered
496 Bravo engines using analog trim gauges
a
b
Ref.
a
Analog trim position sender and harness assembly
b
3‑wire trim sensor
c
Small harness clamp
d
Harness clamp
e
3‑wire connector clip
f
3‑wire connector
Replacing the SmartCraft Trim Position Sensor and Analog Trim Position
Sender
SmartCraft Trim Position Sensor and Analog Sender Important Information
The SmartCraft trim position sensor and analog sender kit is provided for SmartCraft transom assemblies that use a 3‑wire
trim position sensor for digital trim limiting, or SmartCraft trim position input, and a 2‑wire analog trim position sender for
analog trim gauge input.
90-8M0119720 eng MAY 2016
Models Covered
DTS engines
c
d
Description
SmartCraft Transom Serial Number Range
0M300000–2A417473
e
f
© 2016 Mercury Marine
All
61497
Part Number
805130A10
8M0083579
818557001
818557
831957
8307973
Page 1 / 8
Advertisement
Table of Contents

Summary of Contents for Mercury 8M0107462
- Page 1 Mercury Marine products, have the work performed by an authorized Mercury Marine dealer technician. Improper installation or servicing of the Mercury product could result in damage to the product or personal injury to those installing or operating the product. Always refer to the appropriate Mercury Marine service manual for component removal and installation instructions.
- Page 2 Apply sealant to the trim harness clamp plate screw threads and install the clamp plate. Tighten the screw to the specified torque. Tube Ref No. Description Where Used Part No. Perfect Seal Trim harness clamp plate screw threads 92-34227Q02 Page 2 / 8 © 2016 Mercury Marine 90-8M0119720 eng MAY 2016...
- Page 3 10. Install the bell housing and sterndrive using the assembly procedures described in the appropriate service manual. 11. Place the sterndrive in the full‑in (all the way down) position. 90-8M0119720 eng MAY 2016 © 2016 Mercury Marine Page 3 / 8...
- Page 4 NOTE: When viewed in CDS G3 live data the trim range should fall between 50 and 200 counts with the index mark on the rotor aligned with the #1 index mark on the sensor body (drive in full down position). Trim position sensor Screw, washer, and retainer 61570 Page 4 / 8 © 2016 Mercury Marine 90-8M0119720 eng MAY 2016...
- Page 5 18. Reconnect the battery cables. Trim Sensor Setup Procedures For all DTS and all PCM 112 Sterndrive Models Turn the key switch to the RUN position (key on—engine off). 90-8M0119720 eng MAY 2016 © 2016 Mercury Marine Page 5 / 8...
- Page 6 Place the sterndrive in the full‑in (all the way down) position. Rotate the sensor fully clockwise and then snug the screws. 61586 Full-in (all the way down) position Fully clockwise position Page 6 / 8 © 2016 Mercury Marine 90-8M0119720 eng MAY 2016...
- Page 7 Trim Sender Adjustment (For Analog Gauge) Turn the key switch to the RUN position (key on—engine off). Place the sterndrive in the full‑in (all the way down) position. 90-8M0119720 eng MAY 2016 © 2016 Mercury Marine Page 7 / 8...
- Page 8 61641 Products of Mercury Marine © MERCURY MARINE. All rights reserved. Reproduction in whole or in part without permission is prohibited. Alpha, Axius, Bravo One, Bravo Two, Bravo Three, Circle M with Waves Logo, K-planes, Mariner, MerCathode, W6250 Pioneer Road...


Need help?
Do you have a question about the 8M0107462 and is the answer not in the manual?
Questions and answers