
Subscribe to Our Youtube Channel
Related Manuals for Lincoln Electric WELDYSTIFFENER


Summary of Contents for Lincoln Electric WELDYSTIFFENER
- Page 1 PORTABLE WELDING CARRIAGE WELDYSTIFFENER SAFETY INSTRUCTION FOR USE AND MAINTENANCE 60 to 160 mm – 120 to 320 mm 8695 5876 EDITION : EN Instructions for use REF : REVISION : E DATE : 10-2018 Original instructions...
- Page 2 Thank for the trust you have expressed by purchasing this equipment, which will give you full satisfaction if you follow its instructions for use and maintenance. Its design, component specifications and workmanship comply with applicable European directives. Please refer to the enclosed CE declaration to identify the directives applicable to it.
-
Page 3: Table Of Contents
2 - TECHNICAL SPECIFICATIONS ..................7 D - INSTRUCTIONS FOR USE ......................8 1 - CARRIAGE .......................... 8 2 - OPERATING OF WELDYSTIFFENER ................. 10 3 - CONTROL PANEL ......................10 4 - FUNCTIONAL SEQUENCE '' INTERMITTENT '' ............... 11 5 - PARAMETER SETTING .................... - Page 4 The measuring tools or displays for voltage, intensity and speed ..either analog or digital, must be considered as indicators REVISIONS REVISION B 08/08 DESIGNATION PAGE Update photos REVISION C 08/09 DESIGNATION PAGE Update REVISION D 08/14 DESIGNATION PAGE Spare parts REVISION E 10/18 DESIGNATION PAGE To change logo WELDYSTIFFENER...
-
Page 5: A - Identification
8695 5876 / E A - IDENTIFICATION Please enter the number of your machine in the following box. Quote this information in all correspondence. WELDYSTIFFENER... -
Page 6: B - Safety Instructions
Periodically check that electrical connections are properly tightened and do not overheat. WARNING ! Be careful not to crush your fingers Make sure that no spray or water enters into the electrical box of the carriage. IP23 PROTECTION WELDYSTIFFENER... - Page 7 B - SAFETY INSTRUCTIONS 8695 5876 / E WELDYSTIFFENER...
-
Page 8: C - Description
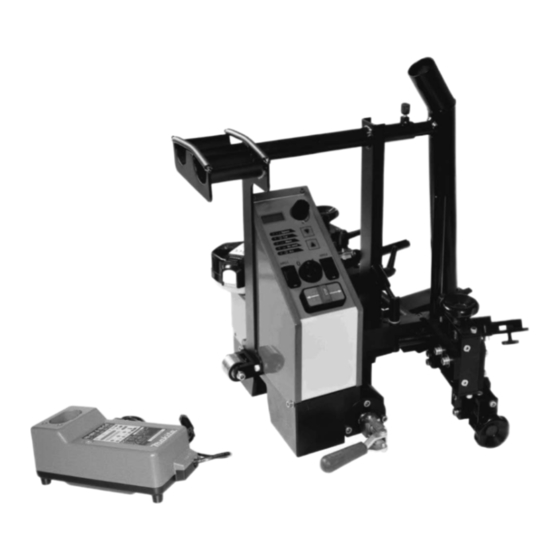
8695 5876 / E C - DESCRIPTION 1 - DEFINITION WELDYSTIFFENER carriages are portable, with two driving wheels, it supports 2 independent torches. They are specially designed for semiautomatic welding of stiffener named " holland – profile " of size : - 60 to 160 mm - 120 to 320 mm. - Page 9 The carriage takes place quickly and easily on the welded seam. The tilted position of the carriage is done by setting the height of the rollers. The troggle clamp allows to maintain the carriage against the profil to be welded. WELDYSTIFFENER...
- Page 10 E) CARRYING Lightweight 16 kg and handy (M7) WELDYSTIFFENER can be held easily by an operator for a fast commissioning.. WELDYSTIFFENER...
-
Page 11: Technical Specifications
1T/2A Operating temperature -5°C to +45°C -5°C to +45°C Storage temperature -10°C to +60°C -10°C to +60°C Relative humidity <90% <90% Dimensions in mm L x l x h 500 x 500 x 500 500 x 500 x 600 WELDYSTIFFENER... -
Page 12: D - Instructions For Use
- selection of the displacement direction (left) - selection of the displacement direction (right) Menu Scroll through menu , confirm and save a selection or setting Indication of battery Display. Numerical incrementing/decrementing potentiometer Switch "arc 1" Switch "arc 2" WELDYSTIFFENER... - Page 13 Connect the charger to a main connector 220-240V / 50-60 Hz. When the battery is well connected, according to the polarities, green warning light goes red and the charge begins. The light remains red during all the charging time. When the charge is over, the light turns green. WELDYSTIFFENER...
-
Page 14: Operating Of Weldystiffener
D - INSTRUCTIONS FOR USE 8695 5876 / E 2 - OPERATING OF WELDYSTIFFENER When power is turned on with M2 - The direction is automatically set to the right - To connect the cable "TRIGGER" on the touch. -
Page 15: Functional Sequence '' Intermittent
With PG = 01 : - WELD = X… Carriage LS / HS and automatic stop - NO WELD = X… after steps. - PA = X… 4 - FUNCTIONAL SEQUENCE '' INTERMITTENT '' WELD NO WELD sequence STEPS (PA) STEPS (PA) WELDYSTIFFENER D-11... -
Page 16: Parameter Setting
A push on the key ---- returns to the preceding parameter and saves the actual parameter The value of parameter can be ARC modified by a rotation of button WELDYSTIFFENER D-12... - Page 17 A push on the key returns to the preceding parameter and saves the actual parameter ( AF ) 0 ou 1 The value of parameter can be modified by a rotation of button WELDYSTIFFENER D-13...
-
Page 18: E - Maintenance
- adjust the clearance of guiding shims on the slides - adjust the clearance of the geared motor on the large sprocket wheel. - wash and grease the wheels. - blow very carefully the electronic card, speed regulator, electric rack. WELDYSTIFFENER E-14... -
Page 19: Spare Parts
W000XXXXXX Machine interface board W000XXXXXX Flowmeter 9357 XXXX Silk-screen printed front panel For parts order, give the quantity required and put the number of your machine in the box below. TYPE: Number: WELDYSTIFFENER E-15... - Page 20 E - MAINTENANCE 8695 5876 / E WELDYSTIFFENER E-16...
- Page 21 Drive wheel Troggle clamp Inox chain + quick link Idler sprocket For parts order, give the quantity required and put the number of your machine in the box below. TYPE: Number: WELDYSTIFFENER E-17...
-
Page 22: Wiring Diagram
E - MAINTENANCE 8695 5876 / E 3 - WIRING DIAGRAM WELDYSTIFFENER E-18... -
Page 23: Pc Board
E - MAINTENANCE 8695 5876 / E 4 - PC BOARD WELDYSTIFFENER E-19... - Page 24 E - MAINTENANCE 8695 5876 / E WELDYSTIFFENER E-20...
-
Page 25: Electrical Maintenance
CPU; idem if distances have been exceeded FAULT WELDING CONTROL -check CPU 's ls1 and ls2 of pc board lits up, if no change pc board CPU -the plug connexion is faulty (follow wiring diagram with CT1/CT2 , plugs X1/X2 ) WELDYSTIFFENER E-21... -
Page 26: Personal Notes
E - MAINTENANCE 8695 5876 / E PERSONAL NOTES Lincoln Electric France S.A.S. Avenue Franklin Roosevelt 76120 Le Grand Quevilly 76121 Le Grand Quevilly cedex www.lincolnelectriceurope.com WELDYSTIFFENER E-22...
Need help?
Do you have a question about the WELDYSTIFFENER and is the answer not in the manual?
Questions and answers