Table of Contents
Advertisement
Quick Links
1
User Manual
For Firmware V1.0.2
※In the interest of product improvement, the specifications and/or the content of products (including but not limited to appearances, packaging design, manual
content, accessories, size, parameters and display screen), are subject to change without prior notice. Please check with local supplier for exact offers. Specifications
and features (including but not limited to appearances, colors and size) may vary by model owing to environmental factors, and all images are illustrative.
Advertisement
Table of Contents

Related Manuals for Hotone AMPERO II STAGE


Summary of Contents for Hotone AMPERO II STAGE
- Page 1 User Manual For Firmware V1.0.2 ※In the interest of product improvement, the specifications and/or the content of products (including but not limited to appearances, packaging design, manual content, accessories, size, parameters and display screen), are subject to change without prior notice. Please check with local supplier for exact offers. Specifications and features (including but not limited to appearances, colors and size) may vary by model owing to environmental factors, and all images are illustrative.
-
Page 2: Table Of Contents
Contents Welcome ··················································································1 Safety Instructions ··································································2 Precautions ···························································································· 2 Definition of intended use ································································· 2 Definitions ···············································································7 Panel ························································································9 Front ········································································································· 9 Top ···········································································································11 Getting Started ······································································13 Using the Interface ································································15 Unit Mode and Main Display ·················································17 Patch Mode ··························································································18 Stomp Mode (FX Chain View) ························································19 Stomp Mode (Footswitch View) ··················································... - Page 3 Scenes ································································································· 50 Patch Settings ····················································································51 FS Settings ·························································································· 52 Quick Access Para ············································································· 53 EXP 1-3 Settings ··············································································· 54 SAVE ······································································································ 56 Patch Management ········································································ 57 GLOBAL ··················································································60 I/O ··········································································································· 60 USB Audio ···························································································· 63 Advanced USB Audio Interface Function Guide ······················ 64 Controls ·······························································································...
-
Page 4: Welcome
Welcome ˃ Welcome Thank you for purchasing a Hotone product. Please read this manual carefully to get the most out of your Ampero II Stage. Please keep this manual in a safe place for further reference. -
Page 5: Safety Instructions
Hotone will not be responsible for physical injury to you or others, or damage to the device or other property. - Page 6 Safety Instructions This device contains no user-serviceable parts. Do not open the device or attempt to disassemble the internal parts or modify them in any way. Opening the case may expose you to dangerous voltages, or other hazards. Opening the casing or performing self-repairs on this device will result in the loss of the warranty eligibility for this device.
- Page 7 Safety Instructions make sure that all volume levels are set to the minimum. Failing to do so may result in hearing loss, electric shock, or device damage. Location Please keep away form children, or be accompanied by an adult. The following may cause choking hazard.
- Page 8 Safety Instructions Please do not apply excessive force to the screen (if applicable) or casing, which may cause malfunction. Please do not expose the unit to strong impact or drop it. Please do not place foreign objects (liquid or solid) into the device. Malfunction If any of the following problems occur, immediately turn off the device and disconnect the electric plug from the outlet.
- Page 9 You can contact the store where you bought the device, or contact Hotone support (service@hotoneaudio.com) Please use this device according to the manual provided. Any other use, as well as use under other operating conditions, is considered improper use.
-
Page 10: Definitions
Module Ampero II Stage employs 13 kinds of effects, each kind is called an “effects module,” or simply “module”. There are several effects available in each module. To use an effect, add a module to an empty effect slot, and then pick one effect in the module. - Page 11 You can use scene function for gap free effect switching or natural delay/ reverb trail spillovers during live performance. Bank A set of 5 patches is called a “bank”. Ampero II Stage has a total of 60 banks, which means, you have up to 300 fully editable/savable patches.
-
Page 12: Panel
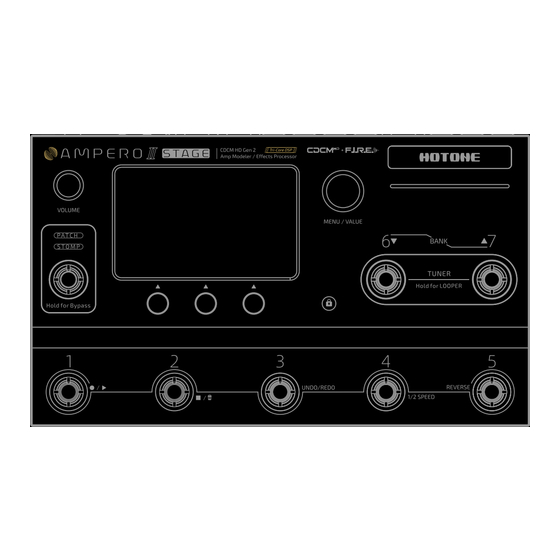
Panel ˃ Panel Front 1. Display Screen: Displays unit current status. Use the touchscreen to select effects, edit patches, and make tone adjustments. Volume Knob: Turning this knob allows you to adjust unbalanced/ balanced (along with headphones output)/Bluetooth (appears when connected) output volume, press to switch between control targets: Turn to adjust selected output volume... - Page 13 Panel Press Volume Press - When Bluetooth disconnected Press Volume Press Volume Press Volume Press - When Bluetooth connected 3. MENU/VALUE Knob (Main Knob): Turning or pressing this knob allows you to change menus and adjust parameters. 4. Screen Lock Button: Use to lock or unlock the touchscreen. 5.
-
Page 14: Top
Panel 12 13 1. EXP/CTRL 1/2: 1/4" (6.35mm) TRS inputs, for connecting external expression pedals/momentary footswitch controllers. Perfect for Ampero II Press. EXP/CTRL 2. INPUT L: 1/4" (6.35mm) unbalanced input connection for guitar or other instruments 3. INPUT R: XLR/TS combo input for instruments or microphones. 4. - Page 15 Panel From other devices (L) From other devices (R) FX Loop return jack 5. UNBALANCED OUTPUT: 1/4" (6.35mm) unbalanced stereo output connections to amplifiers or other equipment. For mono output, use only the left unbalanced output. 6. BALANCED OUTPUT: A pair of balanced XLR outputs for stereo connection to mixer or audio interface.
-
Page 16: Getting Started
Getting Started ˃ Getting Started 1. Connecting your unit Plug your guitar in to the Ampero II Stage’s input L jack and run a cable from OUTPUT L to your amp. Please remember: • Keep your amp volume down. • Connect your cable to the amp’s FX Loop Return if it has one (see Suggested Setups section on page 78) •... - Page 17 Getting Started 4. Select a patch: • Tap footswitch 1-5 to choose a patch you like. • Tap footswitch 6 to move backward through the banks, tap footswitch 7 together to move forward through the banks, tap footswitch 1-5 to select a patch.
-
Page 18: Using The Interface
Using the Interface ˃ Using the Interface Touch operation Changing patches and editing settings can all be done with the touchscreen: Sliding on one bar in parameter list to adjust: Tap on left/right side of the bar for fine tuning a parameter: Tap=Value-1 Tap=Value+1 buttons indicate there are more parameters to be shown. - Page 19 Using the Interface Main Knob Turning the main knob lets you select the object you want to control: The white square indicates current cursor location Then press the knob to confirm the selection: The highlighted patch number square indicates current selection Then turn Main Knob to go through the patches •...
-
Page 20: Unit Mode And Main Display
Ampero II Stage features two modes: Patch Mode and Stomp Mode. Default is set to Patch Mode. Patch Mode is a “classic” mode friendly for most multi-effects users, which is recommended to users who are new to Ampero II Stage or who prefer classic operations. In this mode: •... -
Page 21: Patch Mode
Unit Mode and Main Display Patch Mode 1. Current patch number; press to enter patch list (see Patch Management section on page 57) 2. Current patch name; patch number and name may swap depending on your settings (see Display section on page 74) 3. -
Page 22: Stomp Mode (Fx Chain View)
Unit Mode and Main Display 10. Indicates the current patch tempo; press to enter patch tempo: 11. Indicates current patch volume; press to adjust: 12. Turn on/off Bluetooth audio; the Bluetooth icon will indicate connection status: Flash=waiting for connection, solid=connected 13. -
Page 23: Stomp Mode (Footswitch View)
Unit Mode and Main Display 6. Tap to enter Patch Mode 7. Tap to enter Footswitch View 8. Current patch number; use Main Knob to go through the patches when selected 9. Patch tempo (same as Patch Mode) 10. Patch volume (same as Patch Mode) 11. - Page 24 Unit Mode and Main Display 7. I/O meter (same as Patch Mode) 8. Tap to enter Patch Mode 9. Tap to enter FX Chain View 10. Exp pedal 1 function (same as Patch Mode) 11. Exp pedal 2 function (same as Patch Mode) 12.
-
Page 25: Tuner
Tuner ˃ Tuner Press footswitch 6 and 7 together to open the tuner. In tune Exit tuner Pitch flat Pitch sharp Adjusts the pitch Indicates the current Selects tuner mode calibration note name On the upper part is a scale that indicates your pitch. Left of center is flat, and right of center is sharp. -
Page 26: Looper
Looper ˃ Looper Hold footswitch 6 and 7 until looper menu appears as shown below: Looper progress bar Drum, reverse and 1/2 speed function indicator Lit on=on, grey out=off Back Rec/play time Current patch number Previous patch and patch name Slide to go Next patch through patches... - Page 27 Looper • In Post mode, the looper will record stereo audio with effects CHAIN selects between setting the loop in chain A or chain B. Press FS EDIT button to enter Looper FS Settings menu: • Rec/Play: Tap to recording, then tap again to start playback •...
- Page 28 Looper Looping operation and status modes: Function/ LED Color (Rec/ LED Color (Stop/ Operation Status Play) Clear) On with no data Stop None None Tap Stop/Clear footswitch Stop Flashing green Flashing green while loop is playing Tap Rec/Play footswitch Record Steady red None when there’s no data...
-
Page 29: Drum
Controls drum speed switch Controls drum output Use the style list to scroll between genre styles (see Ampero II Stage Drum Rhythm List). Use TEMPO to adjust the drum tempo, ranging from 40BPM-300BPM. Use VOLUME to adjusts the drum volume from 0-100. -
Page 30: Bypass
In Patch and Stomp modes, hold Mode footswitch to bypass the unit: When the unit is bypassed, press any footswitch to go back to normal. Ampero II Stage supports two bypass modes: DSP Bypass and Analog Bypass. You can set unit bypass mode depending on your needs (see GLOBAL section on page 60). -
Page 31: Customizing Your Unit
Customizing Your Unit ˃ Customizing Your Unit This section will show you how to customize your Ampero II Stage’s settings, edit patches, using scenes, setup the expression pedal, and change other features to your taste. Edit A Patch Edit your patches to get the tone you want. - Page 32 Customizing Your Unit This shows how your Ampero II Stage processes your sound by showing internal signal flow, effect combination, etc. Now let’s see detailed effects chain info: Effects Chain The upper effects chain is called effects chain A (or simply “chain A”), the lower chain is called effects chain B (or simply “chain B”):...
- Page 33 Effect Slots Effect slots (or simply “slots”) are spaces located on an effects chain for adding effects. Ampero II Stage features 6 slots on one effects chain, 12 slots in total. Slot numbering is shown below: Number indicates signal flow:...
-
Page 34: Input Node Setup
Customizing Your Unit • EQ: Equalizers • MOD: Modulation effects • DLY: Delay effects • RVB: Reverb effects There are also 3 FX Loop related modules: • FX SND: FX loop send module for sending signal to external devices via unit’s FX loop send jack •... - Page 35 Customizing Your Unit SOURCE lets you select an input signal source of current effects chain: • Input: Sets the effects chain input source to the unit’s input jack • FX RTN: Sets the effects chain input source to unit’s FX loop return jack •...
-
Page 36: Output Node Setup
Customizing Your Unit Output Node Setup Select an output node and the parameters will come up as shown below: OUTPUT TO lets you decide where the output signal goes: • All Outputs: Sets the signal output to unit’s all output jacks •... -
Page 37: Effects Chain Types
Customizing Your Unit Effects Chain Types Ampero II Stage supports various effects chain types: Parallel The chain A and B are fully parallel (won’t affect each other): When you load an empty patch, the default effects chain type is a special parallel state that only chain A is working. - Page 38 Customizing Your Unit Next we’ll take parallel type as an example to show how to change chain types: Change To A/B-Y Drag and drop output node of chain B on chain A depending on your needs: Change To Y-A/B Drag and drop input node of chain B on chain A depending on your needs: Change To Serial Drag and drop input node of chain B to the output node of chain A: Change To Split-Mix...
-
Page 39: Split/Mixer Node Settings
Customizing Your Unit Split/Mixer Node Settings When using two chains, for best possible result, you need to carefully setup split and mixer nodes. The texts next will you how to setup split and mixer nodes. Split Node Select a split node and the parameters will come up as shown below: Notice the parameter difference between Mode I and II MODE lets you select a signal separation mode:... - Page 40 Customizing Your Unit 2. Mode II In this mode the split node will convert node input signal into dual mono signal and send it to both chain A and B. If the split node is between slots with mixed mono/stereo effects (e.g. one stereo effect in the slot right before the split node, two mono effects in slots right next to the split node on both chains for processing L/R outputs of the stereo effect), this mode is recommended.
- Page 41 Customizing Your Unit Use A/B PAN to set input signal stereo panning from A/B chains. The ranges are all L50~Center~R50, defaults are all set to Center. When you mix A/B chain signals, output may sound very sharp/thin/weak/ muddy, even left and right outputs are L/R not balanced, this may be caused by signal phase issue.
-
Page 42: Effects Chain Templates
Customizing Your Unit Effects Chain Templates You can load built-in effects chain templates for quick setup, or save all your current effects chain settings (incl. chain type and node settings) as a user effects chain template. All templates are global data that won’t change when changing patches. You can load them anytime in any patch. -
Page 43: Slots And Modules Settings
Customizing Your Unit Slots and Modules Settings Add a Module Press any empty effect slot to enter Module/FX Select menu. This lets you add a module to a slot: Move a Module Drag and drop a module on an empty slot (or between slots): Or you can press and hold a module Select Move and choose a target until module edit menu appear:... - Page 44 Customizing Your Unit Swap a Module Drag and drop a module on the target module: DELETE Or you can press and hold a module Select Swap and choose a target until module edit menu appear: module by touchscreen or Main Knob: DELETE Copy/Paste a Module You can copy a module (incl.
- Page 45 Customizing Your Unit Reminder: 1. You need to copy before paste. 2. The copied module can be used in different patches. 3. The copied module data will be lost if the unit power is off. 4. If there already exists a module in target slot, pasting will overwrite existing data.
-
Page 46: Effects Settings
Customizing Your Unit Effects Settings In FX Chain View In FX Chain View, select a slot loaded with a module, and parameter list will show as below: Press switch or use quick access knob 1 to turn the selected slot on/ off. - Page 47 Customizing Your Unit In Module/FX Select Menu You can press current effect name to enter Module/FX Select menu: Analog Delay M Module Type Effect category of selected module Effects list shows available effects in selected category If an effect supports stereo processing, an icon will occur will appear as shown below: : Supports mono in, stereo out...
- Page 48 Customizing Your Unit Set the tempo by repeatedly tapping the footswitch. This tempo will apply to the delay time and other effects with adjustable speed parameters. Tap divide values in relation to their musical beats are shown below: Time Value Beats Display Whole note...
-
Page 49: Using Fx Loop
Customizing Your Unit In some extreme cases the signal processor may become overloaded and display this caution: If this happens (the effect output is probably abnormal), try changing out some of the effects modules/node positions/chain types, move modules back or to another position, delete unnecessary modules, etc. Using FX Loop To use unit’s FX loop jacks you need to: 1. - Page 50 Customizing Your Unit • Mono (R): Mono I/O configuration, receives right channel of input signal only • Stereo: Stereo I/O configuration Use Send Level to adjust output level to FX Loop Send jack from Mute ~ -60dB ~ +20dB, default is set to 0dB. Use Thru Level to adjust output level to next slot/node from Mute ~ -60dB ~ +20dB, default is set to 0dB.
- Page 51 Customizing Your Unit FX LOOP The FX LOOP module sends signal from previous slot/node to FX Loop Send jack and signal from the FX Loop Return jack to next slot/node. When using with external devices, this module will “insert” the external device connected to FX Loop jacks to an effects chain: External device To FX Loop Send jack...
- Page 52 Signal from previous To next slot/node slot/node Ampero II Stage supports both serial and parallel FX loop connection. Fine tune the parameters depending on your needs: • Use as a serial FX loop FX SND: Set Thru Level to 0 FX RTN and FX LOOP: Set Mix to 100, and Send Level cannot be muted •...
-
Page 53: Patch Tempo And Volume
You can use scene function for gap free effect switching, natural delay/ reverb trail spillovers and setting different parameter combinations for different parts of your songs. Ampero II Stage supports up to 5 scenes in a patch. Whenever you select a patch, the default scene selection will always be Scene 1. -
Page 54: Patch Settings
Customizing Your Unit Gain Presence Master Notice that effect selection button is greyed out, indicating function unavailable Reminder: 1. Scene 2-5 settings will be temporarily saved when you switch to another scene in current patch. 2. After editing a scene, if you switch to another patch, all scene settings will be lost. -
Page 55: Fs Settings
Customizing Your Unit In Footswitch View, press button to enter Patch Settings menu: FS Settings This menu allows you to set the footswitch functions in Stomp Mode under the current patch. Select a footswitch you want to assign from FS1-FS7 Choose a function You can only assign one function for each footswitch. -
Page 56: Quick Access Para
Customizing Your Unit Function, module and footswitch color are listed below: Function/Module Color Cyan (LED on=slot on, LED off=slot off, DYN, EQ same below) FREQ, AMP Blue WAH, VOL Purple DRV, DLY White PRE AMP, MOD Green CAB, RVB Gold FX SND/RTN/LOOP Orange Effect Slot (Multiple Selection) -
Page 57: Exp 1-3 Settings
Customizing Your Unit The available selections depend on the modules/effects used in the current patch. Please refer to Effects List for more info. If there is no module/effect, the available selections are NONE, Patch Tempo, Patch Volume and Input Level A only. You can also enter this menu by holding any quick access para (available in Patch Mode and Footswitch View). - Page 58 Customizing Your Unit Select a target module/function Select an expression Select a target effect target parameter Patch Volume Adjusts target expression range (depending on chosen parameter) and curve Target 1-4 let you set the pedal’s control target. You can set up a maximum of four effect parameters/function targets for the expression pedal to control.
-
Page 59: Save
Customizing Your Unit When MIN < MAX When MIN > MAX If you don’t want the expression pedal on, select NONE to turn its function off. For EXP 1/2, you can also enter this menu by holding EXP 1/2 icon (available in Patch Mode and Footswitch View). -
Page 60: Patch Management
In Patch Mode and Footswitch View, press patch number to enter patch list. The patch list menu shows all patches on your Ampero II Stage. You can browse through and jump to a patch directly, edit the patch list order, or copy/paste any patch. - Page 61 Customizing Your Unit Patch Move Swap Press Swap in the management menu, and select a new position you need, then the two patches will be swapped: Patch Swap Rename Select a patch, press Manage button, then press Rename in the management menu: RENAME Enter a name and click OK to finish.
- Page 62 Customizing Your Unit Then find a position you need and press Paste to paste the patch you copied. 1. You need to copy before paste. 2. The copied patch data will be lost when you move/swap patches, exit patch list or the unit power is off. 3.
-
Page 63: Global
GLOBAL ˃ GLOBAL Use the GLOBAL menu to set Ampero II Stage’s global functions like I/O, USB Audio, Global EQ and MIDI settings. You can also return to factory settings from this menu. Global settings will affect unit’s overall working status. These will override any other settings made to your patches. - Page 64 GLOBAL Use INPUT MODE (L)/(R) to select between input modes for individual input jack. • E.GT: Electric guitar or bass • A.GT: Acoustic guitar or other acoustic instruments • Line: Keyboard or synthesizer When a XLR cable is connected to Input R, the INPUT MODE (R) selections will go to: •...
- Page 65 • USB Only: Only USB audio output will be sent to the corresponding jack. When Ampero II Stage is your main USB audio interface, if you need to monitor a track in a DAW while recording (or software monitoring), this selection is recommended.
-
Page 66: Usb Audio
USB OUT OFF BAL. SOURCE FX SND SOURCE Use this menu to set up USB audio settings when using Ampero II Stage as a USB audio interface. Ampero II Stage features an 8-in, 8-out USB audio interface with signal routings shown as below:... -
Page 67: Advanced Usb Audio Interface Function Guide
USB audio interface. Example 1: Monitoring Different Outputs You can use Ampero II Stage’s output/phones jacks and FX loop send jack for monitoring different signal sources. In this example, a guitar is connected to unit’s left input, and a bass is connected to the right input. - Page 68 USB Audio Input 3, output to USB Audio Output 3/4. Then turn on monitor switches on both tracks; (3) On your Ampero II Stage, enter USB Audio menu and set OUTPUT SOURCE to USB OUT 1/2, then set FX SND SOURCE to USB OUT 3/4;...
- Page 69 In this example, all global settings are set to default, and several guitar/bass dry DI tracks are needed: (1) On your Ampero II Stage, create a new patch and use chain A only. Set input node Source to USB OUT 3/4, INPUT CH to L, and keep other parameters as default;...
-
Page 70: Controls
Mode: Initial and Wait. Default is set to Initial. This affects both built-in and external footswitches: • Initial: Ampero II Stage will jump to a new patch immediately after switching a bank. • Wait: When switching banks, the unit will enter patch pre-select menu shown as below: In this menu, the current patch you’re using won’t be changed (footswitch... - Page 71 GLOBAL • The cab will automatically change according to the amp model you choose; matched cab list please check Effects List. EXP/CTRL 1/2 FUNC allows you to set up the working mode of EXP/CTRL 1/2 jack and the functions of external footswitches. Available selections are: •...
- Page 72 GLOBAL • Loop Undo/Redo: Executes undo/redo function • Loop 1/2 SPD: Switches 1/2 speed record/playback on/off • Looper Rev: Switches reverse record/playback on/off • Looper: Enter looper menu • Looper Exit: Exit looper menu • Tuner: Enter/exit tuner • Drum: Enter/exit drum menu •...
- Page 73 GLOBAL Bring the pedal all the way up (back) and press NEXT. Then press the pedal all the way down and press NEXT. The calibration will be set, and this message will appear: Press BACK to return to the previous menu. If the calibration fails, this message will appear: Press REPEAT to begin the calibration process again.
-
Page 74: Midi Settings
CLOCK SOURCE CLOCK OUT(TRS) CLOCK OUT(USB) This menu allows you to set up Ampero II Stage’s MIDI input source, MIDI I/O channels, MIDI clock I/O options. MIDI IN SOURCE allows you to choose a MIDI input source: • TRS Only: Receives MIDI messages from MIDI IN jack only •... -
Page 75: Global Eq
Ampero II Stage’s Tap Tempo will not function. CLOCK OUT (TRS/USB) switches MIDI clock output on/off. Turn on to use Ampero II Stage as your main MIDI clock. If you’re using clock out, the external clock input will be ignored; if you set CLOCK SOURCE to TRS/USB Only, there will be no MIDI clock output. - Page 76 GLOBAL • HIGH CUT: Low pass filter that attenuates high frequency contents above the frequency you set; available parameters are FREQ and Q Detailed parameter descriptions: • FREQ: Controls the filter center frequency/cutoff frequency ranging from 20Hz to 20000Hz. The default FREQ settings of each band are: - LOW CUT and LOW SHELF: 20Hz - BAND 1: 100Hz - BAND 2: 500Hz...
-
Page 77: Display
GLOBAL Display Mode 1 Footswitch English PATCH MODE STOMP MODE LANGUAGE Gold 30 Min Normal COLOR DISPLAY TIME LED STRIP BRIGHTNESS This menu setup display modes and system UI language. Use DISPLAY MODE to switch between two display modes: • Mode 1: The default display mode which stresses patch number: •... -
Page 78: Bluetooth
AUDIO CONTROL Use AUDIO to switch Bluetooth audio on/off. The default Bluetooth audio device name is Ampero II Stage Audio. Use CONTROL to switch Bluetooth control on/off. This affects app connection and Bluetooth MIDI. When switched on, button will appear SEARCH for searching and pairing nearby BLE devices like MIDI controllers (e.g. -
Page 79: About
5. Find your Ampero Control in popped out Search Device menu and confirm connection. Ampero Control’s name may vary depending on your settings. Then you can use Ampero Control to control Ampero II Stage via Bluetooth depending on your needs. About Firmware Version V1.0.6... - Page 80 Choose a selection depending on your needs. Remember, resetting Ampero II Stage will delete part/all of your saved changes and personal settings. Once it is executed, it cannot be undone, so please back up your settings before performing a factory reset.
-
Page 81: Suggested Setups
Suggested Setups ˃ Suggested Setups Here are some common setups to get the most out of Ampero II Stage. Using with your instrument and amp Plug your instrument into the unit’s input L jack (or L+R if stereo connection is needed), and run a cable (or two) from the output jack(s) to your amplifier(s). -
Page 82: Connecting To Your Amp's Return Or Power Amp
If you have one amp, run the cable from the left output. When using with non-FRFR amps, for best results, turn off the CAB module on Ampero II Stage. Sometimes, the AMP module may sound harsh or boomy when running through FX Loop Return jack on some amps. -
Page 83: On-Stage Dual Outputs
Suggested Setups On-stage dual outputs In this scenario, we recommend to use Y-A/B chain template: - Chain A: Normal output with cab sim, send directly to mixer via XLR outputs; - Chain B: Without cab sim, send to stage instrument amps via unbalanced outputs for monitoring In this case, you can also pick up instrument amplifiers and mix them with Chain A outputs on mixer. -
Page 84: Singer Performing With Instruments
Suggested Setups Singer performing with instruments In this scenario, we recommend to use independent effects chains: - Chain A: Processes instrument signal only and send to instrument amps via unbalanced outputs (or mixer/PA depending on your needs) - Chain B: Processes vocal signal and send to mixer/full range speakers via XLR outputs... -
Page 85: Connecting Your Mixer, Interface, Headphones, And Other
Turn the output volume all the way down before connecting headphones to prevent harm to your ears. Ampero II Stage’s headphones out comes with hi- fi stereo sound. For best results, please use AMP/PRE AMP and CAB modules. -
Page 86: Connecting To Your Computer As An Audio Interface
Connect a USB cable from Ampero II Stage to your computer. For PC systems, you’ll need to set up the driver. Ampero II Stage is plug and play for macOS. Run line out cables to your monitors, or use headphones. -
Page 87: Using Bluetooth Audio And Aux In
Suggested Setups Using Bluetooth audio and AUX IN Find an aux cable and connect to Ampero II Stage with your music player. You can also pair and play music via Bluetooth connection. Then you can practice and improvise as much as you want with backing tracks or built-in drum/... -
Page 88: The Editor
The Editor ˃ The Editor Connect Ampero II Stage to your computer and access the free software to manage your device, adjust tonal settings, transfer files, update firmware, and upload third party IR files. Ampero II Stage editor is compatible with Windows, macOS, iOS and Android platforms. -
Page 89: Troubleshooting
Troubleshooting ˃ Troubleshooting Device won’t turn on • Make sure the power supply is properly connected and the device is switched on. • Check if the power adapter is working properly. • Check if you’re using the correct power adapter. No sound or slight sound •... - Page 90 Troubleshooting • If you’re using an external expression pedal to control distortion or other similar parameters, check to see if the expression pedal is set up properly. • Check your effects parameter setup. If effects are set to extremes, Ampero II Stage may only emit noise.
-
Page 91: Technical Specifications
Technical Specifications ˃ Technical Specifications Effects Digital Audio Signal Processing: 24-bit depth, 44. 1 kHz sample rate Frequency Response: 20Hz – 20kHz ± 1dB Dynamic Range: Max. 127 dB (digital to analog) Effects: 460+ (incl. global EQ) No. of Effect Modules: 16 Effects Slots: Total of 12 simultaneous effects slots Patches: 300 Looper Time: Stereo 60 seconds... - Page 92 Technical Specifications Input Impedance: - 1/4" (6.35mm) Tip Sleeve (TS) Input: E.GT: 1MΩ; A.GT: 4.7MΩ; LINE: 10kΩ - XLR Input: 5kΩ - FX Loop Return: 100kΩ - Aux In: 10kΩ Output Impedance: - Unbalanced Output: 1kΩ - Balanced Output: 1kΩ - FX Loop Send: 1kΩ...
Need help?
Do you have a question about the AMPERO II STAGE and is the answer not in the manual?
Questions and answers
Ampero 2 stage problemI get no sound through the XLR outputs. meter shows signal to my mixer but no sound. either through speakers or headphone out from the mixer. I can plug same xlr cable in to my simplifier x and get sound. So problem is isolated to the ampero stage 2. I have made sure to check the input and output options to be sure they are set correctly as far as I know.
The cause of no sound through the XLR outputs on the Hotone Ampero II Stage, despite showing a signal, could be the *Ground Lift* function being turned on. When the Ground Lift is activated, it disconnects the ground connection of the XLR outputs to avoid noise caused by a Ground Loop, which may also result in no sound output. Ensure the Ground Lift is turned off for normal grounding and sound output.
This answer is automatically generated
how do I assign my hotline expression pedal for volume to a new patch