Table of Contents
Advertisement
Quick Links
Advertisement
Table of Contents

Related Manuals for GIONIEN GTM724T


Summary of Contents for GIONIEN GTM724T
- Page 1 Ceramic Hob Instruction Manual / Installation Manual MODEL: GTM724T...
-
Page 2: Safety Warnings
Safety Warnings Your safety is important to us.Please read this information before using your cooktop. The appliance is not to be used by persons (including children) with reduced physical, sensory or mental capabilities,or lack of experience and knowledge,unless they have been given supervision or instruction.Children being supervised not to play with the appliance.Cleaning and user maintenance... - Page 3 CAUTION:The cooking process has to be supervised.A short term cooking process has to be supervised continuously. WARNING:Unattended cooking on a hob with fat or oil can be dangerous and may result in a fire. If the supply cord is damaged,it must be ...
-
Page 4: Product Overview
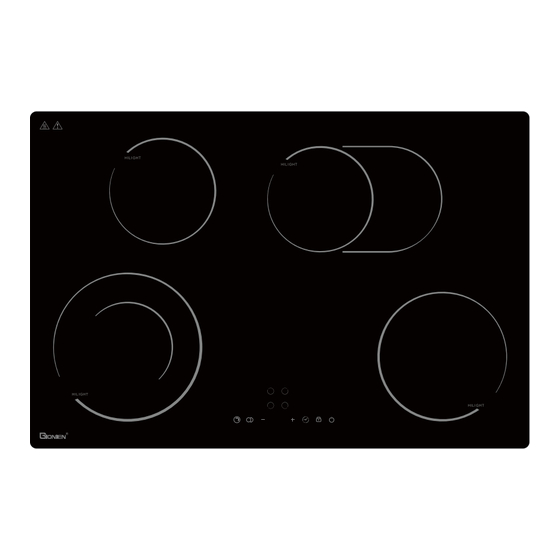
Product Overview Top View Heating zone Power Heating Zone Max.Power(220-240V~ 50/60Hz) 2200W/1100W(230~) (Double ring) 1200W(230~) 2000W/1100W(230~) 1800W(230~) Total Rating Power 7200W(230~) -
Page 5: User Interface
User interface 邑 Reference Description Zone Select Key ON/OFF Key Power Regulating Key(Reduce) Power Regulating Key(Increase) Double Ring Control Key Child Lock Key . . . Timer Key . . • • •... - Page 6 Product functions > The ceramic hob caters for all kind of cooking,with its radiant heat cooking zones and its electronic touch controls and multi-functions, making it the ideal choice for the modern family. > The ceramic hob is extremely user-friendly,durable and safe. Special functions Protection from over-heating A sensor monitors the temperature in the cooking zones.When the...
-
Page 7: Before Using Your New Ceramic Hob
Before using your New Ceramic Hob • Read this guide,taking special note of the ‘Safety Warnings’ section. • Remove any protective film that may still be on your Ceramic hob. Using the Touch Controls • The controls respond to touch,so you don’t need to apply any pressure. •... -
Page 8: Using Your Ceramic Hob
Always lift pans off the ceramic hob – do not slide,or they may scratch the glass. Using your Ceramic Hob To start cooking 1.Place a suitable pan on the cooking zone that you wish to use. • Make sure the bottom of the pan and the surface Of the cooking zone are clean and dry. -
Page 9: Using The Timer
from 9 to 0. • If you don’t choose a heat setting within 20 seconds, the ceramic hob will automatically switch off. You will need to start again at step 2. • You can modify the heat setting at any time during cooking. Using Child Lock Function •... - Page 10 3.Using the “ “ or ” ” buttons,you can realize the setting of timing from 1 to 99 minutes. 4.When the time is set,it will begin to count down immediately.The red dot next to power level indicator will illuminate indicating that zone has set timer. 5.If you need to check the remaining time,you can operate step 1 and step 2 again.
-
Page 11: Care And Maintenance
Care and maintenance Warning Always switch off the electricity supply before performing maintenance work. In the event of a fault, contact customer services. Damaged power cables should be replaced by a competent person or qualified electrician. For domestic use only. Never place an empty pan on the hob as this will cause an error message to appear on the control panel. - Page 12 Appliance cleanliness Caution • Avoid rubbing with any abrasive or with the base of the pans, etc, as this will wear the markings on the top of the ceramic hob over time. • Clean the ceramic hob on a regular basis to prevent the build up of food residue.
-
Page 13: Troubleshooting
The above are the judgment and inspection of common failures. Please do not disassemble the unit by yourself to avoid any dangers and damages to the ceramic hob and please contact the supplier. Technical Specification GTM724T Cooking Hob Cooking Zones 4 Zones... -
Page 14: Selection Of Installation Equipment
Installation Selection of installation equipment Cut out the work surface according to the sizes shown in the drawing. For the purpose of installation and use,a minimum of 5 cm space shall be preserved around the hole. Be sure the thickness of the work surface is at least 30 mm.Please select heat-resistant work surface material to avoid larger deformation caused by the heat radiation from the hotplate. - Page 15 A(mm) B(mm) C(mm) 50 mini 20 mini Air intake Air exit 5mm Before you install the hob,make sure that • The work surface is square and level, and no structural members interfere with space requirements. • The work surface is made of a heat-resistant material. •...
- Page 16 Installation fig.1 Cut out worktop to supplied dimensions shown(fig.1) with suitable equipment. Seal the cut edge of the worktop using silicone PTFE and allow to dry prior to fitting the hob. fig.2 Stretch out the supplied seal along the underside edge of the hob,ensuring the ends overlap.
-
Page 17: Connecting The Hob To The Mains Power Supply
Cautions 1.The ceramic hotplate must be installed by qualified personnel or technicians. We have professionals at your service.Please never conduct the operation by yourself. 2.The hob will not be installed directly above a dishwasher,fridge,freezer, washing machine or clothes dryer,as the humidity may damage the hob electronics. - Page 18 This appliance requires a 32 Amp Miniature Circuit Breaker. • If the cable is damaged or to be replaced, the operation must be carried out the by after-sale agent with dedicated tools to avoid any accidents. • If the appliance is being connected directly to the mains an omnipolar circuit-breaker must be installed with a minimum opening of 3mm between contacts.
Need help?
Do you have a question about the GTM724T and is the answer not in the manual?
Questions and answers