Denon CDR-1000 - CD RECORDER Manual
- Brochure & specs (2 pages) ,
- Operating instructions manual (50 pages)
Advertisement
- 1 FEATURES
- 2 CAUTIONS DURING USE
- 3 ABOUT CD-R/RW DISCS
- 4 DISC HANDLING AND PRECAUTIONS
- 5 RESTRICTIONS RELATED TO THE CD-R/RW STANDARDS
- 6 CONNECTIONS
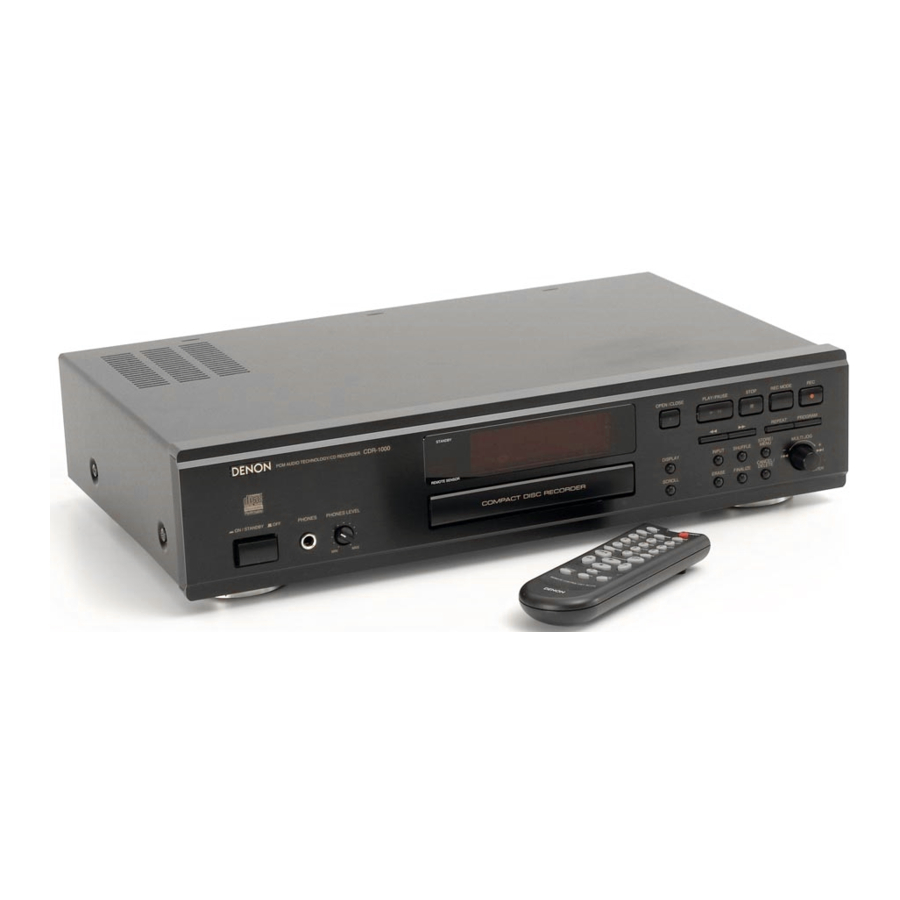
- 7 PART NAMES AND FUNCTIONS
- 8 REMOTE CONTROL UNIT
- 9 RECORDING
- 10 PLAYING
- 11 PROGRAMMING
- 12 MENU MODE
- 13 TROUBLESHOOTING
- 14 MAIN SPECIFICATIONS
- 15 SAFETY INSTRUCTIONS
- 16 Documents / Resources
FEATURES
- Various Recording Modes
- This unit is equipped with three convenient synchro-recording functions: Disc Synchro-recording records one album from the source side, Track Synchro-recording records your desired tracks one at a time, and Auto Finalize Synchro-recording automatically performs finalization upon completion of Disc Synchro-recording. Manual recording is also permitted with manual operation. Fade-in and fade-out recording is also supported, enabling you to create your own original discs.
- Wide Variety of Playback Functions
- Various playback modes are provided for your enjoyment including programmed play, shuffle (random) play, single track or all track repeat play, as well as intro scan play which allows you to listen to the initial portion of successive tracks.
- Rich Variety of Digital Input Jacks
- In addition to the analog input jacks, this unit is equipped with a total of three digital input jacks. There is one optical digital input jack for use with digital sources such as CD, MD and satellite broadcasts, and there are two digital coaxial input jacks.
- Equipped with Sampling Rate Converter
- This converter permits direct digital input recording from DAT or satellite broadcasts (32 kHz, 48 kHz) which have sampling frequencies that differ from that of the 44.1 kHz used with CD and MD.
- Text Entry and Display Function
- The album title, artist name, and the track title and artist names for individual tracks can be entered and displayed for recorded CD-R/RW discs.
CAUTIONS DURING USE
- During track selection, during search and when the recorder sustains a strong impact, the disc's rotational speed changes greatly, causing a small noise to be emitted. This is not a malfunction of the recorder.
- If the CD recorder is operated while an FM or AM broadcast is being received, there may be noise in the FM or AM reception. Please switch the power to the CD recorder off at such times.
- The CDR-1000 has a broad dynamic range. Please exercise caution when turning up the volume on the amplifier in cases when the playback volume is low. If the volume is turned up too high, it could damage the speakers.
- Placing this recorder or its connection cords near a TV or other audio device could cause a humming sound to be emitted. If this occurs, relocate the recorder or reroute the connection cords.
- Be sure to remove the disc from the recorder before moving it. The disc could be damaged if left in the recorder while it is being moved.
- Do not place any object in the tray in the position where the disc is loaded, or open and close the tray with anything inside. Foreign objects in the tray could damage the play mechanism.
- Do not move the recorder from a cold place to a warm place suddenly. If the recorder is cold when brought into a warm room, condensation could form, preventing proper operation of the recorder. If condensation does form on the recorder when it is brought into a warm room, wait at least 30 minutes before use.
ABOUT CD-R/RW DISCS
Discs that Can Be Used with this Unit
CD-R Discs and CD-RW Discs
Be sure to use discs that bear either of the following marks when recording with this unit.

* Recording will not be possible with discs that do not bear the aforementioned marks.
CD Discs

This unit uses CDs (optical digital audio discs) which bear the mark located at the right. Note that specially shaped CDs, for example, heart shaped or hexagonal cannot be played. Do not attempt to use such CDs since doing so may cause breakdown of this unit.

CD Text Discs

This unit can display text information on the display when playing CD text discs which contain text information in English category. The CD text disc includes the mark shown at the right.
 NOTE:
NOTE:
- This unit can provide a text display of the following types of characters. Other types of characters will result in "_" being displayed.
- Alphabet
![]()
- Numbers
![]()
- Alphabet
- Symbols
![]() ( _is a blank.)
( _is a blank.)


 ( _is a blank.)
Methods of Recording to Disc
CD-R Discs
- CD-R discs incorporate a pigment layer for recording. When exposed to the recording laser, a change in form occurs at the boundary of this layer and the plastic layer resulting in the recording of the signal. The recorded information is maintained until the end of the life of the disc.
- After recording, finalized discs can be played on ordinary CD players.
CD-RW Discs
- CD-RW discs incorporate a phase change layer. The recording process causes this layer to change from a crystal (reflective) condition to an amorphous (noncrystal) condition.
- Recorded information can be erased from CD-RW discs. Deletion can take the form of deleting all of the disc tracks or only the specified tracks working back from the last track of the disc.
- Finalized CD-RW discs can be played on CD players designed for use with CD-RW discs as well as on CD recorders.
Digital Copies
A CD-R/RW disc onto which has been recorded using the digital input cannot be further digitally recorded (i.e., copied) onto a separate CD-R/RW disc or MD, etc.. This is a standard established by the SCMS (Serial Copy Management System).

Track Numbers: Auto Track Function
* Recording in the Synchro-recording mode (e.g., disc Synchro-recording, track Synchro-recording, and auto finalization recording) results in the track numbers being automatically associated. The manner in which the track numbers are associated will differ as follows for digital recording and for analog recording depending on the conditions.
Recording from a digital input

When making a digital recording from a CD, MD or DAT, a track number that is the same as the original track number will automatically be associated. (This system automatically detects the track switching number that has been recorded to the CD, MD or DAT and switches the track number.)
- When recording from a satellite broadcasts or other digital equipment, the detection of a blank portion of about 2.7 seconds or longer, the same as when making recordings with an analog input, will result in the operation of the auto track function and the automatic association of the track number.
- A blank portion is regarded as having a recording level of –55 dB or less.
- The track number might not switch correctly when there is a lot of noise in the blank portion between tracks.
- The track number might change when the signal level is very low within the track.
Recording from an analog input

Track numbers will automatically be associated when a blank portion of about 2.7 seconds or longer is detected.
- When the input signal is affected by noise or there is some other interference, the track number might not change at the correct position.
- The track number might change when the signal level is very low within the track.
* The on/off setting of the auto track function is possible in manual recording. (See "Auto track increment".)
NOTES:
- DAT track selection signals (Start ID) are recorded slightly after the beginning of tracks, so when DATs are recorded as such, the beginning of the first track may be missing and the track numbers may only change after the tracks begin. In such cases, move the DAT Start ID to the proper positions before recording the DAT.
- When recording an analog source that contains a very low level signal within the track, or a digital source other than CD/MD/DAT, switch off the auto track function then make a manual recording and associate the track numbers manually.
- When the recording level is set too low while recording an analog source or a digital source other than CD/MD/DAT, the track numbers might not be associated at the correct position. Please set a suitable recording level. (See "Setting of the Recording Level".)
Finalization Processing of CD-R Discs

After the recording of a CD-R disc is completed, finalization processing is required to enable it to be played on an ordinary CD player.
NOTES:
- Once a CD-R disc has been finalized, additional recording will no longer be possible.
- The information that has been recorded to a CD-R disc cannot be erased.
Finalization Processing of CD-RW Discs
CD-RW discs cannot be played on an ordinary CD player, even with finalization processing. Playback is possible only on CD recorders or players suited for use with CD- RW discs. They can only be played on a player that is suited for use with CD-RW discs. Also note that CD-RW discs can be erased after being finalized.
DISC HANDLING AND PRECAUTIONS
Disc Handling
Avoid touching the surface of the disc when inserting or removing it.

Be careful not to get fingerprints on the signal recording surface.
Disc Cleaning
- When the disc has become marked with fingerprints or dirt, wipe it clean before use. The dirt will not affect the signal of the disc, but the sound quality may drop and there may be breaks in the sound. Note that when the surface of a CDR/RW disc is dirty, it may not record properly.
- To wipe the disc clean, use one of the disc cleaning sets available on the market or a soft cloth.
![]()
Lightly wipe in the direction from centre to outside.
![]()
Do not wipe in a circular manner.


Storage Precautions
- Be sure to eject the disc after playing.
- Always return the disc to its case to avoid dust, scratches, and misshaping.
- Do not leave the disc in the following places:
- Where it will be exposed to direct sunlight for long periods.
- Where there is a lot of dampness and dust.
- Where it will be exposed to heat such as from a heater.
NOTES:
- Do not attach commercially available disc labels or other seals on the disc. Doing so may make it impossible to record or play the disc properly.
![]()
- Do not use record spray or static electricity prevention products. Do not use benzene, thinner, or other volatile chemicals.
![]()


Handling Precautions
- Do not allow fingerprints, oil, or dirt to adhere.
- Be careful not to scratch the surface, especially when removing or returning the disc to the case.
- Do not bend the disc.
- Do not heat the disc.
- Do not enlarge the center hole.
- Do not write on the label surface (i.e., printed side) with a ballpoint pen or pencil.
- Water droplets may form on the surface of the disc when it is suddenly brought from a cold place such as outdoors to a warm place. If this happens, do not dry the disc with a hair dryer.
Precautions When Loading Discs
- Only load one disc. Loading two or more discs in a layer will cause breakdown and may also scratch the discs.
- Discs of the 8 cm size should be carefully aligned with the recessed disc guide area and loaded without the use of an adapter. If not properly loaded, the disc may fall out or the disc holder may cease to open.
- Be careful not to get your finger caught when the disc holder is closing.
- Do not place anything other than a disc on the disc tray.
- Do not use discs that are cracked, misshapen, or have been repaired with an adhesive, etc.
- Do not use discs that have adhesive coming out from cellophane tape or the label of a rental disc, or adhesive remaining after removal of the label. Use of a disc in this condition may result in the disc not being ejected or in breakdown.
RESTRICTIONS RELATED TO THE CD-R/RW STANDARDS
* Standards concerned with CD recorder playback have been established based on the existing standards of CD players; however, for recording, the method differs from that used with existing cassette decks and MD recorders, etc. In view of this, please gain a good understanding of the following restrictions associated with CD-R/RW discs and enjoy the medium.
Restrictions of Audio CD-R/RW Discs
- Only audio CD-R/RW discs can be recorded with this unit. "WRONG DISC" will be displayed when a disc other than one for use with audio such as a CD-R/RW disc for use with a personal computer or another type of disc is loaded. (See "Discs that Can Be Used with this unit".)
- CD-R discs can be recorded to only once. The recorded information cannot be erased.
- The recorded information of CD-RW discs can be erased. When this disc has been finalized, erase after the finalization removal operation has been performed. (See "Unfinalizing CD-RW Discs")
- Recording mistakes made with CD-R discs cannot be erased; therefore, it is recommended that a CD-RW disc be used until you are accustomed to the recording operation.
Restrictions in Recording with this Unit
- The recording operation procedure is the same for CD-R discs and CD-RW discs.
- When making additional recording to a previously recorded disc, the end of the last track is detected and recording is started from there.
- The record standby mode cannot be set for CD-R/RW discs with a recordable time of about 7 seconds or less remaining. "DISC FULL" will be displayed at this time.
- Songs with a recording time of less than 4 seconds cannot be recorded. Stopping the recording within 3 seconds of starting will result in no recording.
- A maximum of 99 tracks can be recorded to one CD-R/RW disc. When the recording reaches the 99th track, "DISC FULL" is displayed and recordings beyond this track will not be possible.
- Digital recording is not possible from CD-R/RW discs onto which have been digitally recorded, normal is it possible from MD or DAT, etc. When a digital recording is attempted from such sources, "COPY PROTECT" is displayed. To record from these digital sources, make the recording from the analog input. (See "Digital Copies")
- This unit cannot record CD-ROM and other non-audio signal sources. When an attempt is made to record from such sources,"NO AUDIO TR" is displayed.
- When a recording is made from a disc that includes data other than audio signals such as CD graphics or CD-TEXT, only the audio signal is recorded; other data is not recorded.
- DVD (Dolby Digital, DTS, and other compressed audio signals) cannot be recorded.
Compatibility with Other CD Players and Discs
- Finalization processing on a CD-R disc that has been recorded with this unit will permit that disc to be played on ordinary CD player. (See "Finalization Processing of CD-R Discs".)
- Finalization processing on a CD-RW disc that has been recorded with this unit will permit that disc to be played only on a CD player designed to be used with CD-RW discs or on another CD recorder. (See "Finalization Processing of CD-RW Discs".)
NOTES:
- To assure accurate recording, record with an ambient temperature of 30°C or less.
- Do not obstruct the ventilation holes on the top and side.
- Recording may stop if the unit is subject to shocks during recording. If recording stops, it may no longer be possible to use the disc normally.
CONNECTIONS
Analog Input/Output Jack Connections

- Use the supplied pin plug cable when making connections with the analog input/output jacks.
- Input:
Connect the analog input jacks (ANALOG IN) of this unit with the output jacks of the amplifier (MD or TAPE). - Output:
Connect the analog output jacks (ANALOG OUT) of this unit with the input jacks of the amplifier (MD or TAPE).
Connection of Digital Input/Output Jacks

- Please use the supplied optical fiber cables when making connections to the digital (OPTICAL) input/output jacks. Use 75Ω/ohms pin plug cable, which is available on the market, when making connections to the digital (COAXIAL) input/output jacks.
- Input:
Connections with Playback Equipment such as the CD Players
The digital input jacks of this unit (either DIGITAL IN OPTICAL or DIGITAL IN COAXIAL) should be connected with the digital output jacks of the CD player (OPTICAL or COAXIAL). Up to three pieces of digital playback equipment can be connected. - Output:
Connections with Equipment having a Digital Input such as the MD Recorder
The digital output jacks of this unit (either DIGITAL OUT OPTICAL or DIGITAL OUT COAXIAL) should be connected with the digital input jacks of the MD recorder or other equipment (OPTICAL or COAXIAL).
NOTES:
- Do not plug the power plug into the power outlet until all connections have been completed.
- Connect the red plug of the pin plug cable into the R (right) jack and the white plug into the L (left) jack.
- Do not make a connection to the PHONO jack of the amplifier. Doing so will lead to breakdown.
- Firmly plug in the power plug. An imperfect connection will cause noise to be generated.
- Bundling the connection cables together with the power cable will cause hum or other noise.
- When the power plug is disconnected from the power outlet, wait about 5 seconds before reinserting.
Connection of the AC Cord
- Plug the power cord supplied into the AC IN on the CD recorder, then into a mains socket.
PART NAMES AND FUNCTIONS
Front Panel

- Power button
- Turns the CD recorder ON and OFF.
- When the power is ON, On/Standby switching is possible with the power button of the remote control.
- Phones jack (PHONES)
- Jack for headphones.
- Phones level control (PHONES LEVEL)
- Adjust the headphone volume.
- Remote control sensor (REMOTE SENSOR)
- Receives signals from the remote control.
- Disc tray
- Display button (DISPLAY)
- Selects display information/text.
- Scroll button (SCROLL)
- Use to display the text information once only.
- Input button (INPUT)
- Selects input source.
- Switching will be as follows each time the button is pressed.
![]()
* Switching is not permitted during recording.
- Erase button (ERASE)
- Selects erasing mode.
- Shuffle button (SHUFFLE)
- Plays CD, CD-R/RW or program in random order.
- Finalize button (FINALIZE)
- Selects finalize mode.
- Cancel/Delete button (CANCEL/DELETE)
- Deletes tracks from a program.
- Deletes text in Menu mode.
- Returns to a higher level in the menu.
- Store/Menu button (STORE/MENU)
- Enters Menu mode.
- Stores Menu settings.
- Multi Jog dial (
![]() MULTI JOG
MULTI JOG ![]() )
) - Beginning of the current/next track (Play and Program mode).
- Recording level control (Recording).
- Selects settings (Menu mode).
Enter button (ENTER) (push) - Plays selected tracks.
- Selects settings in Menu mode.
- Programs track numbers.

- Rec button (REC)
- Starts recording (Manual REC Mode) finalizing, erasing.
- Program button (PROGRAM)
- Opens/closes program memory.
- Rec Mode button (REC MODE)
- Selects recording modes.
- Repeat button (REPEAT)
- Selects repeat mode.
- Switching will be as follows each time the button is pressed.
![]()

- Stop button (
![]() STOP)
STOP) - Stops/clears a program.
- Manual search forward button (
![]() )
) - Searches forward.
- Use this to fast-forward in Menu/Program.
- Play/Pause button (
![]() PLAY/PAUSE)
PLAY/PAUSE) - Starts play/interrupts play or recording.
- Manual search reverse button (
![]() )
) - Searches backward.
- Use this to fast-reverse in Menu/Program.
- Open/Close button (
![]() OPEN/CLOSE)
OPEN/CLOSE) - Opens/closes disc tray.
- Display
- Information screen.
- Standby indicator (STANDBY)
 PLAY/PAUSE)
 Rear Panel

- Analog output jacks (ANALOG OUT)
- Connects to the line input of an amplifier (left and right).
- Analog input jacks (ANALOG IN)
- Connects to the line output of an amplifier (left and right).
- Digital output jack (DIGITAL OUT COAXIAL)
- Connects to the digital coaxial input of e.g. amplifier or recording device.
- Digital output jack (DIGITAL OUT OPTICAL)
- Connects to the digital optical input of e.g. amplifier or recording device.
- Digital input jacks (DIGITAL IN COAXIAL-1, 2)
- Connects to the digital coaxial output of an external digital sources.
- Two systems can be connected. Use the INPUT button to select "DIGITAL I" or "DIGITAL II".
- Digital input jack (DIGITAL IN OPTICAL)
- Connects to the digital optical output of an external digital source.
- AC inlet (AC IN)
- Connect the supplied power cable.
Display indications

- Input source display
- DIGITAL I: DIGITAL IN COAXIAL-1 selected for external recording.
- DIGITAL II: DIGITAL IN COAXIAL-2 selected for external recording.
- OPTICAL I: DIGITAL IN OPTICAL selected for external recording.
- ANALOG: ANALOG IN selected.
- Music calendar display
- Tracks on a disc or in a program.
- Track in play/recording.
- The "+" sign is displayed when there are 21 or more track numbers.
- Mode display
![]() :
:
CD (a pre-recorded CD or finalized CD-R or CD-RW disc) is loaded.![]() R:
R:
An unfinalized CD-R disc is loaded.![]() RW:
RW:
An unfinalized CD-RW disc is loaded.- ● : Lights during recording.
- ►: Lights during play/recording.
![]() : Pause function active.
: Pause function active.- PROGRAM:
Flashes during programming/lights in program mode. - MANUAL:
Manual recording active. (In auto track increment mode OFF) - SYNC:
Synchronized recording active. - SHUFFLE:
Plays tracks in random order. - REPEAT TRACK/ALL:
Lights up when a track/complete disc (or program) is repeated. - SCAN:
Lights up when the first 10 seconds of each track are played. - STEP:
Indicates the number of tracks in a program. - FADE:
Fade mode active. ![]() :
:
Balance (lights during balance adjustment).![]() :
:
Remote control active.
- Level meter
- Record/play level bar, indicates the audio signal level.
- Multiple display
- This display indicates the number of tracks, track number, play time, recording time, various operational information, text messages, etc.
- Time display
- TOTAL REM/TRACK TIME:
Total or remaining time of disc or track. - TRACK:
Track number. - REM TIME:
Remaining recording time/recording time.
- TOTAL REM/TRACK TIME:
 :
:Display messages
Messages, as listed and explained here, may appear on the display for your guidance.
General
READING: Reading disc information.
OPEN: During tray opening.
CLOSE: During tray closing.
NO DISC: No disc inserted, disc unreadable or disc inserted upside down.
PROG FULL: Program full.
INSERT DISC: Insert disc or insert disc in correct way.
WRONG DISC: Inserted disc is no audio CD.
USE AUDIO CD
UNFINALIZED: Unfinalized CD-R/RW disc.
MEMORY  : Indicates the amount of text memory used for unfinalized discs.
Recording
WAIT: The specified operation is being set.
UPDATE: Updating disc contents.
DISC FULL: No more recording possible.
DIGITAL I: Digital input coaxial 1 selected.
DIGITAL 2: Digital input coaxial 2 selected.
OPTICAL: Digital input optical selected.
ANALOG: Analog input selected.
COPY PROTECT: No digital recording can be made of the connected source. See "Digital Copies".
NOT FINALIZED: When opening the tray with an unfinalized disc inserted.
MAKE CD: Start of synchronized recording of a complete disc and Auto Finalize function selected.
RECORD DISC: Start of synchronized recording of a complete disc.
RECORD TRACK: Start of synchronized recording of a single track.
REC MANUAL: Manual start of recording selected.
 DB: Level is being adjusted.
ERASE TRACK: When erasing one or more tracks.
ERASE DISC: When erasing a disc.
FINALIZE CD: When finalizing a disc.
FINALIZED: When trying to finalize an already finalized disc.
CHECK INPUT: When REC button is pressed while no digital source is detected.
 ERASE: Time countdown when erasing a track or a disc.
FINAL: Time countdown when finalizing a disc.
UNFINAL: Time countdown when unfinalizing a disc.
MONITOR MODE: Monitor mode (sample rate convertor) active.
PRESS RECORD: To start manual recording, finalizing or erasing.
START SOURCE: To start synchronised recording from a source.
FINALIZED CD: When trying to record on a finalized CD-R or a prerecorded CD.
UNFINALIZE PRESS ENTER: When trying to record on a finalized CD-RW.
PROF SOURCE: When a professional source is connected.
USE REC MODE: Press the REC MODE button.
Play
PROGRAM: Program mode selected.
ALBUM TITLE: Will be followed by album title.
TRACK TITLE: Will be followed by track title.
ALBUM ARTIST: Will be followed by artist name.
TRACK ARTIST: Will be followed by track artist name.
Others
NO AUDIO TR: When the recorder enters a data track during recording.
INITIALIZING: During laser power calibration for unfinalized discs.
DISC RECOVER: During disc recovering after power failure.
OPC ERROR: OPC failure during OPC procedure (OPC = Optimum Power Calibration)
RECORD ERROR: An error has occurred during recording.
DISC ERROR: Recording or finalization is not possible due to a disc fault.
MEMORY FULL FINALIZE CD: When text memory is full. To add a to the list, first finalize or erase another disc from the list.
Menu messages
Menu messages
NO TRACKS: When attempting to edit text for a disc which has no tracks.
TEXT EDIT: When entering Text Edit mode.
ALBUM ARTIST: When editing or erasing an artist name.
ALBUM TITLE: When editing or erasing a title.
ARTIST TR  : When editing or erasing an artist name per track.
TITLE TR : When editing or erasing a title per track.
TEXT ERASE: When entering Text Erase mode.
ALL TEXT: When entering All Text mode.
ERASE OK: When confirmation for erasing has to be given with ENTER button.
ERASE ALL OK: Confirmation for erasing the text of the entire album has to be made with the ENTER button.
ERASE MEMORY: When waiting for confirmation when erasing a disc.
MEMORY VIEW: When selecting text review per unfinalized disc in memory.
MEMORY EMPTY: When text memory review mode is selected while no text is in memory.
AUTO TRACK: When selecting auto track increment ON or OFF.
ON: Auto Track increment or Fade on.
OFF: Auto Track increment or Fade off.
SET BALANCE: When selecting Balance setting mode.
SET FADE: When selecting FADE adjustment.
FADE ON/OFF: When switching FADE on or off.
SET FADE IN: When setting the FADE IN time.
SET FADE OUT:When setting the FADE OUT time.
NO TEXT: No text stored for disc.
REMOTE CONTROL UNIT
Remote control unit can be used to control the CD recorder from a convenient distance.
Inserting Batteries
- Remove the battery cover on the back of the remote control unit.
![]()
- Insert two R03/AAA dry cell batteries with correct polarity as indicated inside the battery compartment.
![]()
- Replace the battery cover.
![]()


Notes On the Batteries
- The remote control unit uses R03/AAA dry cell batteries.
- The batteries will need to be replaced approximately once a year. Replacement may be necessary earlier depending on how much the remote control unit is used.
- If, in less than a year from the time new batteries were inserted, the remote control fails to operate the CD recorder from a near-by position, it is time to replace the batteries.
- The included battery is only for verifying operation. Replace it with a new battery as soon as possible.
- Insert the batteries properly, following the polarity diagram inside the battery compartment, in other words make sure (+) and (–) terminals are properly aligned.
- Batteries are prone to damage and leakage. Therefore:
- Do not combine new batteries with used ones.
- Do not combine different types of batteries.
- Do not jumper opposite poles of the batteries, expose them to heat, break them open nor expose of them in open fire.
- If the remote control unit is not to be used for a long period of time, remove the batteries from the unit.
- If the batteries have leaked, remove any traces of battery fluid from the battery compartment, wiping thoroughly with a dry cloth. Then insert new batteries.
Using the Remote Control Unit

- Operate the remote control unit while pointing it towards the remote control sensor on the CD recorder (see left). When a remote control signal is received, the remote control indicator on front of the CD recorder lights briefly.
- The remote control unit can be used at a distance up to 8 meters in a straight line from the CD recorder. This distance decreases if there are obstructions blocking the signal path or when the remote control unit is operated at an angle from the remote control sensor.
- Operation is possible in a range of up to 30° left and right of the remote control sensor.
NOTES:
- The remote control may cease to function when the remote control is exposed to direct sunlight or strong artificial light.
- Do not press the operation buttons of the main unit and the remote control at the same time. Doing so will cause a malfunction.
- Batteries contain chemical substances, so they should be disposed of properly.
Names and Functions of Remote Control Unit Buttons
* Buttons without descriptions have the same function as those on the main unit. See "PART NAMES AND FUNCTIONS".

Inserting Discs

- Press the OPEN/CLOSE button (
![]() ) to open the disc tray.
) to open the disc tray. - "OPEN" lights up.
- Insert a CD, CD-R or CD-RW in the appropriate recess in the tray, label side up.
- Press the OPEN/CLOSE button (
![]() ) to close the tray.
) to close the tray. - "CLOSE" lights up, followed by "READING" and the display will show the type of disc you inserted.
- If you insert a blank or partly-recorded CD-R or unfinalized CD-RW, the CD recorder will calibrate the disc for optimum recording. During this process the display will first show "INITIALIZING" and then the number of audio tracks. Calibration can take up to 40 seconds.
- If a CD-R/RW is finalized it will show "CD" on the display.
- If CD-text is available the TITLE/ARTIST will scroll by.
NOTES:
- If your finger should get caught in the disc tray when it closes, press the OPEN/CLOSE button (
![]() ).
). - Only Audio CDs will be accepted. If a non-audio disc is inserted, the display shows "WRONG DISC".
- For recording it is important that the blank disc is completely free from dust particles or scratches. See "Disc cleaning".
RECORDING
Remarks About Recording
- To assure accurate recording, record with an ambient temperature of 30°C or less.
- Recording may stop if the unit is subject to shocks during recording. If recording stops, it may no longer be possible to use the disc normally. ("DISC ERROR")
Recording Modes
* Your recorder offers several recording modes.
* Pressing the REC MODE button will switch the recording mode as described below.
 | To make a synchronized recording of the complete disc or a program simply by starting the source. |
 | To make a synchronized recording of a single track simply by starting the source. |
 | To manually start a recording simply by pressing the REC button. |
 | To make a synchronized recording of the complete disc or a program simply by starting the source. Finalizing will be done automatically. |
NOTE:
- Analog recording is not possible in the Make CD mode.
 Some remarks on recording:
- When Auto track is ON (default setting), track numbers will automatically be increased during recording.
- By programming the source first, a compilation can be recorded.
- If a finalized CD-R disc is inserted in the CD recorder, "FINALIZED CD" will be displayed when the REC MODE button is pressed. Recording is not possible.
- If a finalized CD-RW disc is inserted in the CD recorder, "UNFINALIZE" and "PRESS ENTER" will be dis-played when the REC MODE button is pressed. If ENTER button is pressed, the disc will be unfinalized.
Setting of the Recording Level
* Set the recording level as described below before recording.
* The recording level can be set separately for digital input and analog input.
* The recording level is stored once it is set.
* The recording level can be adjusted during recording.

- Switch on the power.
- Load the CD-R/RW disc to be recorded.
- Press the INPUT button and select the source to be recorded. (See "PART NAMES AND FUNCTIONS".)
- Press the REC MODE button to display "REC MANUAL".
- Start playing the source to be recorded.
- The recording level is displayed on the level meter display.
- Turn the MULTI JOG dial and adjust to a suitable recording level.
- The level value will be displayed as "_ _ DB".
Digital input: Adjustments can be made from –63 dB to 6 dB in 1 dB increments.
Analog input: Adjustments can be made from –12 dB to 9 dB in 3 dB increments. - Set so that the red portion of the level meter lights only when the largest signal is input.
* A distorted sound will be recorded when the setting results in the red portion being lit all the time.
- The level value will be displayed as "_ _ DB".
- Press the STOP button (
![]() ) to exit the setting.
) to exit the setting. - Stop the playback source.
NOTES:
- Be sure to perform the setting of the recording level in the Rec Manual mode. When the setting is made in a Synchro-recording mode, this unit will automatically start recording when playback of the source is started.
- Set the recording level to 0 dB to perform digital recording with the same level as the source (CD, MD, etc.).
- When the recording level is set too low while recording an analog source or a digital source other than CD/MD, the track numbers might not be associated at the correct position. Please set a suitable recording level.
- When recording on HDCD discs, set the digital recording level to 0 dB. Normal recording on HDCD discs is not possible if the level is set to anything other than 0 dB.
Autostart Recording
- This feature enables you to make fast and easy recordings of a CD. Track increments are automatically detected from the source material. Track increments cannot be added manually.
In analog source material a silence of 2.7 seconds or more is automatically detected as a track increment.

- Recording from CD-changers should always be started in the RECORD DISC, RECORD TRACK or MAKE CD mode.
- Make sure the disc is absolutely free of scratches and dust particles.
Autostart recording
"RECORD DISC"
"RECORD TRACK"
"MARK CD"

- Perform the next setting before recording. See "Setting of the Recording Level".
- Setting the input to be recorded
- Setting the recording level
- While the CD recorder is stopped, press the REC MODE button and select the recording mode.
Once: To select "RECORD DISC".
Twice: To select "RECORD TRACK".
Four times: To select "MAKE CD".- "
![]() "and "SYNC" start to flash and the display shows the selection.
"and "SYNC" start to flash and the display shows the selection. - If "CHECK INPUT" message also flashes, the digital connection is incorrect.
- "
- To start recording, press the PLAY button on the selected source.
- The CD recorder automatically starts to record and "
![]() " lights continuously.
" lights continuously. - To check the elapsed recording time, press the DISPLAY button. (This can also be done during recording)
- The recorder stops automatically.
- In the Make CD mode, the recorder will stop and then goes to finalizing.
- The CD recorder automatically starts to record and "
When using digital input:
* In the Record Disc mode and Make CD mode, for DAT and DCC, stop after a blank portion has continued for about 20 seconds.
* In the Record Track mode, the unit will stop when the next track starts at the source side, or a blank portion continues for 20 seconds.
* Depending on the equipment of the source side, the recorder will stop and go to REC STANDBY for 1
When using analog input:
Stop after the playback has ended and a blank portion has continued for about 20 seconds.
In the Record Track mode, the unit will stop when the next track starts at the source side (a blank portion of about 2.7 seconds or longer detected), or a blank portion continues for 20 seconds.
NOTES:
- Analog recording is not possible in the Make CD mode.
- In the Make CD mode, depending on the equipment of the source side, the recorder will stop and go to "WAIT" mode for 1 minute and then goes to finalizing.
* To stop recording manually, press the STOP button (![]() ) on the CD recorder.
) on the CD recorder.
- "WAIT" lights up and "SYNC" and "
![]() " go out.
" go out.
* If STOP button (![]() ) was pressed within 3 seconds after pressing the PLAY button (
) was pressed within 3 seconds after pressing the PLAY button (![]() ), no recording will take place.
), no recording will take place.
* To interrupt recording, press the PAUSE button (![]() ) on the CD recorder.
) on the CD recorder.
- To resume, press the REC button on the CD recorder.
* After recording the display will show "UPDATE" for several seconds.
- If you want to play the recorded CD-R disc on any regular CD player, it must first be finalized. See "Finalizing CD-R/RW Discs".
- Finalized CD-RW discs play only on CD-RW compatible CD players.
NOTES:
- If, however, you start the source during a track, recording starts at the beginning of the next track or after 2.7 seconds of silence in analog recordings.
- Use Manual recording mode to record satellite broadcasts.
- In the auto start recording mode, the auto track function is automatically activated regardless whether the auto track mode is set on or off. If you wish to give track numbers on your own, record in the Manual recording mode with the auto track mode turned off. (See "Auto track increment".
- 20-second recording in the auto recording stop mode for media other than CDs and MDs is as follows:
- CD-R discs: A 20-second blank section is recorded at the final track.
- CD-RW discs: No 20-second blank section is recorded.
Manual Recording
- Recording from CD-changers should always be started in the RECORD DISC, RECORD TRACK or MAKE CD mode.
- Only make analog recordings when digital recording is not possible.
- Make sure the disc is absolutely free of scratches and dust particles.
Manual recording

- Perform the next setting before recording. See "Setting of the Recording Level".
- Setting the input to be recorded
- Setting the recording level
- Setting of the Auto Track Mode
- When Auto Track is ON (default setting), track numbers will automatically be increased during recording.
- To switch off the Auto Track function you have to enter Menu mode. If you wish to increase track numbers manually, press the TRACK MARK button on the remote control.
ON (AUTO):
The track increments are automatically taken over from the digital source material or after 2.7 seconds silence during analog recording.
OFF (MANUAL):
Track numbers can be incremented manually by pressing the TRACK MARK button on the remote control. (Minimum track length is 4 sec.) (This can also be done in Auto mode.) - Track numbers cannot be changed after recording.
- With the recorder stopped, press the REC MODE button three times to enter the Manual Record standby mode.
- The display shows "REC MANUAL".
- "MANUAL" flashes when the auto track mode is turned off.
- If "CHECK INPUT" message also flashes, the digital connection is incorrect.
- To start recording, press the REC button on the CD recorder and immediately start the source (from Stop mode).
- "
![]() " lights continuously. The track number and recording time appear on the display.
" lights continuously. The track number and recording time appear on the display. - To check the elapsed recording time, press the DISPLAY button on the CD recorder. (This can also be done during the recording.)
- "
- To stop recording, press the STOP button (
![]() ) on the CD recorder.
) on the CD recorder. - "WAIT" lights up and "
![]() " goes out.
" goes out. - After recording the display will show "UPDATE" for several seconds.
- If STOP button (
![]() ) was pressed within 3 seconds after RECORD, no recording will take place.
) was pressed within 3 seconds after RECORD, no recording will take place. - To interrupt recording, press the PAUSE button (
![]() ) on the CD recorder. "
) on the CD recorder. "![]() " starts to flash. Resume at step 2.
" starts to flash. Resume at step 2. - To record a 3 second silence at the start of a track, press the PAUSE button (
![]() ) on the CD recorder while the recording is paused.
) on the CD recorder while the recording is paused.
- "WAIT" lights up and "
NOTES:
- With Auto track mode OFF, the auto stop mode is disabled.
- With Auto track mode ON, the recorder stops automatically. (See "Autostart Recording".)
If you want to play the recorded CD-R disc on any regular CD player, it must first be finalized. See "Finalizing CD-R/RW Discs".
Finalized CD-RW discs play only on CD-RW compatible CD players.
Finalizing CD-R/RW Discs
Finalizing is a simple procedure, necessary to:
- Be able to play recordings on a CD player,
- Avoid further unwanted recordings on a disc,
- Avoid erasure of tracks on a CD-RW.
Auto finalizing
Auto finalizing is possible when using the Make CD recording function. See "Autostart Recording"
Manual finalizing

- Load the CD-R/RW disc that is to be finalized.
- With the recorder stopped press the FINALIZE button.
- The display shows "FINALIZE" and "PRESS RECORD".
- Press the REC button.
- "FINAL" and the approximate finalization time appears on the display. The display counts down through the finalization. On completion, the total number of tracks and the total time recorded appears on the display.
- The disc indication of the display will become "CD".
NOTES:
- Make sure the disc is absolutely free of scratches and dust particles.
- Finalizing will take at least 2 - 4 minutes.
- During finalization, the CD recorder accepts no operating commands.
Unfinalizing CD-RW Discs
* For CD-RW discs only.
* If you want to make more recordings (or erasures of tracks) on a finalized disc you must unfinalize it first. The Table of Contents (TOC) will be removed. To unfinalize:

- Load the CD-RW disc that is to be unfinalized.
- With the CD recorder stopped, press the REC MODE button or ERASE button.
- "UNFINALIZE" and "PRESS ENTER" will appear on the display.
- Press the ENTER button.
- The remaining time of the unfinalization process is displayed.
- When the unfinalization process is completed, the disc synchro-recording standby mode or the track erase standby mode is set.
- The disc indication of the display will become "CD-RW".
NOTES:
- Make sure the disc is absolutely free of scratches and dust particles.
- Unfinalizing will take approximately 2 minutes.
- During unfinalization, the CD recorder accepts no operating commands.
- When unfinalizing a CD-RW disc with text on it available, this text will be transferred to the CD recorder memory. It may occur that the text memory is full. The message "MEMORY FULL/FINALIZE CD" will be displayed. You will now have to erase text, stored for other discs, or finalize another disc in order to obtain memory space.
Erasing CD-RW Discs
* For unfinalized CD-RW discs only.
* You can erase:
- One or more tracks from the end,
- The entire disc.
To erase one or more tracks from the end

- Load the CD-RW disc that is to be erased.
- Press the ERASE button once.
- The display shows "ERASE TRACK". The number of tracks and their total playing time and "PRESS RECORD" lights up.
- If the disc is finalized, "CD" appears on the display after inserting a CD-RW in the recorder. The recorder will ask you to confirm unfinalizing first. Confirm by pressing the ENTER button.
- Select the track(s) you wish to erase by turning the MULTI JOG dial to the left.
- The selected track numbers start blinking on the track bar.
- The display shows the remaining number of tracks and the remaining playing time after erasing the selected track (s).
- Press the REC button.
- The display shows the total countdown time and "ERASE".
- After the selected track(s) have erased, the display shows the remaining tracks and their total playing time.
NOTE:
- No operations will function while erasing.
To erase the entire disc

- Load the CD-RW disc that is to be erased.
- Press the ERASE button twice.
- The display shows "ERASE DISC". The number of tracks and their total playing time and "PRESS RECORD" light up.
- If the disc is finalized, "CD" appears on the display after inserting a CD-RW in the recorder. The recorder will ask you to confirm unfinalizing first. Confirm by pressing the ENTER button.
- Press the REC button.
- The display shows the total countdown time and "ERASE". The complete disc will be erased.
- Erasure of a complete disc may take up to 15 seconds.
- The time display is set to "0:00" once erasing is completed.
PLAYING
Playing a CD

- Load the disc to be played.
- Press the PLAY/PAUSE button (
![]() ) or PLAY button (
) or PLAY button (![]() ) on the remote control to start CD play.
) on the remote control to start CD play. - "
![]() " lights up and the track number and track time of the track in play appear on the display.
" lights up and the track number and track time of the track in play appear on the display. - Press the DISPLAY button once, twice or three times to see: Remaining track time, total remaining time, text information.
- "
* To interrupt play temporarily, press the PLAY/PAUSE button ( ![]() ) again or press the PAUSE button (
) again or press the PAUSE button ( ![]() ) on the remote control.
) on the remote control.
- "
![]() " lights on the display.
" lights on the display. - To continue play, press the PLAY/PAUSE button (
![]() again or press the PLAY button (
again or press the PLAY button (![]() ) or the PAUSE button (
) or the PAUSE button (![]() ) on the remote control.
) on the remote control.
* To stop play, press the STOP button ( ![]() ).
).
- The number of tracks and the total playing time appear on the display.
NOTE:
- "NO DISC" will be displayed at such times as when a disc is not loaded, the disc cannot be read properly due to scratches or dirt, or the disc is loaded upside down.
Selecting a Track
Selecting a track during play

- Turn the MULTI JOG dial until the required track number appears on the display.
- Play skips to the beginning of the selected track.
or
Button in the required track number using the numerical buttons on the remote control. For 2-digit track numbers, press the buttons in rapid succession. - Example:
15th track: Press the 1 button and then 5 button on the remote control.
or
Press the automatic search reverse button (![]() ) or the automatic search forward button (
) or the automatic search forward button ( ![]() ) on the remote control one or more times.
) on the remote control one or more times.
- Play skips to the beginning of the selected track.
Selecting a track when CD play is stopped

- Turn the MULTI JOG dial until the required track number appears on the display.
- Press the ENTER button to confirm or press the PLAY button (
![]() ) to start playing.
) to start playing.
or
- Button in the required track number using the numerical buttons on the remote control. For 2-digit track numbers, press the buttons in rapid succession. Play starts.
or
- Briefly press the automatic search reverse button (
![]() ) or automatic search forward button (
) or automatic search forward button (![]() ) on the remote control one or more times.
) on the remote control one or more times. - Start playback by pressing the PLAY button (
![]() ) or ENTER button on the remote control.
) or ENTER button on the remote control.
Manual Search

- Hold down the manual search reverse button (
![]() ) or the manual search forward button (
) or the manual search forward button (![]() )
) - The player first searches backwards or forwards at 10 times normal speed with sound at low volume, the goes to 50 times normal speed with sound muted.
- Release the button at the desired passage.
- Play starts at the desired passage.
NOTES:
- During Shuffle, Repeat Track or Programmed play, search is restricted to within the track being played at the time.
- A press of the manual search reverse button (
![]() ) or manual search forward button (
) or manual search forward button (![]() ) while paused will cause the unit to advance quickly while in mute mode.
) while paused will cause the unit to advance quickly while in mute mode. - Holding down the manual search forward button (
![]() ) will result in the unit stopping upon reaching the end of the last recorded track.
) will result in the unit stopping upon reaching the end of the last recorded track.
Shuffle (random order) Play
* The tracks recorded on the disc can be listen to in random order.

- Press the SHUFFLE button before or during CD play to start shuffle play.
- The tracks on the CD (or program if set) play in random order.
* Press the PLAY button (![]() ) on the remote control to return to normal CD play.
) on the remote control to return to normal CD play.
NOTE:
- Shuffle is also cleared if you open the disc tray.
Repeat Play

- Press the REPEAT button one or more times during CD play.
- When "REPEAT TRACK" lights up, the current track plays repeatedly. When "REPEAT ALL" lights up, the disc or program plays repeatedly.
- To return to normal play, press the REPEAT button one or more times until:
- The "REPEAT" label disappears from the display.
NOTES:
- You can use shuffle in combination with "REPEAT ALL" or programmed play.
- Repeat play will be cancelled when the disc holder is opened or when the STOP button (
![]() ) is pressed when the unit is stopped.
) is pressed when the unit is stopped.
PROGRAMMING
* You can program up to 99 tracks to play in any desired sequence.
* Tracks can be programmed more than once, but each time counts as a track ("STEP").
Programming

- In Stop mode press the PROGRAM button to enter Program mode.
- "PROGRAM" flashes and "PROGRAM" appears on the display.
- Select the required track numbers by turning the MULTI JOG dial left or right and store by pressing the ENTER button.
or
Button in a track number with the number buttons and store by pressing the ENTER button. For 2-digit numbers, press the buttons in rapid succession.- The track will be stored in the program.
- The track number, total program time and the number of programmed tracks ("STEP") are displayed.
- Repeat step 2 for all tracks to be programmed.
- Press the STOP button (
![]() ) or PROGRAM button to end programming.
) or PROGRAM button to end programming. - "PROGRAM" lights continuously.
- Press the PLAY button (
![]() ) to start programmed play.
) to start programmed play.
NOTES:
- To review the program, press the PROGRAM button followed by manual search reverse button (
![]() ) or manual search forward button (
) or manual search forward button (![]() ) with the CD recorder in Stop mode.
) with the CD recorder in Stop mode. - To add more tracks to the program, repeat steps 1 to 4.
- If you try to store more than 99 tracks, "PROG FULL" appears on the display.
- The total program time will not be displayed when it exceeds 199 minutes. Neither will the program remaining time be displayed when the remaining time of programmed play exceeds 199 minutes.
- Program operations will not be possible during play or pause.
Clearing a program
- Press the STOP button (
![]() ) if necessary to stop programmed play.
) if necessary to stop programmed play. - Press the STOP button (
![]() ) again to clear the program.
) again to clear the program. - "PROGRAM" disappears from the display.
- The program is also cleared if you open the disc tray.
Erasing a track from a program
- In Stop mode press the PROGRAM button to enter Program mode.
- Use the manual search reverse button (
![]() ) or the manual search forward button (
) or the manual search forward button (![]() ) to select the track from which to delete.
) to select the track from which to delete. - The track number and program step will be shown on the display.
- Press the CANCEL/DELETE button to erase the track from the program.
- The remaining program steps and the remaining playing time of the program will be displayed.
Intro Scan Play
* The first 10 seconds from the beginning of the track can be listened to in succession for the tracks recorded on the disc.

- Press the SCAN button while the unit is stopped.
- The "SCAN" display will light. The time display will count down from 0:10 to 0:00.
- Intro Scan play will start from the first track.
* Play will stop when all of the recorded tracks have ended.
* To listen to a track all the way to the end during Intro Scan play, press the SCAN button or the PLAY button ( ![]() ) on the remote control once.
) on the remote control once.
* A press of the SCAN button during program setting will result in Intro Scan play beginning in the order of programmed tracks.
MENU MODE
Remarks About Menu Mode
- In Menu mode you will have access to a number of features which are not available via the regular buttons (on the deck's front and the remote control).
- The TEXT submenus allow you to give names to discs and tracks. The disc and track names will be displayed during playback.
- In the RECORDING submenus you can set Auto Track, Balance and Fade.
- All settings (except Balance) made in Menu mode will be stored in the deck's memory and can be called up and changed at any time.
General Operation

- Press the STORE/MENU button to enter Menu mode.
- "TEXT EDIT" appears on the display.
- Turn the MULTI JOG dial to select the required submenus.
Menu Structure
Turning the MULTI JOG dial clockwise will cause the menu to change as follows.
Structure of the menu mode while stopped

Structure of the menu mode while recording is paused

- Press the ENTER button to confirm selections.
- Turn the MULTI JOG dial to select options in the submenus.
- Press the ENTER button to confirm selections.
- Press the STORE/MENU button to store settings and return to the submenu.
- Press the STOP button (
![]() ) to store settings and exit Menu mode.
) to store settings and exit Menu mode.
NOTES:
- Text can only be edited for unfinalized discs. (Finalized CD-RW discs must be unfinalized first.)
- The Auto track recording setting mode is not displayed in the auto start recording mode.
Text Editings
* In text edit mode various information such as the album title, artist name, and individual track titles and associated artist names can be added and corrected.
* Entry of the text data is not recorded directly to the disc, but is first stored in the memory of this unit. (Text for up to 30 discs can be stored in the memory.) By finalizing the disc, the text data of the disc is automatically recorded to the disc.
Storing names "TEXT EDIT"

- Select the TEXT EDIT submenu.
- "TEXT EDIT" appears on the display.
- Press the ENTER button to confirm.
- Turn the MULTI JOG dial to select the required option in the submenu:
![]()
- Press the ENTER button to confirm.
- Select the characters by turning the MULTI JOG dial or by pressing the corresponding numeric/alphabet button on the remote control.
- Turning the MULTI JOG dial clockwise will result in the display of characters changing as follows. (Turning the control counterclockwise will result in the opposite arrangement.)
Display Characters

- Turning the MULTI JOG dial clockwise will result in the display of characters changing as follows. (Turning the control counterclockwise will result in the opposite arrangement.)
- Press the ENTER button to store the characters and move to the next cursor position.
- Repeat operations 5 and 6 and enter the characters one after another.
- Press the STORE/MENU button to store a name you have entered and return to the submenu or STOP button (
![]() ) to exit.
) to exit.


NOTES:
- Text editing is not possible with commercial audio CDs or with finalized CD-R/RW discs.
- A maximum of 60 characters can be stored per item. Approximately 2,700 characters can be input per disc.
- By pressing the ENTER button without selecting a character first, you can insert a space between characters.
- With the manual search reverse button (
![]() ) and manual search forward button (
) and manual search forward button ( ![]() ) you can move to a required cursor position.
) you can move to a required cursor position. - With the CANCEL button you can delete a character.
- When an artist's name has been stored for a certain track, the name will automatically be copied for the next track.
The name can be confirmed by pressing the STORE/MENU button or a new name can be entered as described above.
Erasing names "TEXT ERASE"
* In the text erase mode, the entire text of the album can be erased at once, or the album title or artist name, or the individual track titles and associated artist names can be erased separately.

- Select the TEXT ERASE submenu.
- "TEXT ERASE" appears on the display.
- Press the ENTER button to confirm.
- Turn the MULTI JOG dial to select the required option in the submenu:
![]()
- Press the ENTER button to confirm.
- The display will ask you to reconfirm your selection.
- Press the ENTER button to reconfirm.
- Press the STORE/MENU button to return to the submenu or the STOP button (
![]() ) to exit.
) to exit.

NOTE:
- Erasure of text is not possible with commercial audio CDs or with finalized CD-R/RW discs.
Text memory review/erase text memory "MEMORY VIEW"
* In the text memory review mode, the text data that is stored in this unit can be checked and the text can be erased for each disc.

- Select the MEMORY VIEW submenu.
- "MEMORY VIEW" appears on the display.
- Press the ENTER button to confirm.
- The initial album title is displayed.
- Turn the MULTI JOG dial clockwise to display the stored album titles in succession.
- After the check is completed, press the STORE/MENU button to return to the menu display.
- Select the disc you wish to erase.
- Press the ENTER button to confirm.
- "ERASE MEMORY" appears on the display.
- Press the ENTER button to reconfirm.
- Press the ENTER button to confirm the erasure of the text for that particular disc.
- Press the STORE/MENU button to return to the submenu or STOP button (
![]() ) to exit.
) to exit.
NOTES:
- If there are no discs in the memory, the message "MEMORY EMPTY" appears on the display.
- It is not possible to check or erase the text of a disc that has been finalized. When the disc is finalized, the text stored in the memory of this unit is moved to the disc.
- When the text memory of your CD recorder is full, the message "MEMORY FULL" will appear, followed by "FINALIZE CD". If you want to add a CD to the list of discs for which text is stored, you have to erase a disc from this list or finalize another disc. ("for which text is stored")
- "MEMORY FULL/FINALIZE CD" may also appear when unfinalizing a CD-RW disc for which text was stored (see 'Unfinalizing CD-RW discs'). The same action(s) should be taken in order to obtain memory space.
Recording Settings
* The recording setting mode permits the setting of fade recording, the auto track function, and recording balance.
* Details of the recording settings are stored in this unit. The next time a recording is made, it can be made with the same settings. To use different settings, change those settings when required.
* Note that settings details are not stored only for the recording balance setting mode. Make settings as required.
Fade "SET FADE"
* This unit permits fade-in recording, where the recording level gradually increases from the start of the recording, as well as fade-out recording, where the recording level gradually decreases from the where the STOP button (![]() ) was pressed and the recording ends, or from where the PLAY/PAUSE button (
) was pressed and the recording ends, or from where the PLAY/PAUSE button (![]() ) or the PAUSE button (
) or the PAUSE button ( ) on the remote control was pressed and the recording was paused.

- Select the SET FADE submenu.
- "SET FADE" appears on the display.
- Press the ENTER button to confirm.
- "FADE ON/OFF" appears on the display.
- Press the ENTER button and turn the MULTI JOG dial to select "ON" or "OFF".
- Press the ENTER button to confirm.
- "FADE ON/OFF" appears on the display again.
- Turn the MULTI JOG dial to select "SET FADE IN" or "SET FADE OUT".
- Press the ENTER button to confirm.
- The currently set fade time is displayed.
- By turning the MULTI JOG dial you can set the FADE IN or FADE OUT time.
- The fade time can be adjusted from 0 to 10 seconds in 0.05 second increments. It will be displayed in the form of
![]()
- FADE IN automatically starts when you press RECORD to start recording. Your recording will automatically be faded out when you press the STOP button (
![]() ) or the PLAY/PAUSE button (
) or the PLAY/PAUSE button (![]() ) or the PAUSE button (
) or the PAUSE button (![]() ) on the remote control.
) on the remote control.
- The fade time can be adjusted from 0 to 10 seconds in 0.05 second increments. It will be displayed in the form of
- Press the STORE/MENU button to store settings and return to the submenu or STOP button (
![]() ) to exit.
) to exit.

NOTES:
- Fade-in and Fade-out will not function in Synchro-recording mode. However, the sound fades out if the STOP button (
![]() ) or the PAUSE button (
) or the PAUSE button (![]() ) is pressed during synchronized recording.
) is pressed during synchronized recording. - Use manual recording when performing fade-in recording.
Auto track increment "AUTO TRACK"
* The auto track function setting can be switched in the manual recording mode. It is also possible to give track numbers manually as you record.
* The operation conditions of the auto track function will differ depending on the input source. For details, see "Track Numbers".
* The set mode is stored and this allows the set information to also be used the next time a recording is made.

- Select the AUTO TRACK submenu.
- "AUTO TRACK" appears on the display.
- Press the ENTER button to confirm.
- Select the Auto track "ON" or "OFF".
- Press the ENTER button to confirm.
- When "ON" is selected, track numbers will be automatically incremented during recording.
- When "OFF" is selected, you can number the recorded tracks yourself. (Press the TRACK MARK button on the remote control.)
- Press the STORE/MENU button to store settings and return to the submenu or STOP button (
![]() ) to exit.
) to exit.
NOTES:
- In the Autostart recording mode, the track number cannot be associated manually.
- In the Autostart recording mode, the auto track function is automatically activated regardless of whether the auto track mode is set ON or OFF.
- The track number cannot be changed after the recording.
- The track number cannot be changed for 4 seconds following the last change. (See "Restrictions in Recording with this Unit".)
Balance "SET BALANCE"
* Balance can be adjusted between the left and right recording levels.

- Select the SET BALANCE submenu.
- "SET BALANCE" appears on the display.
- Press the ENTER button to confirm.
- "
![]() " and
" and ![]() appear on the display.
appear on the display. - Initially, the left and right levels are the same.
- "
 " and
" and  appear on the display.
- Adjust recording balance by turning the MULTI JOG dial.
- Turn right: left counts up, right counts down.
- Turn left: right counts up, left counts down.
- Press the ENTER button to confirm.
- Press the STORE/MENU button to store settings and return to the submenu or STOP button (
![]() ) to exit.
) to exit.
NOTE:
- The balance setting will not be stored.
Sample Rate (Monitor Mode) Convertor
* The sample rate convertor is used to convert input signals into CD-standard digital output signals.

- Connect the non digital source to one of the input connectors of the recorder.
- Connect the optional recording device to the digital output connector (DIGITAL OUT COAXIAL or DIGITAL OUT OPTICAL).
- Press the REC MODE button (without a disc inserted in the recorder).
- "MONITOR MODE" is displayed. The signal will now be converted into a CD-standard digital output signal (44.1 kHz).
* Use the MULTI JOG dial to set the recording level.
- "MONITOR MODE" is displayed. The signal will now be converted into a CD-standard digital output signal (44.1 kHz).
TROUBLESHOOTING
Check Again Before Assuming The Player Is Malfunctioning
- Are all the connections correct?
- Are you following the instructions in the manual?
- Are the amplifier and speakers operating properly?
If the CDR-1000 does not seem to be functioning properly, check the table below. If this does not solve the problem, the CDR1000 may be damaged. Turn off the power, unplug the power cord from the power outlet, and contact your store of purchase or nearest DENON sales office.
| Symptom | Check |
| No power. |
|
| Auto track does not work. |
|
| No sound. |
|
| Amplifier sound is distorted. |
|
| Play will not start. |
|
| Remote control does not work. |
|
| Will not record. |
|
| Recording is distorted. |
|
| 20 second pause between recordings. |
|
| "DISC RECOVER" on the display. |
|
| "DISC ERROR" on the display. |
|
| A recorded CD-R disc cannot be played on another player. |
|
MAIN SPECIFICATIONS
| AUDIO | |
| Frequency Response: | 2 Hz~22.05 kHz |
| Dynamic Range: | During digital recording/playback: 100 dB |
| Signal-to-noise Ratio: | During digital recording/playback: 108 dB |
| Harmonic Distortion: | During digital recording/playback: 0.003% (1 kHz) |
| Separation: | During digital recording/playback: 105 dB |
| Digital input recording/playback performance: | Same as for CD playback |
| Analog input recording sensitivity: | 500 mV |
| Wow and Flutter: | Below measurable limit: (±0.001% W. peak) |
| Output Voltage: | 2.0 V |
| DISCS | CD-DA (Compact Disc-Digital Audio) format CD-R Discs for Audio consumer use CD-RW Discs for Audio consumer use |
| SIGNAL FORMAT | |
| Sampling frequency: | 44.1 kHz |
| Quantization bits: | 16 bits linear/channel |
| Transfer bit rate: | 4.3218 Mb/sec. |
| DIGITAL OUTPUT SIGNAL FORMAT | |
| Format: | Digital Audio Interface |
| Coaxial output voltage: | 0.5 Vp-p / 75 Ω/ohms |
| Optical output: | –15 dBm ~ –21 dBm |
| Emission wavelength: | 660 nm |
| GENERAL CHARACTERISTICS | |
| Power Supply: | AC 120V, 60 Hz |
| Power consumption: | 26 W |
| Dimensions: | 434 (W) x 100.5 (H) x 285 (D) mm (17-1/16" x 3-15/16" x 11-3/16") |
| Weight: | 4.5 kg (9.921 lbs.) |
| REMOTE CONTROL UNIT | RC-276 |
| Remote Control System: | Infrared pulse system |
| Power Supply: | 3 V; DC, two R03 (standard size AAA) dry cell batteries |
| External Dimensions: | 50 (W) x 144 (H) x 24 (D) mm (1-15/16" x 5-5/8" x 15/16") |
| Weight: | 70 g (0.1543 lbs.) (including batteries) |
* Design and specifications are subject to change without notice in the course of product improvement.
SAFETY INSTRUCTIONS

RISK OF ELECTRIC SHOCK
DO NOT OPEN
TO REDUCE THE RISK OF ELECTRIC SHOCK, DO NOT REMOVE COVER (OR BACK). NO USER SERVICEABLE PARTS INSIDE. REFER SERVICING TO QUALIFIED SERVICE PERSONNEL.
 The lightning flash with arrowhead symbol, within an equilateral triangle, is intended to alert the user to the presence of uninsulated "dangerous voltage" within the product's enclosure that may be of sufficient magnitude to constitute a risk of electric shock to persons.
The exclamation point within an equilateral triangle is intended to alert the user to the presence of important operating and maintenance (servicing) instructions in the literature accompanying the appliance.

TO REDUCE THE RISK OF FIRE OR ELECTRIC SHOCK, DO NOT EXPOSE THIS APPLIANCE TO RAIN OR MOISTURE.
- Read Instructions – All the safety and operating instructions should be read before the appliance is operated.
- Retain Instructions – The safety and operating instructions should be retained for future reference.
- Heed Warning – All warnings on the appliance and in the operating instructions should be adhered to.
- Following Instructions – All operating and use instructions should be followed.
- Water and Moisture – The appliance should not be used near water – for example, near a bathtub, washbowl, kitchen sink, laundry tub, in a wet basement, or near a swimming pool, and the like.
- Carts and Stands – The appliance should be used only with a cart or stand that is recommended by the manufacturer.
6A.
![]()
An appliance and cart combination should be moved with care. Quick stops, excessive force, and uneven surfaces may cause the appliance and cart combination to overturn. - Wall or Ceiling Mounting – The appliance should be mounted to a wall or ceiling only as recommended by the manufacturer.
- Ventilation – The appliance should be situated so that its location or position does not interfere with its proper ventilation. For example, the appliance should not be situated on a bed, sofa, rug, or similar surface that may block the ventilation openings; or, placed in a built-in installation, such as a bookcase or cabinet that may impede the flow of air through the ventilation openings.
- Heat – The appliance should be situated away from heat sources such as radiators, heat registers, stoves, or other appliances (including amplifiers) that produce heat.
- Power Sources – The appliance should be connected to a power supply only of the type described in the operating instructions or as marked on the appliance.
- Grounding or Polarization – Precautions should be taken so that the grounding or polarization means of an appliance is not defeated.
- Power-Cord Protection – Power-supply cords should be routed so that they are not likely to be walked on or pinched by items placed upon or against them, paying particular attention to cords at plugs, convenience receptacles, and the point where they exit from the appliance.
- Cleaning – The appliance should be cleaned only as recommended by the manufacturer.
- Power Lines – An outdoor antenna should be located away from power lines.
- Outdoor Antenna Grounding – If an outside antenna is connected to the receiver, be sure the antenna system is grounded so as to provide some protection against voltage surges and built up static charges. Article 810 of the National Electrical Code, ANSI/NFPA 70, provides information with regard to proper grounding of the mast and supporting structure, grounding of the lead-in wire to an antenna-discharge unit, size of grounding conductors, location of antenna discharge unit, connection to grounding electrodes, and requirements for the grounding electrode. See Figure A.

Figure A
- Nonuse Periods – The power cord of the appliance should be unplugged from the outlet when left unused for a long period of time.
- Object and Liquid Entry – Care should be taken so that objects do not fall and liquids are not spilled into the enclosure through openings.
- Damage Requiring Service – The appliance should be serviced by qualified service personnel when:
- The power-supply cord or the plug has been damaged; or
- Objects have fallen, or liquid has been spilled into the appliance; or
- The appliance has been exposed to rain; or
- The appliance does not appear to operate normally or exhibits a marked change in performance; or
- The appliance has been dropped, or the enclosure damaged.
- Servicing – The user should not attempt to service the appliance beyond that described in the operating instructions. All other servicing should be referred to qualified service personnel.


NOTE ON USE

- Avoid high temperatures.
Allow for sufficient heat dispersion when installed on a rack.

- Handle the power cord carefully.
Hold the plug when unplugging the cord.

- Keep the set free from moisture, water, and dust.

- Unplug the power cord when not using the set for long periods of time.

* (For sets with ventilation holes)
- Do not obstruct the ventilation holes.

- Do not let foreign objects in the set.

- Do not let insecticides, benzene, and thinner come in contact with the set.

- Never disassemble or modify the set in any way.
IMPORTANT TO SAFETY
TO PREVENT FIRE OR SHOCK HAZARD, DO NOT EXPOSE THIS APPLIANCE TO RAIN OR MOISTURE.

- Handle the power supply cord carefully
Do not damage or deform the power supply cord. If it is damaged or deformed, it may cause electric shock or malfunction when used. When removing from wall outlet, be sure to remove by holding the plug attachment and not by pulling the cord. - Do not open the top cover
In order to prevent electric shock, do not open the top cover. If problems occur, contact your DENON DEALER. - Do not place anything inside
Do not place metal objects or spill liquid inside the CD recorder.
Electric shock or malfunction may result.
Please, record and retain the Model name and serial number of your set shown on the rating label.
Be sure to keep this manual for future reference, should any questions or problems arise.
Please check to make sure the following items are included with the main unit in the carton:
- Operating Instructions: 1
- Connection Cord: 2
- Optical Fiber Cord: 1
- Remote Control Unit RC-276: 1
- R03/AAA Dry Cell Battery: 2
- AC Cord" 1
- Service Station List: 1
NOTE:
This CD recorder uses the semiconductor laser. To allow you to enjoy music at a stable operation, it is recommended to use this in a room of 10°C (50°F) ~ 30°C (86°F).
- Place of installation
To ensure sufficient ventilation, leave a space of at least 10 cm between the front, sides and back of the unit and walls or other objects which may obstruct ventilation.

Documents / ResourcesDownload manual
Here you can download full pdf version of manual, it may contain additional safety instructions, warranty information, FCC rules, etc.
Advertisement


Need help?
Do you have a question about the CDR-1000 and is the answer not in the manual?
Questions and answers