Advertisement
Quick Links
USA office: Fontana
AUS office: Truganina
DEU office: FDS GmbH, Neuer Höltigbaum 36, 22143 Hamburg, Deutschland
GBR office: FDS Corporation Limited,Unit 4, Blackacre Road, Great Blakenham,Ipswich, Ip6 0FL,United Kingdom
If you're having difficulty, our friendly
customer team is always here to help.
Oct. 18, 2023, R1 EN 17191:2021
ITA office: Milano
POL office: Gdańsk
FRA office: Saint Vigor d'Ymonville
USA:cs.us@costway.com
POL:sklep@costway.com
AUS:cs.au@costway.com
DEU:cs.de@costway.com
GBR:cs.uk@costway.com
FRA:cs.fr@costway.com
I T A :cs.i t @costway.com
ESP:cs.es@costway.com
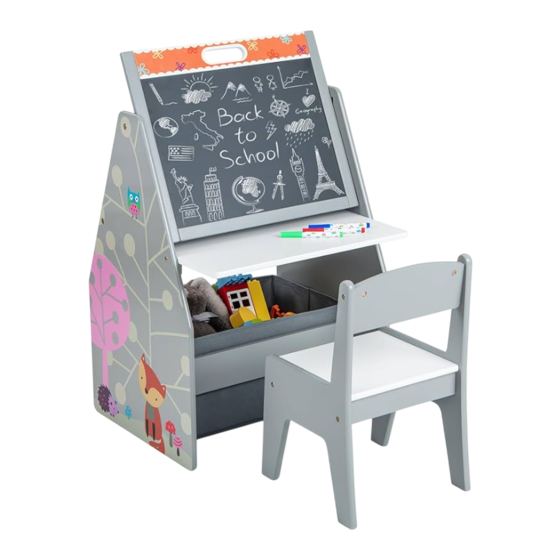
Kids Table and Chair Set
Tisch- und Stuhlset für Kinder
Ensemble Table et Chaises pour Enfants
Juego de Mesa y Silla para Niños
Set di Tavolo e Sedie per Bambini
Stolik z krzesełkami dla dzieci
TP10174
THIS INSTRUCTION BOOKLET CONTAINS IMPORTANT SAFETY INFORMATION.
PLEASE READ AND KEEP FOR FUTURE REFERENCE.
Advertisement

Subscribe to Our Youtube Channel
Related Manuals for Costway TP10174


Summary of Contents for Costway TP10174
- Page 1 THIS INSTRUCTION BOOKLET CONTAINS IMPORTANT SAFETY INFORMATION. USA:cs.us@costway.com POL:sklep@costway.com If you're having difficulty, our friendly AUS:cs.au@costway.com DEU:cs.de@costway.com customer team is always here to help. PLEASE READ AND KEEP FOR FUTURE REFERENCE. GBR:cs.uk@costway.com FRA:cs.fr@costway.com Oct. 18, 2023, R1 EN 17191:2021 I T A :cs.i t @costway.com ESP:cs.es@costway.com...
-
Page 2: Before You Start
Before You Start Bevor Sie beginnen Please read all instructions carefully and keep it for future reference. Bitte sorgfältig lesen und zum späteren Nachschlagen aufbewahren. General Security Warning Allgemeine Sicherheitswarnung Caution: Children should use this product under the parental supervision. Vorsicht: Kinder sollten diesen Artikel unter elterlicher Aufsicht benutzen. -
Page 3: Avant De Commencer
Avant de Commencer Antes de Empezar Veuillez lire attentivement toutes les instructions et les conserver pour la référence ultérieure. Lea atentamente todas las instrucciones y consérvelas para futuras consultas. Avertissement de Sécurité Générale Advertencia de Seguridad General Atención: Los niños deben utilizar este producto bajo la supervisión de sus padres. Attention : Les enfants doivent utiliser ce produit sous la surveillance de leurs parents. -
Page 4: Prima Di Iniziare
Prima di Iniziare Zanim Zaczniesz Si prega di leggere attentamente tutte le istruzioni e conservarle per riferimento futuro. Przeczytaj uważnie wszystkie instrukcje i zachowaj je na przyszłość. Avvertenza di sicurezza generale Ogólne ostrzeżenia dotyczące bezpieczeństwa Attenzione: I bambini devono usare questo prodotto sotto la supervisione dei genitori. Uwaga: Dzieci moga używać... - Page 5 A x1 B x1 C x1 D x1 AA x 8 BB x 4 CC x 6 DD x 4 EE x 8 M6 x 40MM M6 x 20MM Cam Bolt / M4 x 18MM Φ10 x 10MM Nockenbolzen / Boulon à...
- Page 6 Lock the cam bolts (CC) to the two side panels (B,C). Do not lock the Lock the table (D) to the left panel (B). screw crooked, please lock it tightly. Verriegeln Sie die Nockenbolzen (CC) an den beiden Seitenteilen Verriegeln Sie den Tisch (D) an der linken Platte (B). (B,C).
- Page 7 Lock the rear panel (E) over the left panel (B). Lock the rear panel (E) under the left panel (B). Verriegeln Sie die Rückwand (E) über die linke Platte (B). Verriegeln Sie die Rückwand (E) unter die linke Platte (B). Verrouillez le panneau arrière (E) sur le panneau gauche (B).
- Page 8 Lock the two metal tubes (L) to the left panel (B). Place the left panel assembly down on the flat surface and lock the small block (F) to the left panel (B). Verriegeln Sie die beiden Metallrohre (L) an der linke Platte (B). Legen Sie die linke Paneelbaugruppe auf die ebene Fläche und verriegeln Sie den kleinen Block (F) an der linken Platte (B).
- Page 9 Place the cloth cover (N) over the locked metal tube (L). Insert the other Lock the small screw (GG) to the left and right sides of the whiteboard metal tube (M) into the middle tube sleeve of the cloth cover. (A).
- Page 10 Place the whiteboard (A) in slot on the left panel (B). In this step, it is recommended that two people work together, one holding the whiteboard (A) and the middle metal tube (M), and the other locking the right board (C) to the hole. Setzen Sie das Whiteboard (A) in den Schlitz auf der linken Seite (B) In diesem Schritt wird empfohlen, dass zwei Personen ein.
- Page 11 Lock the small block (F) to the right panel (C). Place the drawer bottom panel inside the fabric drawer and place the fabric drawer (O) at the bottom of the product storage side. Verriegeln Sie den kleinen Block (F) an der rechten Blende (C). Setzen Sie die Schubladenunterseite in die Stoffschublade ein und platzieren Sie die Stoffschublade (O) unten auf der Seite der Produktaufbewahrung.
- Page 12 Place the nut (EE) in the holes of backrest Lock the backrest panel (I), lower panel (J) to the left panel (G) of the panel (I) and lower panel (J) respectively. chair. Setzen Sie die Mutter (EE) in die Löcher Verriegeln Sie die Rückenlehnenplatte (I) und die untere Platte (J) mit der Rückenlehnenplatte (I) und der der linken Platte (G) des Stuhls.
- Page 13 Insert the seat panel (K) into slot on the left panel (G) of the chair. Attach the right panel (H) of the chair and lock it. Setzen Sie die Sitzplatte (K) in den Schlitz an der linken Platte (G) des Befestigen Sie die rechte Platte (H) des Stuhls und verriegeln Sie sie.
- Page 14 Chair assembly completed. Whiteboard Angle is adjustable. Montage des Stuhls abgeschlossen. Die Neigung der Tafel ist einstellbar. Assemblage de la chaise terminé. L’angle du tableau noir est réglable. Montaje de la silla completado. El ángulo de la pizarra es ajustable. Assemblaggio della sedia completato.
- Page 15 Instructions for the safe use of the seating IMPORTANT! READ CAREFULLY AND KEEP FOR FUTURE REFERENCE WARNING ● DO NOT place this product near a window as it can be used as a step by the child and cause the child to fall out of the window. ●...
- Page 16 Instructions pour une utilisation sûre du siège Istruzioni per l'uso sicuro della seduta IMPORTANT ! LIRE ATTENTIVEMENT ET IMPORTANTE! LEGGERE ATTENTAMENTE E CONSERVER POUR RÉFÉRENCE FUTURE CONSERVARE PER RIFERIMENTO FUTURO AVERTISSEMENT AVVERTENZA ● NE PAS placer ce produit près d’une fenêtre car il peut être utilisé ●...
- Page 17 Return / Damage Claim Instructions Instructions De Retour / Réclamation De Dommages DO NOT discard the box / original packaging. NE PAS jeter la boîte/l'emballage d'origine. Dans le cas où un retour est requis, l'article doit être retourné dans sa boîte In case a return is required, the item must be returned in original box.
- Page 18 Istruzioni Per La Restituzione / Reclamo Per Danni NON scartare la scatola / confezione originale. Nel caso in cui sia richiesto un reso, l'articolo deve essere restituito nella scatola originale. Senza la scatola originale il tuo reso non sarà accettato. Fare una foto dei contrassegni sulla scatola.
Need help?
Do you have a question about the TP10174 and is the answer not in the manual?
Questions and answers