Table of Contents
Advertisement
Quick Links
Table of Contents
Introduction ................................................................................................................................................ 2
Tools and Materials Needed .................................................................................................................. 2
Pre-Installation Checklist ..................................................................................................................... 3
Closets and Materials
Double Hang (Included in Models: Basic 2,4,6 & 10) .............................................................................. 4
Long Hang (Included in Closet Models: Basic 1,4,5,6,10 and Standard 1) .......................................... 6
Tall Double Hang (Included in Models: Basic 8,11 and Standard 2,3,4,5 & 6) ........................................ 8
Tall Shelf (Included in Closet Models: Basic 8,9 & 11) ..................................................................... 10
Tall Hang Shoe (Included in Models: Basic 11 and Standard 5) ............................................................ 12
Tall 4 Drawer Hang (Included in Closet Models: Standard 1-6) ........................................................ 14
Floor Standing Closet Installation Guide ............................................................................................ 16
Installing Drawer Boxes and Fronts ......................................................................................................... 17
Hanging Closet Installation Guide ........................................................................................................... 17
Closet Installation Instructions
Installation Instruction
Page 1 of 19
Advertisement
Table of Contents

Related Manuals for Riverside Double Hang Basic 2


Summary of Contents for Riverside Double Hang Basic 2
-
Page 1: Table Of Contents
Installation Instruction Page 1 of 19 Closet Installation Instructions Table of Contents Introduction ..............................2 Tools and Materials Needed ........................2 Pre-Installation Checklist ........................3 Closets and Materials Double Hang (Included in Models: Basic 2,4,6 & 10) ................4 Long Hang (Included in Closet Models: Basic 1,4,5,6,10 and Standard 1) .......... 6 Tall Double Hang (Included in Models: Basic 8,11 and Standard 2,3,4,5 &... -
Page 2: Introduction
Remember, a well-planned installation is key to achieving the best results. If at any point you need additional support, our team at Riverside Millwork is just a call or email away, ready to assist you. Tools and Materials Needed Before embarking on your closet installation journey, it's essential to gather all the necessary tools and materials to ensure a smooth and efficient process. -
Page 3: Preinstallation Checklist
Installation Instruction Page 3 of 19 Preinstallation Checklist Read Through the Instructions: Before beginning, take the time to thoroughly read through the installation guide. Understanding each step in advance will help streamline the process. Check All Components: Ensure you have received all necessary components for your closet installation. Cross- reference the parts with the inventory list provided in the guide. -
Page 4: Double Hang (Included In Models: Basic 2,4,6 & 10)
Installation Instruction Page 4 of 19 Included in Models: Basic 2,4,6 & 10 Double Hang (DH) - Page 5 Installation Instruction Page 5 of 19 Diagram A ORDER OF ASSEMBLY/STEPS Prepare the Gables: Start by placing both gables (left and right) face up on a soft cloth or cardboard. This will help protect your floor and the cabinet panels from scratches.
-
Page 6: Long Hang (Included In Closet Models: Basic 1,4,5,6,10 And Standard 1)
Installation Instruction Page 6 of 19 Included in Closet Models: Basic 1,4,5,6,10 and Standard 1 Long Hang (LH) - Page 7 Installation Instruction Page 7 of 19 Diagram B ORDER OF ASSEMBLY/STEPS Tall Double Hang (TDH) Starting Off: Begin by laying both gables face up on a piece of cardboard or cloth. This is a smart move to avoid any scratches or damage to the unit. Attaching Screws to Gables: Now, grab Screw B and attach it to both the left and right gables.
-
Page 8: Tall Double Hang (Included In Models: Basic 8,11 And Standard 2,3,4,5 & 6)
Installation Instruction Page 8 of 19 Included in Models: Basic 8,11 and Standard 2,3,4,5 & 6 Tall Double Hang (TDH) - Page 9 Installation Instruction Page 9 of 19 Diagram C ORDER OF ASSEMBLY/STEPS Prepare the Gables: Begin by laying both gables face up on cardboard or cloth. This is to make sure you don’t scratch or damage the unit. Safety first! Attaching Screws to Gables: Now, take Screw B and attach it to both the right and left Gables as shown in Diagram C.
-
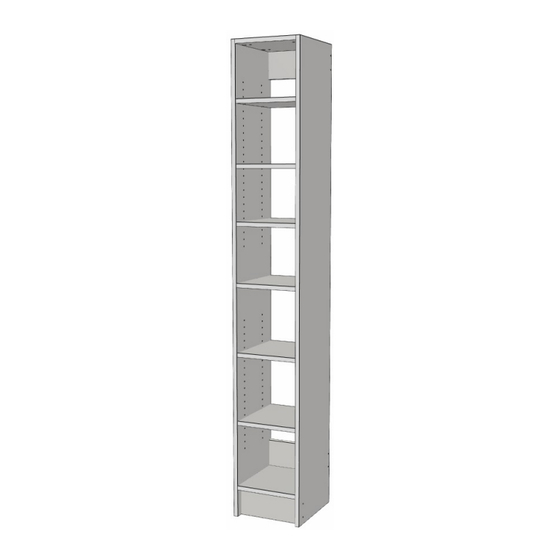
Page 10: Tall Shelf (Included In Closet Models: Basic 8,9 & 11)
Installation Instruction Page 10 of 19 Included in Closet Models: Basic 8,9 & 11 Tall Shelf (TSHF) - Page 11 Installation Instruction Page 11 of 19 ORDER OF ASSEMBLY/STEPS Diagram D Starting with the Gables: First, lay down both gables face up on cardboard or cloth. This is a smart step to avoid scratching or damaging the unit. Attaching Screws to Gables: Use Screw B to attach it to the left and right gables, as shown in Diagram D.
-
Page 12: Tall Hang Shoe (Included In Models: Basic 11 And Standard 5)
Installation Instruction Page 12 of 19 Included in Models: Basic 11 and Standard 5 Tall Hang Shoe (THSHOE) - Page 13 Installation Instruction Page 13 of 19 Diagram E ORDER OF ASSEMBLY/STEPS Getting Started with the Gables: Begin by laying down both gables face up on a piece of cardboard or cloth. This is a great way to protect your unit from any scratches or damage. First Steps with Screws: Attach Screw B to the left and right Gables as shown in diagram E.
-
Page 14: Tall 4 Drawer Hang (Included In Closet Models: Standard 1-6)
Installation Instruction Page 14 of 19 Included in Closet Models: Standard 1-6 Tall 4 Drawer Hang (T4DH) - Page 15 Installation Instruction Page 15 of 19 Diagram F ORDER OF ASSEMBLY/STEPS Preparing the Gables: Begin by laying both Gables face up on cardboard or a cloth. This smart move helps to prevent any scratches or damage to the unit. Attaching the First Screws: Screw B comes into play here! Attach it to the left and right Gables as shown in Diagram F.
-
Page 16: Floor Standing Closet Installation Guide
Page 16 of 19 Installation Instructions Arranging the Cabinets: Start by arranging your assembled cabinets in the order Riverside Floor Standing Closet Installation shown on the provide drawings. It's like a fun puzzle, getting everything in just the Guide right place. -
Page 17: Installing Drawer Boxes And Fronts
Repeat the Process: Repeat steps 1-6 for each drawer front until they are all installed. It's a bit repetitive, but the result is worth it! Riverside Hanging Closet Installation Guide Measuring and Cutting the Closet Hanging Rod: First things first, measure the width of your closet and subtract a quarter inch from that measurement. - Page 18 Installation Instruction Page 18 of 19...
- Page 19 Installation Instruction Page 19 of 19...
Need help?
Do you have a question about the Double Hang Basic 2 and is the answer not in the manual?
Questions and answers