Table of Contents
Advertisement
Advertisement
Table of Contents

Related Manuals for cycliq FLY6 PRO


Summary of Contents for cycliq FLY6 PRO
- Page 1 CYCLIQ.COM USER GUIDE MODEL: FLY6 PRO CE604...
- Page 2 We’re doing so by creating a global network of Cycliq users on all major social media platforms, encouraging user engagement cycliq.com Subscribe to our newsletter at for all the latest product news.
-
Page 3: Table Of Contents
Contents page What’ s in the box Features Video resolution Read this before using your Fly6 PRO High Dynamic Range (HDR) Electronic Image Stabilisation Your Fly6 PRO Looping function Register your Fly6 PRO Incident protection mode Fly6 PRO layout Manual footage capture... -
Page 4: What's In The Box
What’s in the box 1 x Fly6 PRO 1 x Cycliq 64GB microSD Card (installed in Fly6 PRO) 1 x Seat post mount 1 x Standard seat post strap 1 x Aero seat post strap 1 x 0° Spacer 1x D-shaped seat post adapter... -
Page 5: Read This Before Using Your Fly6 Pro
Read this before using your Fly6 PRO Disclaimer Safety, operating and care information The Fly6 PRO is designed specifi cally to be used as a ‘head light’ with video The following is important information which relates to the safe operation and audio recording capabilities for bicycles. -
Page 6: Your Fly6 Pro
Your Fly6 PRO Register your Fly6 PRO We strongly advise you register your Fly6 PRO with Cycliq, to ensure you receive notifications of firmware updates, feature upgrades and user tips. Registration will also allow us to deliver the fastest possible response should you require technical or warranty support. -
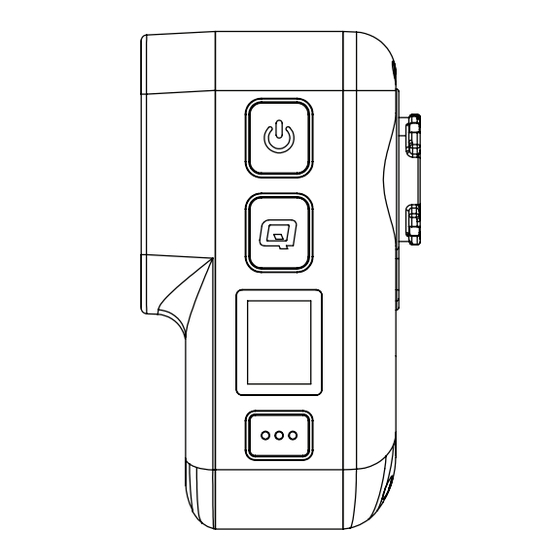
Page 7: Fly6 Pro Layout
Your Fly6 PRO Fly6 PRO layout Fly6 PRO User Guide | 7 of 35... -
Page 8: Before Your First Ride
To maximise battery life, select a lower intensity light mode and turn off the Fly6 PRO when not in use. The light mode last used will be remembered when the Fly6 PRO is turned off . The Press and hold the power button (for approximately 2 seconds) until the next time the Fly6 PRO is turned on it will resume with the previously used light mode. -
Page 9: Display Screen
Display Screen Getting to know the display screen on your Fly6 PRO The display screen on the back of the Fly6 PRO allows you to control many features and functions with ease. The main functions of the display screen can be toggled by pressing the function button. -
Page 10: Home Screen
Bluetooth status The Bluetooth icon is shown when a Bluetooth connection is established with the Fly6 PRO. Time The time on the Fly6 PRO can be adjusted via CycliqPlus. See section on changing your time setting on page 28. Light mode The current active light mode is displayed on the home screen. -
Page 11: Rotation
Display Screen 3. Screen On/Off By default, the OLED screen of your Fly6 PRO is set to turn off after 30 seconds of inactivity. Changing settings To set your OLED screen of your Fly6 PRO to always on, press and hold the function button (for approximately 3 seconds). -
Page 12: Sd Card Formatting
This screen will be shown if your microSD card can not be formatted. This could be due to a corrupt or damaged microSD card. No SD card If there is no microSD card installed, or it is not correctly installed this screen will be shown. Fly6 PRO User Guide | 12 of 35... -
Page 13: Factory Reset
A fi ve second countdown will appear - continue to hold the function button during the countdown and release the button when the Fly6 PRO turns off. The Fly6 PRO will then turn itself back on and the reset is complete. -
Page 14: Incident Protection And Image Capture
Incident protection mode has been designed to automatically lock fi les containing incidents so that they are not recorded over. Incident protection mode is activated when the Fly6 PRO is tilted more than 60° from vertical for more than fi ve seconds. Learn more about incident protection mode on page 24. -
Page 15: Other Screens
Shown when you Fly6 PRO has NO microSD card installed and is connected to a desktop. SD card errors Will fl ash on the display when turning on your Fly6 PRO if any issues are detected. Fly6 PRO User Guide |... -
Page 16: Setting Up Your Fly6 Pro
3 rapid high pitched beeps = 50% to <75% charged Note The Fly6 PRO is fast charge compatible and accepts up to 2 amps. Accordingly, the time to charge from fl at to fully charged varies from 2.5 to 8 hours depending on the method of charging, i.e. -
Page 17: Inserting And Removing The Microsd Card
• Your Fly6 PRO comes with a 64GB microSD card pre-installed. • Your Fly6 PRO MUST have a microSD card installed to operate correctly. To install a microSD card into your Fly6 PRO, press the card gently into the card slot of your Fly6 PRO until locked in place. -
Page 18: Mounting Your Fly6 Pro
You can leave the mount on your bike for next use. Note If installing your Fly6 PRO using the universal adapter and a finned style mounting sytem, the process of operating the 1/8th turn is the same as above. -
Page 19: Attaching The Safety Tether
Attaching the safety tether to your TETHER SLOT Fly6 PRO 1. On the frontof the Fly6 PRO there is a single slot for the safety tether to be attached. 2. Thread the thinner part of the tether through the slots, then thread the other end through the loop to secure the tether. -
Page 20: Changing Your Fly6 Pro Settings
On the Fly6 PRO • Most primary functions can be accessed using the power, Q and function button. • The display screen on the rear of the Fly6 PRO is controlled by the Q BUTTON function button. On the CycliqPlus mobile app •... -
Page 21: Visual And Audio Alerts
(refer to above charge level) Audible sound: 3, 5 or 10 minute beeps Note To listen to tones described in the table above visit the Visual and Audio Alerts Guide for Fly6 PRO. Fly6 PRO User Guide | 21 of 35... -
Page 22: Features
Video resolution The Fly6 PRO is equipped with a 4K camera. The lens has a 145° viewing angle providing an ultra-wide view. There are multiple video resolutions to choose from. More storage space and power will be used, the higher the resolution settings. -
Page 23: Looping Function
Note The Fly6 PRO requires a compatible Class 10 microSD card. Not all micro sd cards are the same and may have diff ering read/write speeds. See our recommended list of compatible microSD cards. -
Page 24: Incident Protection Mode
Q button. This will lock the current and immediately preceding video fi les. Incident protection mode is activated when the Fly6 PRO is tilted more than 60° from vertical (or 30° from the ground) for more than fi ve seconds. If... -
Page 25: Audio Settings
Heat protection so you are aware if the Fly6 PRO is turned on. The Fly6 PRO is designed with a heatsink, to allow the Fly6 PRO to be cooled down by wind as you ride. With in-built sensors monitoring the temperature of the Fly6 PRO, if it ever reaches an abnormally hot temperature, the main LED will dim to cool the Fly6 PRO and ensure normal operation. -
Page 26: Video Segment Length
The table below gives an indication of approximate file size per segment length: Example at 1440p QHD @30fps Segment Length Approx. File Size 3 minutes 700 MB 5 minutes 1.17 GB 10 minutes 2.34 GB Video segment length can be changed via CycliqPlus. Fly6 PRO User Guide | 26 of 35... -
Page 27: Using Your Footage
After your ride, you can access your footage in a number of ways: 1. Connect the Fly6 PRO to any PC or Mac using the supplied USB cable. 2. Remove the microSD card and read data using your PC or Mac SD card slot. -
Page 28: Cycliqplus Mobile App
Connecting for the first time Video resolution The first time you connect your Fly6 PRO to your mobile device you will The resolution the Fly6 PRO records in can be customised. need to follow the below steps to enable Bluetooth. -
Page 29: Updating Your Firmware
Firmware will be updated automatically to the latest version CycliqPlus Firmware Updater Visit our download page on cycliq.com. Fly6 PRO User Guide | 29 of 35... -
Page 30: Trouble Shooting Your Fly6 Pro
Fly6 PRO on to confirm the reset was sucessful. WARNING DO NOT complete a master rest when the Fly6 PRO is in the process of completing a fi rmware update, as this may damage your Fly6 PRO. Still need help? -
Page 31: Technical Data
Battery size 4380mAh (up to 9 hours in camera only mode) Watt hours 16.86Wh Voltage 3.85V (battery) Ingress protection IP67 Operating temperature / humidity 0-45°C (32-113°F) Storage temperature / humidity 0-45°C (32-113°F) Fly6 PRO User Guide | 31 of 35... -
Page 32: Compliance Statement
This equipment should be installed and operated with minimum distance 20cm between the radiator and your body. This transmitter must not be co-located or operating in conjunction with any other antenna or transmitter. Fly6 PRO User Guide | 32 of 35... - Page 33 FCC Rules. These limits are designed to provide reasonable protection against harmful interference in a residential installation. This equipment generates, uses and can radiate radio frequency energy and, if not installed and used in accordance with the instructions, may cause harmful interference to radio communications. Fly6 PRO User Guide | 33 of 35...
-
Page 34: Regulatory Information
20cm from nearby persons. Cycliq customer support Warning Please go to support.cycliq.com for further information and support. Changes or modifications to this unit not expressly approved by the party responsible for compliance could void the user’s authority to operate the Caution equipment. - Page 35 CYCLIQ.COM PO Box 404 Subiaco WA 6904 Australia info@cycliq.com User Guide - Version 1.0.0 MODEL: FLY6 PRO CE604 Fly6 PRO User Guide Cycliq reserves the right, at its discretion, to change and modify portions of this User Guide.
Need help?
Do you have a question about the FLY6 PRO and is the answer not in the manual?
Questions and answers