Table of Contents

Related Manuals for Vinotemp 1500CD


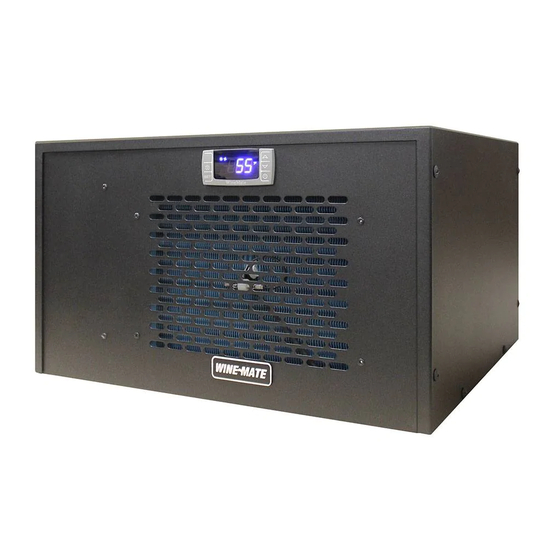
Summary of Contents for Vinotemp 1500CD
- Page 1 WINEMATE Cooling Unit Use & Care Manual VINO1500CD, CTED VINO2500CD, CTED...
-
Page 2: Important Safety Information
Important Safety Information • DO NOT PLUG IN UNTIL 24 HOURS AFTER DELIVERY. • DO NOT USE A GROUND FAULT INTERRUPTER (GFI). • A DEDICATED 15 AMPCIRCUIT IS HIGHLY RECOMMENDED. - 1 -... -
Page 3: Table Of Contents
TABLE OF CONTENTS Feature Description…………………………….……………..3 Installation Instruction………………………………………..5 Use and Temperature Control……………………………….7 Care Guide……………………………………………………10 Troubleshooting……………………………………………..12 Wiring Diagram……………………………………….………15 Customer Support……………………………………………16 Warranty……………………………………………………….17 Appendix……………………………………………………….19 - 2 -... -
Page 4: Feature Description
Feature Description • VINO1500CD, CTED and VINO2500CD, CTED cooling units are designed and used to provide a stable temperature between 50~65 space at a normal environment. • The refrigerated space will maintain humidity of 50~70% RH even when the environment becomes dry and humid. •... -
Page 5: Model Description
The dimension and capacity are specified as follows: Model Description 1500cd Rear Exhaust 1500cted Top Exhaust 2500cd Rear Exhaust 2500cted Top Exhaust • See the voltage, frequency and AMP from the label on the back of the cooling unit. Fig. 1.2 DIMENSIONS... -
Page 6: Installation Instruction
Installation Instruction 1. Location • Place the wine cabinet in a properly ventilated location. Otherwise, heat exhausted by the cooling unit will build up and it will not operate properly. • The exhaust area must not be closed space and must be ventilated. 1) Rear Exhaust •... - Page 7 Fig. 2.2 TOP EXHAUST GASKET • Cut a rectangular opening with the ¼” clearance at the rear of wine cabinet to the width and height of the cooling unit. • If top exhaust, cut a rectangular opening at the top of the cabinet to the length and width of the top exhaust openings.
-
Page 8: Use And Temperature Control
Temperature & Humidity Control 1. Temperature Setting • Set the temperature at 55 • Set the temperature higher at very high ambient temperature. • On initial start-up, the time required to reach the desired temperature will vary, depending on the quantity of bottles, temperature setting and surrounding temperature. - Page 9 1.2 Front Panel Commands 2) Alarm Signals 2.1 Code Description 2.2 Alarm Recovery Probe alarms P1”, start a few seconds after the fault in the related probe; they automatically stop a few seconds after the probe restarts normal operation. Check connections before replacing the probe. Temperature alarms “HA”, “LA” automatically stops as soon as the temperature returns to normal value.
- Page 10 1. Push the SET key for more than 3 seconds to change the Set point value; 2. The value of the set point will be displayed and the “°C” or “°F” LED starts blinking; 3. To change the Set value, push the o or n arrows within 10s. 4.
-
Page 11: Care Guide
I. Model Number & Serial Label and Component Locations Label II. Condenser Coil Cleaning • The condenser coil is on the rear side of the wine cooling unit. • Clean the condenser coil regularly. Coil may need to be cleaned at least every 6 months. - Page 12 • Use a vacuum cleaner with an extended attachment to clean the coil when it is dusty or dirty. • Plug the cooling unit or reconnect power. III. Moisture Removing • Remove the extra condensate if it is accumulated in the wine cabinet at high ambient temperature and humidity.
-
Page 13: Troubleshooting
This Troubleshooting Chart is not prepared to replace the training required for a professional refrigeration service person, not is it comprehensive Complaint Possible Causes 1. Unit not running a. Power cord unplugged b. No power to unit c. Defrost light blinking d. - Page 14 Iced evaporator Low voltage k. Operating 60 Hz unit at 50Hz Sealed system problem m. Undercharge or overcharge 5. Unit running too long or continually a. Improper cabinet seals b. Exhaust too close to wall or ceiling c. Cabinet too large d.
- Page 15 c. Failed thermistor d. Failed components e. Improper condenser airflow Dirty condenser g. Overcharge of refrigerant h. Discharge or suction pressure too high 8. Fan motor running but compressor not running a. Incorrect power supply b. Incorrect or loose wirings c.
-
Page 16: Wiring Diagram
Wiring Diagram Fig. 6.1 WIRING DIAGRAM - 15 -... -
Page 17: Customer Support
Customer Support If you still have problems, please contact us at: Vinotemp International 17631 South Susana Road Rancho Dominguez, CA 90221 Tel: (310) 886-3332 Fax: (310) 886-3310 Email: info@vinotemp.com - 16 -... -
Page 18: Warranty
BTU/H. While every effort has been made to provide accurate guidelines, VINOTEMP can not warranty its units to cool a particular enclosure. In case of failure, VINOTEMP cooling units must be repaired by the factory or its authorized agent. Repairs or modifications made by anyone else will void the warranty. - Page 19 VINOTEMP will, at its discretion, repair or replace the unit and return it free of charge to the original retail customer. If the unit is found to be in good working order, or beyond the initial twelve month period, it will be returned freight collect.
-
Page 20: Appendix
Appendix I. Enclosure This is only a guide and should be considered as minimum requirements. All interior walls and floors should have a vapor barrier and a minimum of R11 insulation. All exterior walls and ceiling should have a vapor barrier and a minimum of R19 insulation.
Need help?
Do you have a question about the 1500CD and is the answer not in the manual?
Questions and answers