Advertisement
Advertisement
Table of Contents

Related Manuals for NANLUX Evoke 2400B


Summary of Contents for NANLUX Evoke 2400B
- Page 1 Evoke 2400B LED Bi-color Spot Light USER MANUAL Guangdong NanGuang Photo&Video Systems Co., Ltd.
- Page 2 Thank you for purchasing Nanlux product -- Eovke 2400B! Evoke 2400B is a LED bi-color spotlight specifically designed for film and TV projects. It is equipped with rated power of 2400W, adjustable CCT of 2700K-6500K, precise dimming in 0.1% increment, 12 effects, 4 fan CCTs, and 2 output CCTs. The multiple control methods include on-board, remote control, Nanlink App, DMX/RDM, LumenRadio CRMX and Ethernet (Art Net, sACN).
-
Page 3: Product Diagram
Evoke 2400B LED Bi-color Spot Light Product Diagram Technical Data Rated Power: 2400W Input: DC48V/26A×2 AC100V-240V 50/60Hz 26A Max Color Temperature: 2700K - 6500K (GM±80) CRI: Average 96 TLCI: Average 97 WWW.NANLUX.COM... -
Page 4: Product Details
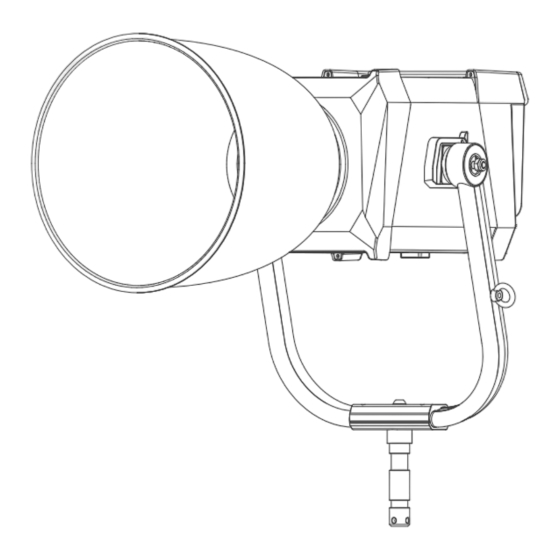
Product Details 1. Quick Release Device 3. NL Mount 2. Adjustable Handle 4. Lock Catch 5. Eye Bolt 6. Yoke WWW.NANLUX.COM... - Page 5 7. Handle 8. Display Screen 9. Buttons 10. Left Knob 15. Right Knob 11. Middle Knob 12. USB Port 16. Wire Control Socket 13. LAN1 17.DMX IN 14. LAN2 18.DMX OUT 19.DC IN WWW.NANLUX.COM...
- Page 6 20. Power Supply Handle 27. Reflector 21. Hanging Hole 22. AC Power Input Socket 23. Power Switch 24. DC Power Output Socket 25. LED Indicator 26. Quick Release Plate 28. COB Protective Cap WWW.NANLUX.COM...
-
Page 7: Detailed Description
26. Quick release plate: For mounting the quick release clamp. 27. Reflector: For concentrating light to improve the central illumination. 28. COB protective cap: For protecting the COB when the fixture is not in use. (Note: Take off the cap before using.) WWW.NANLUX.COM... - Page 8 Includes (for CN, UK, AU, EU, KR) Evoke 2400B KIT-FO Flight Case Standard Kit (fixture only) : Evoke 2400B×1 Yoke×1 Power Supply×1 USB Flash Drive×1 Evoke 2400B Reflector×1 DC Connection Cable×1 AC Power Cable×1 (packed separately) CC-EV2400-FT-FO AS-CP-QR-EV WS-RC-C2 User Manual×1 Flight Case×1...
- Page 9 Includes (for US, JP) Evoke 2400B KIT-FO Flight Case Standard Kit (fixture only) : Evoke 2400B×1 Yoke×1 Power Supply×1 USB Flash Drive×1 Evoke 2400B Reflector×1 AC Cable AC Cable DC Connection Cable×1 (packed separately) with Edison Connector×1 (with bare ends)×1...
- Page 10 Usage 1. Connection Between Light Fixture and Power Supply WWW.NANLUX.COM...
- Page 11 Firmly hold the yoke in place with one hand, and pull on both sides of the fixture. installing the quick release plate, then insert the quick release lever with the other hand to lock the them into the mount. plate. WWW.NANLUX.COM...
- Page 12 Press the quick release lever lock catch of the fixture the fastening screws on the light stand. from the heavy-duty light stand first and lay it down on both sides, then release the quick release lever to on flat ground. remove the fixture. WWW.NANLUX.COM...
- Page 13 The installation of the plate mounts to the plates of the yoke. yoke is completed. (Note: Please adjust the plate to right directions when installing the quick release plate, then insert them into the mount.) WWW.NANLUX.COM...
- Page 14 Note: 1. If the rotation is not smooth, pull the lock catch of the mount and rotate the reflector at the same time. 2. The electronic contacts on the accessories should be aligned with those on the fixture. When removing the reflector, pull the lock catch of the mount, rotate anticlockwise the reflector and remove it. WWW.NANLUX.COM...
- Page 15 Align the quick release plate on the power supply with the quick release mount Press the lock catch on the clamp to remove the power supply from the light stand. on the clamp, a click sound will be heard when the power supply is fastened in place. WWW.NANLUX.COM...
-
Page 16: Remote Control
Remote Control ·Evoke 2400B supports remote control via DMX/RDM, 2.4G, LumenRadio, Art-Net & sACN, and has built-in Bluetooth module as well. ▲The ADDRESS needs to be set before operating the remote control via DMX/RDM, 2.4G, LumenRadio, Art-Net & sACN. 1. ADDRESS/DMX, including ADDRESS, DMX CCT, DMX REDUCED CHANNELS, DMX DIMMING CURVE and DMX SMOOTHING settings. - Page 17 DMX REDUCED CHANNELS ULTIMATE DMX 8bit DMX DIMMING CURVE DMX SMOOTHING CH: 512 CH: 512 PRESS “MENU” TO RETURN PRESS “MENU” TO RETURN Rotate the right knob to DMX MODE and press the right knob to enter the tertiary menu. WWW.NANLUX.COM...
- Page 18 Rotate the right knob to DMX REDUCED CHANNELS, and press the right knob to enter the tertiary menu. MENU MENU SMART SMART CH: 512 CH: 512 PRESS “MENU” TO RETURN PRESS “MENU” TO RETURN Rotate the right knob to select ON or OFF and press the right knob to set. WWW.NANLUX.COM...
- Page 19 DMX MODE DMX REDUCED CHANNELS DMX DIMMING CURVE DMX SMOOTHING CH: 512 CH: 512 PRESS “MENU” TO RETURN PRESS “MENU” TO RETURN Rotate the right knob to DMX SMOOTHING and press the right knob to enter the tertiary menu. WWW.NANLUX.COM...
- Page 20 The fixture comes with 5-pin XLR plug/socket. lf a 3-pin XLR plug is used, please follow the instruction below. Five Pin Three Pin Pin 1:GND(SCREEN) Pin 1:GND(SCREEN) Pin 2:Signal(-) Pin 2:Signal(-) Pin 3:Signal(+) Pin 3:Signal(+) Pin 4:N/C Pin 5:N/C WWW.NANLUX.COM...
- Page 21 PIN 2 PIN 3 2.3. ADDRESS Setting. 2.4. Refer to the DMX reference guide from www.nanlux.com and control the light via DMX/RDM console. (For specific operation methods, please refer to the DMX/RDM console operation manual.) 2.5. Note: For technical data, please download from https://www.nanlux.com/en/h-col-274.html.
- Page 22 4. WIRELESS CONTROL 4.1 BLUETOOTH Setting The Evoke 2400B has built-in Bluetooth module, so it can be controlled via Bluetooth connection. MENU SMART MENU SMART OUTPYT MDER BLUETOOTH SETTINGS MODIFIER RECOGNITION 2.4G SETTINGS ADDRESS/DMX LUMENRADIO SETTINGS WIRELESS CONTROL ALL WIRELESS ON/OFF NETWORK SETTINGS Art-Net &...
- Page 23 Rotate the right knob to RESET BLUETOOTH, and press the right knob to enter the next level menu. MENU SMART MENU SMART RESET BLUETOOTH BACK RESET CH: 512 CH: 512 PRESS “MENU” TO RETURN PRESS “MENU” TO RETURN Rotate the right knob to select RESET, and press the right knob to set. WWW.NANLUX.COM...
- Page 24 4.2 2.4G Setting ·Evoke 2400B can be remotely controlled by 2.4G remote controller or by NANLINK APP via WS-TB-1 transmitter box. ① Note: 2.4G remote controller and NANLINK transmitter box are sold separately. ② The fixture supports 2.4G wireless protocol V1.0 and V2.0. The fixture should be set in V2.0 while using WS-RC-C2 remote controller, set in V1.0 while using other remote controllers.
- Page 25 Rotate the right knob to WIRELESS PROTOCOL, and press the right knob to enter the next level menu. MENU SMART MENU SMART 2.4G WIRELESS PROTOCOL V1.0 V2.0 CH: 512 CH: 512 PRESS “MENU” TO RETURN PRESS “MENU” TO RETURN Rotate the right knob to select V1.0 or V2.0, and press the right knob to set. WWW.NANLUX.COM...
- Page 26 4.3 LUMENRADIO Setting Evoke 2400B has built-in CRMX TIMOTWO module, enabling it to receive and send CRMX wireless DMX signals. The specific operations are as below: press MENU to enter the interface. MENU SMART OUTPUT MODE MODIFIER RECOGNITION ADDRESS/DMX WIRELESS CONTROL...
- Page 27 PRESS “MENU” TO RETURN PRESS “MENU” TO RETURN Rotate the right knob to select ON or OFF, and press the right knob to set. CRMX wireless DMX signals can be received and transmitted when the LUMENRADIO is set to be on. WWW.NANLUX.COM...
- Page 28 LUMENRADIO ON/OFF RADIO MODE DO YOU WANT TO UNLINK? UNLINK CH: 512 CH: 512 PRESS “MENU” TO RETURN PRESS “MENU” TO RETURN Rotate the right knob to UNLINK, and press the right knob to enter the next level menu. WWW.NANLUX.COM...
- Page 29 LUMENRADIO ON/OFF RECEIVER MODE RADIO MODE TRANSMITTER MODE UNLINK CH: 512 CH: 512 PRESS “MENU” TO RETURN PRESS “MENU” TO RETURN Rotate the right knob to RADIO MODE, and press the right knob to enter the next level menu. WWW.NANLUX.COM...
- Page 30 Rotate the right knob to RF OUTPUT POWER, and press the right knob to enter the next level menu. MENU SMART MENU SMART 20dBm 16dBm 11dBm 5dBm CH: 512 CH: 512 PRESS “MENU” TO RETURN PRESS “MENU” TO RETURN Rotate the right knob to select 20dBm, 16dBm, 11dBm or 5dBm, and press the right knob to set. WWW.NANLUX.COM...
- Page 31 Rotate the right knob to select LINK, and press the right knob to set. ⑤ UNLINK Setting When the fixture needs to stop transmitting the CRMX wireless DMX signal, set the fixture to UNLINK. The setting method is the same as the UNLINK setting on P27. WWW.NANLUX.COM...
- Page 32 When all wireless functions are set to be on, the Bluetooth, 2.4G and LUMENRADIO settings will be in the ON state. When all wireless functions are set to be off, the Bluetooth, 2.4G and LUMENRADIO settings will be in the OFF state. WWW.NANLUX.COM...
- Page 33 PRESS “MENU” TO RETURN Rotate the right knob to select Automatic, Art-Net, sACN or OFF, and press the right knob to set. (The fixture will automatically recognize Art-Net or sACN signals based on network signals when Automatic is selected) WWW.NANLUX.COM...
- Page 34 SMART MENU SMART Art-Net/sACN STATE Art-Net UNIVERSE sACN Universe sACN UNIVERSE CH: 512 CH: 512 PRESS “MENU” TO RETURN PRESS “MENU” TO RETURN Rotate the right knob to sACN UNIVERSE, and press the right knob to the tertiary menu. WWW.NANLUX.COM...
- Page 35 PRESS “MENU” TO RETURN Rotate the right knob to select the needed sACN Universe value. MENU SMART MENU SMART sACN Universe CH: 512 CH: 512 PRESS “MENU” TO RETURN PRESS “MENU” TO RETURN Press the right knob to set. WWW.NANLUX.COM...
- Page 36 1. Make sure the power is off, then connect the power supply with cable and switch it on. If the power indicator is on that means the power input is normal, the screen will display "NANLUX". 2. CCT Button: Press the CCT button to enter the CCT MODE.
- Page 37 100.0% 5600K 100.0% 5600K CH: 512 CH: 512 Note: (1) In other modes, the G/M adjustment range is the same as in CCT mode. (2) In CCT mode, press the right knob to promptly reset the G/M to 0. WWW.NANLUX.COM...
- Page 38 3. EFFECT Button: Press the EFFECT button to enter the EFFECT mode. Evoke 2400B has built-in effects including: CCT Loop, INT Loop, Flash, Pulse, Storm Auto, Storm Manual, TV, Paparazzi, Candle/Fire, Bad Bulb, Firework, Explosion Auto, Explosion Manual and Welding.
- Page 39 EFFECT: CCT LOOP CCT1: 3200K CCT2: 5600K G/M: 0 CCT1: 3300K CCT2: 5600K G/M: 0 SPEED: 8s CYCLE: TWO WAY SPEED: 8s CYCLE: TWO WAY ADD-ON: OFF ADD-ON: OFF CH: 512 CH: 512 Rotate the middle knob to set the parameters. WWW.NANLUX.COM...
- Page 40 (3) When the ADD-ON is RANDOM FLASH, there is flash effect in the CCT loop, flash can be set by adjusting the FLASH SPEED (range: 1-100). (4) When the ADD-ON is PULSE, there is pulse effect in the CCT loop, pulse can be set by adjusting the PULSES/MIN (range: 1-240). WWW.NANLUX.COM...
- Page 41 There are four add-on effects in INT loop: OFF, FLASH, RANDOM FLASH and PULSE. Note: (1) The setting method and range of CYCLE and ADD-ON are the same as in CCT LOOP. (2) In INT loop, press the right knob to restart cycle. WWW.NANLUX.COM...
- Page 42 INTERVALS: 1.0s FLASH RATIO: 50 FLASH RATIO: 50 PAUSE: OFF PAUSE: OFF CH: 512 CH: 512 Rotate the middle knob to set the parameters. ·Note: The PAUSE includes ON and OFF. When pause is on, the fixture won't flash. WWW.NANLUX.COM...
- Page 43 Rotate the right knob to select CCT, G/M or PULSES/MIN. EFFECT MODE SMART EFFECT MODE SMART DIM: 100.0% EFFECT: PULSE DIM: 100.0% EFFECT: PULSE CCT: 5600K G/M: 0 CCT: 5700K G/M: 0 PULSES/MIN: 40 PULSES/MIN: 40 CH: 512 CH: 512 Rotate the middle knob to set the parameters. WWW.NANLUX.COM...
- Page 44 5600K CCT: 5700K FLASH TIMES: 3 - 6 FLASH TIMES: 3 - 6 INTERVAL RANGE: 2s - 6s INTERVAL RANGE: 2s - 6s PAUSE: OFF PAUSE: OFF CH: 512 CH: 512 Rotate the middle knob to set the parameters. WWW.NANLUX.COM...
- Page 45 Rotate the middle knob to set the parameters. EFFECT MODE SMART DIM: 100.0% EFFECT: STORM MANU CCT: 5700K FLASH TIMES: 3 - 6 CH: 512 PERSS RIGHT KNOB TO TRIGGER Press the right knob to trigger the storm effect. WWW.NANLUX.COM...
- Page 46 5600K G/M: 0 CCT: 5700K G/M: 0 CCT SHIFT: 600K CCT SHIFT: 600K SPEED: 50 SPEED: 50 DIMMING RANGE: 0.0% - 100.0% DIMMING RANGE: 0.0% - 100.0% CH: 512 CH: 512 Rotate the middle knob to set the parameters. WWW.NANLUX.COM...
- Page 47 Rotate the right knob to select CCT, G/M or SPEED. EFFECT MODE SMART EFFECT MODE SMART DIM: 100.0% EFFECT: PAPARAZZI DIM: 100.0% EFFECT: PAPARAZZI CCT: 5600K CCT: 5700K G/M: 0 G/M: 0 SPEED: 50 SPEED: 50 CH: 512 CH: 512 Rotate the middle knob to set the parameters. WWW.NANLUX.COM...
- Page 48 DIMMING RANGE: 0.0% - 100.0% FLICKER: OFF FLICKER: OFF CH: 512 CH: 512 Rotate the middle knob to set the parameters. Note: The FLICKER includes ON and OFF. When the filcker is on, there is flicker in the candle/fire effect. WWW.NANLUX.COM...
- Page 49 SMART DIM: 100.0% EFFECT: BAD BULB DIM: 100.0% EFFECT: BAD BULB CCT: 5600K CCT: 5700K G/M: 0 G/M: 0 INTENSITY: 50 INTENSITY: 50 SPEED: 50 SPEED: 50 CH: 512 CH: 512 Rotate the middle knob to set the parameters. WWW.NANLUX.COM...
- Page 50 EFFECT: FIREWORK DIM: 100.0% EFFECT: FIREWORK CCT: 5600K G/M: 0 CCT: 5700K G/M: 0 CCT SHIFT: 600K CCT SHIFT: 600K SPEED: 50 SPEED: 50 DECAY: 50 DECAY: 50 CH: 512 CH: 512 Rotate the middle knob to set the parameters. WWW.NANLUX.COM...
- Page 51 SMART DIM: 100.0% EFFECT: EXPLOSION AUTO DIM: 100.0% EFFECT: EXPLOSION AUTO CCT: 5600K CCT: 5700K G/M: 0 G/M: 0 SPEED: 50 SPEED: 50 DECAY: 50 DECAY: 50 CH: 512 CH: 512 Rotate the middle knob to set the parameters. WWW.NANLUX.COM...
- Page 52 PERSS RIGHT KNOB TO TRIGGER Rotate the middle knob to set the parameters. EFFECT MODE SMART DIM: 100.0% EFFECT: EXPLOSION MANU CCT: 5700K G/M: 0 DECAY: 50 CH: 512 PERSS RIGHT KNOB TO TRIGGER Press the right knob to trigger explosion. WWW.NANLUX.COM...
- Page 53 Note: The PAUSE includes ON and OFF. When the pause is ON, the welding effect will suspend. ·Lighting effects and additional functionality will be probably upgraded with later firmware version. Detailed information is subject to the latest firmware function instruction. WWW.NANLUX.COM...
- Page 54 MAX OUTPUT MODIFIER RECOGNITION CONSTANT OUTPUT ADDRESS/DMX WIRELESS CONTROL NETWORK SETTINGS Art-Net & sACN SETTINGS CH: 512 CH: 512 PRESS “MENU” TO RETURN Rotate the right knob to OUTPUT MODE, and press the right knob to enter the secondary menu. WWW.NANLUX.COM...
- Page 55 ·When the modifier recognition is off, please ensure the modifier should match the fixture's COB size and work normally to avoid dangerous situations. ·When the modifier recognition is on, only the NL mount modifier that with electronic contacts and by correct installation can be recognized by the fixture. If the modifier cannot be recognized, the brightness will be 0%. WWW.NANLUX.COM...
- Page 56 Art-Net 10 . x . x . x GATEWAY ADDERSS MANUAL MAC ADDRESS CH: 512 CH: 512 PRESS “MENU” TO RETURN PRESS “MENU” TO RETURN Rotate the right knob to NETWORK MODE, and press the right knob to enter the tertiary menu. WWW.NANLUX.COM...
- Page 57 . 168 . 0 . 0 196 . . 0 . 0 CH: 512 CH: 512 PRESS “MENU” TO RETURN PRESS “MENU” TO RETURN Rotate the right knob to the bytes, and rotate the middle knob to select the needed IP address. WWW.NANLUX.COM...
- Page 58 . 255 . 255. 0 255 . . 255. 0 CH: 512 CH: 512 PRESS “MENU” TO RETURN PRESS “MENU” TO RETURN Rotate the right knob to the subnet, and rotate the middle knob to select the needed subnet mask. WWW.NANLUX.COM...
- Page 59 . 168 . 0. 100 192 . . 0. 100 CH: 512 CH: 512 PRESS “MENU” TO RETURN PRESS “MENU” TO RETURN Rotate the right knob to the bytes, and rotate the middle knob to select the needed gateway address. WWW.NANLUX.COM...
- Page 60 MAC ADDRESS CH: 512 CH: 512 PRESS “MENU” TO RETURN PRESS “MENU” TO RETURN Rotate the right knob to MAC ADDRESS, and press the right knob to check. 4.6 Art-Net & sACN For more operation details please refer to P32. WWW.NANLUX.COM...
- Page 61 Note: When the fan is off, the built-in fan will stop working, and the maximum output of fixture will be 15%. When the fan is in low speed, the maximum output is 50%. When the fan is in smart or full speed state, the maximum output is 100%. WWW.NANLUX.COM...
- Page 62 NETWORK SETTINGS SCREEN BRIGHTNESS Art-Net & sACN SETTINGS FAN CONTROL ROTATE SCREEN SCREEN BRIGHTNESS CH: 512 CH: 512 PRESS “MENU” TO RETURN Rotate the right knob to SCREEN BRIGHTNESS, and press the right knob to enter the secondary menu. WWW.NANLUX.COM...
- Page 63 Rotate the right knob to BUTTON BACKLIGHT, and press the right knob to enter the secondary menu. MENU SMART MENU SMART CH: 512 CH: 512 PRESS “MENU” TO RETURN PRESS “MENU” TO RETURN Rotate the right knob to select ON or OFF, and press the right knob to set. WWW.NANLUX.COM...
- Page 64 Rotate the right knob to LANGUAGE, and press the right knob to enter the secondary menu. MENU MENU SMART SMART ENGLISH 简体中文 已设置 CH: 512 CH: 512 PRESS “MENU” TO RETURN PRESS “MENU” TO RETURN Rotate the right knob to select ENGLISH or , and press the right knob to set. 简体中文 WWW.NANLUX.COM...
- Page 65 PRESS “MENU” TO RETURN PRESS “MENU” TO RETURN After the firmware file is found, enter the firmware update interface, rotate the right knob to select UPDATE, and press the right knob to make update. After update, the fixture will automatically restart. WWW.NANLUX.COM...
- Page 66 Rotate the right knob to RESET ALL SETTINGS, and press the right knob to enter the secondary menu. MENU SMART MENU SMART RESET ALL SETTINGS OF THIS LIGHT? CH: 512 CH: 512 PRESS “MENU” TO RETURN PRESS “MENU” TO RETURN Rotate the right knob to select YES or NO, and press the right knob to set. WWW.NANLUX.COM...
- Page 67 firmware, FIRMWARE UPDATE and choose the FIRMWARE UPDATE option in the menu. RESET ALL SETTINGS www.nanlux.com VERSION CH: 512 CH: 512 PRESS “MENU” TO RETURN Rotate the right knob to VERSION, and press the right knob to check the current version.
- Page 68 2. Please check if the modifier / accessory can't be recognized, if so, please align the electronic contacts on the modifier / accessory with those on the fixture. Other Optional Kits Evoke 2400B Flight Case Kit (for CN, UK, AU, EU, KR): Evoke 2400B×1 WS-RC-C2 Remote Controller×1 Yoke×1...
- Page 69 RF-NLM-45-EV2400 Reflector 45°×1 AC Cable (with bare ends)×1 USB Flash Drive×1 User Manual×1 AS-CP-QR-EV Quick Release Clamp×1 CC-EV2400-FT Flight Case×1 Evoke 2400B Carton Packaging (for CN, UK, AU, EU, KR): Evoke 2400B×1 AS-CP-QR-EV Quick Release Clamp×1 Yoke×1 WS-RC-C2 Remote Controller×1 Power Supply×1 DC Connection Cable×1...
- Page 70 Evoke 2400B Carton Packaging (for US, JP): Evoke 2400B×1 WS-RC-C2 Remote Controller×1 Yoke×1 DC Connection Cable×1 Power Supply×1 AC Cable with Edison Connector (US,JP) ×1 RF-NLM-45-EV2400 Reflector 45°×1 AC Cable (with bare ends)×1 USB Flash Drive×1 User Manual×1 AS-CP-QR-EV Quick Release Clamp×1 Optional Purchase RF-NLM-45-EV2400 Reflector 45°...
- Page 71 Nanlux Website Nanlink App This manual has been compiled according to the rigorous testing for Nanlux products. Product designs are subject to change without prior notice. The latest version of the manual for this product is downloadable at www.nanlux.com. WWW.NANLUX.COM...
- Page 72 Certification Made in China WWW.NANLUX.COM...
- Page 73 WWW.NANLUX.COM 0754-85751187 info@nanlux.com 0754-85300887 Dongli Section, Highway 324, Chenghai, Shantou City, Guangdong Province, China...
Need help?
Do you have a question about the Evoke 2400B and is the answer not in the manual?
Questions and answers