Table of Contents
Advertisement
Quick Links
Advertisement
Table of Contents

Related Manuals for NANLUX Dyno 650C


Summary of Contents for NANLUX Dyno 650C
- Page 1 USER MANUAL Dyno 650C/1200C RGBWW LED SOFT PANEL LIGHT WWW.NANLUX.COM...
-
Page 2: Table Of Contents
①CCT LIGHTING MODE ②ADDRESS/DMX ............1. Connection between Dyno 650C and Power Supply ............③LUMENRADIO SETTINGS 2. Connection between two Dyno 650C and Power Supply ..④FAN CONTROL ............3. Connection between Dyno 1200C and Power Supply ... ⑤ROTATE SCREEN ............ -
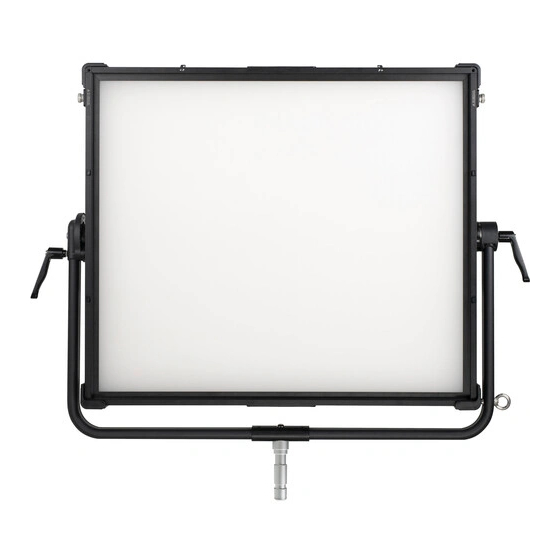
Page 3: Product Diagram
Dyno 650C/Dyno 1200C RGBWW LED Soft Panel Light Product Diagram Technical Data Model No: Dyno 650C Rated power: 650W Input voltage/current: DC48V/14.6A Max AC100-240V 50/60Hz CCT: 2700K-20000K CRI: Average 95 TLCI: Average 95 Model No: Dyno 650C Rated power: 1200W Input voltage/current: DC48V/29.2A Max... -
Page 4: Product Details
Product Details 1. Fixture Body Handle 2. Diffuser Lock Button 2. Diffuser Lock Button 3. Hanging Point 3. Hanging Point 4. Fixing screw 4. Fixing Screw 11. Fan Housing 5. (A) Kipp Handle 5. (B) Kipp Handle 6.DC IN 7. DMX IN 12. - Page 5 16. AC Power Output Socket 17. AC Power Input Socket 18. Power Indicator 19. Power Supply Handle Power Supply Dyno 650C 20. Power Switch 15. DC Power Output Socket 18. Power Indicator 17. AC Power Input Socket 22. Power Supply Display 19.
-
Page 6: Detailed Description
5. Kipp handle: Tighten or release the tilt movement of the fixture on the yoke. (Dyno 1200C has a Kipp handle on each side of the yoke. Dyno 650C just has a single Kipp handle on the left side.) 6. DC IN: DC power input interface. -
Page 7: Usage
Usage 1. Connection between Dyno 650C and Power Supply. -
Page 8: Connection Between Two Dyno 650C And Power Supply
2. Connection between two Dyno 650C and Power Supply. -
Page 9: Connection Between Dyno 1200C And Power Supply
3. Connection between Dyno 1200C and Power Supply. -
Page 10: Light Stand Clamp Installation
① NOTE: When connecting the power supply, please make sure the power, voltage and frequency are consistent with the provided power supply. ② Make sure to use the provided power supply and power cable. The connecion between the DC power ouput socket on power supply and the power cable shoud be connected as following. -
Page 11: Diffuser Installation
5. Diffuser Installation Align the diffuser with the slot on the front of the fixture. Insert the diffuser into the slots along the lower edge of the fixture and push the upper part of the diffuser into place. Use the screws on both sides and secure the diffsuer in place. Loosen Toggle the lock catch according to the direction indicated by the lock on the fastening screws on both sides before removing the diffuser. -
Page 12: Barndoor Installation
6. Barndoor Installation NOTE: Barndoor is sold separatly. Align the barndoor with the slot on the front of the fixture. Rotate the screws on both sides then attach the barndoor to the light fixture. ② ② ① ③ ③ Attach the safety rope on the safety cable ring on the fixture. When removing the barndoor, first remove the safety rope, then loosen the screws on both sides and remove the barndoor from the fixture. -
Page 13: Hanging Options
7. Hanging Options Using the yoke. Using the rigging points. ·NOTE: Always ensure that all rigging points are secureley attached when hanging fixtures. -
Page 14: Remote Control
Remote Control ·Dyno 650C/Dyno 1200C supports remote control via DMX, 2.4G, RDM and LUMENRADIO, and has built-in bluetooth. ▲The ADDRESS needs to be set before operating the remote control via DMX, 2.4G, RDM and LUMENRADIO. 1. ADDRESS/DMX, including ADDRESS, DMX MODE and DMX DIMMING CURVE settings. - Page 15 Rotate ''SELECT knob'' to select the desired ADDRESS number and press the ''SELECT knob'' to set. NOTE: Dyno 650C/Dyno 1200C has 22 channels, for multiple lights remote control via DMX, 2.4G, RDM, LUMENRADIO, the address of the first light is set to 001,...
- Page 16 ② DMX MODE MENU FULL MENU FULL ADDRESS CCT & RGBW 8bit DMX MODE CCT & RGBW 16bit DMX DIMMING CURVE CCT & HSI 8bit CCT & HSI 16bit CCT 8bit CCT 16bit PRESS ”MENU” TO RETURN CN: 512 PRESS ”MENU” TO RETURN CN: 512 Rotate ''SELECT knob'' to DMX MODE and press ''SELECT knob'' to enter the correspoding third menu.
-
Page 17: Dmx Remote Control
③ DMX DIMMING CURVE MENU FULL MENU FULL ADDRESS LOMEAR DMX MODE EXPONENT DMX DIMMING CURVE LOGARITHM S CURVE PRESS ”MENU” TO RETURN CN: 512 PRESS ”MENU” TO RETURN CN: 512 Rotate ''SELECT knob'' to DMX DIMMING CURVE and press ''SELECT knob'' to enter the correspoding third menu. MENU FULL MENU... - Page 18 Refer to the attached DMX channel list and control the light via DMX512 console. (For specific operation methods, please refer to the DMX512 console operation manual.) Note: DMX channel list 《Dyno 650C/Dyno 1200C DMX REFERENCE GUIDE》please download it from www.nanlux.com.
-
Page 19: Remote Control
3. 2.4G Remote Control Set the address of the 2.4G remote controller to be consistent with the light fixture, enabling the Dyno 650C/1200C to be remotely controlled by 2.4G remote controller or by Wi-Fi APP via the 2.4G transfer device. - Page 20 MENU FULL MENU FULL CCT LIGHTING MODE RADIO MODE ADDRESS/DMX UNLINK LUMENRADIO SETTINGS FAN CONTROL ROTATE SCREEN SCREEN BRIGHTNESS CN: 512 PRESS ”MENU” TO RETURN CN: 512 Rotate "SELECT knob" to LUMENRADIO SETTINGS and press "SELECT knob" to enter the corresponding sencondary menu. MENU FULL MENU...
- Page 21 (2) UNLINK Setting MENU FULL MENU FULL RADIO MODE UNLINK DO YOU WANT TO UNLINK? PRESS ”MENU” TO RETURN CN: 512 PRESS ”MENU” TO RETURN CN: 512 Rotate "SELECT knob" to UNLINK and press "SELECT knob" to enter next menu. MENU FULL MENU...
- Page 22 ② TRANSMITTER MODE (1) Set the RADIO MODE of the fixture to TRANSMITTER MODE and connect with the DMX512 console. MENU FULL MENU FULL RADIO MODE RECEIVER MODE UNLINK TRANSMITTER MODE PRESS ”MENU” TO RETURN CN: 512 PRESS ”MENU” TO RETURN CN: 512 Rotate "SELECT knob"...
- Page 23 (2) The light can set the RF OUTPUT POWER under the TRANSMITTER MODE. The setting mothods is as below: MENU FULL MENU FULL RADIO MODE 20dBm RF OUTPUT POWER 16dBm LINK 11dBm 5dBm PRESS ”MENU” TO RETURN CN: 512 PRESS ”MENU” TO RETURN CN: 512 Rotate "SELECT knob"...
- Page 24 (4) Connect the fixture set in TRANSMITTER MODE with the fixture set in RECEIVER MODE, then the LUMENRADIO wireless signal can be sent to the fixture set to RECEIVER MODE. MENU FULL MENU FULL RADIO MODE LINK RF OUTPUT POWER UNLINK LINK PRESS ”MENU”...
-
Page 25: Operating Instructions
Operation Instructions 1. Make sure the power switch on the fxture is in the off positon, then connect the fixture to the adapter with power cable. When turned on, the screen will first display“NANLUX", that means the power is active. Mode... - Page 26 Note: In other modes, the brightness adjustment range is the same as in CCT mode. When the fixture function is unlock, in any mode, press the “DIM knob”, the light is off, the brightness percentage on the display is 0.0% , press again, the fixture restores the previous status, press continuously to switch brightness betweeen on and off.
-
Page 27: Hsi Key
3. HSI Key: Press HSI Key to enter the operation interface of HSI mode. HSI MODE FULL 100.0% 100% (Left knob) (Middle knob) (SELECT knob) CN: 512 ① HSI setting, rotate “middle knob”, clockwise to increase the value of HSI while counterclockwise to reduce the value of HSI, the screen displays the value of HSI and the corresponding HSI status bar. -
Page 28: Xy/Rgbw Key
4. XY / RGBW Key: Press XY/RGBW key to defaultly enter the operation interface of XY mode. Press again to switch to the operation interface of RGBW mode. XY COORDINATES FULL RGBW MODE FULL 100% 100.0% 0.680 0.300 0.0 0.1 0.2 0.3 0.4 0.5 0.6 0.7 XY CHART FOR ROUGH REFERENCE CN: 512 CN: 512... - Page 29 ② In R, G, B, W ''SELECT knob'' to select R, G, B or W, then rotate “middle knob” to adjust the numerical proportion of R, G, B, W to color mixing. The adjustment range of RED, BLUE, GREEN, WHITE is from 0-255. RGBW MODE FULL RGBW MODE...
-
Page 30: Gel Key
5. GEL Key: Press the GEL key to enter the operation interface of GEL mode. GEL MODE FULL 100.0% DOUBLE CTB 5600K (Left knob) (Middle knob) (SELECT knob) CN: 512 ① CCT Setting: Rotate or press “middle knob” to select the value of CCT as 3200K or 5600K. GEL MODE FULL GEL MODE... -
Page 31: Effect Key
(SELECT knob) PRESS ”SELECT” TO RESTART FR CN: 512 ·Dyno 650C and Dyno 1200C has built-in special effects: HUE LOOP, CCT LOOP, INT LOOP, FLASH, PULSE, STORM, POLICE CAR, TV, PAPARAZZI, CANDLE/FIRE, DISCO, BAD BULB, FIREWORK, EXPLOSION, WELDING. EFFECT MODE... - Page 32 ① HUE LOOP HUE LOOP setting: Rotate ''SELECT knob'' to select HUE1, HUE2, SAT, SPEED (Range: 2S-30S), CYCLE, ADD-ON, then rotate “middle knob” to sset the parameters of the corresponding options. EFFECT MODE FULL EFFECT MODE FULL DIM: 100.0% EFFECT: HUE LOP DIM: 100.0% EFFECT: HUE LOP...
- Page 33 ·HUE LOOP EFFECT has three cycle modes: ONE WAY, TWO WAY and REVERSE. Rotate “middle knob” to select CYCLE mode. FULL EFFECT MODE FULL EFFECT MODE DIM: 100.0% EFFECT: HUE LOP DIM: 100.0% EFFECT: HUE LOP HUE1: 1 HUE2: 360 SAT: 100% HUE1: 1 HUE2: 360...
- Page 34 ② CCT LOOP CCT LOOP setting: Rotate ''SELECT knob'' to select CCT1 (Range: 2700K-7500K), CCT2 (Range: 2700K-7500K), G/M, SPEED (Range: 2S-30S), CYCLE, ADD-ON, then rotate “middle knob” to set the parameters of the corresponding options. EFFECT MODE FULL EFFECT MODE FULL DIM: 100.0% EFFECT:...
- Page 35 ③ INT LOOP INT LOOP setting: Rotate ''SELECT knob'' to select color. COLOR: CCT and HSI. ·When the COLOR is CCT, rotate ''SELECT knob'' to select CCT, G/M, SPEED (Range: 2S-30S), CYCLE, DIMMING RANGE, ADD-ON, then rotate “middle knob” to set the parameters of the corresponding options. EFFECT MODE FULL EFFECT MODE...
- Page 36 ④ FLASH FLASH setting: Rotate ''SELECT knob'' to select COLOR. COLOR: CCT and HSI. ·When COLOR is CCT, rotate ''SELECT knob'' to select CCT, G/M, INTERVALS (Range: 0.1S-10S), FLASH RATIO (Range: 0%-100%), PAUSE, then rotate “middle knob” to set the parameters of the corresponding options. EFFECT MODE FULL EFFECT MODE...
- Page 37 ⑤ PULSE PULSE setting: Rotate ''SELECT knob'' to select COLOR. COLOR: CCT and HSI. ·When COLOR is CCT, rotate ''SELECT knob'' to select CCT, G/M, PULSES/MIN (Range:1-240), then rotate “middle knob” to set the parameters of the corresponding options. EFFECT MODE FULL EFFECT MODE FULL...
- Page 38 ⑥ STORM STORM setting: Rotate “SELECT” knob to select trigger. TRIGGER: AUTO and MANUAL. ·When TRIGGER is AUTO, rotate ''SELECT knob'' to select CCT, FLASH TIMES (Range: 1-10), INTERVAL RANGE (Range: 1S-60S), PAUSE, then rotate “middle knob” to set the parameters of the corresponding options. Note: PAUSE: ON and OFF. When PAUSE is ON, the fixture is always on. EFFECT MODE FULL EFFECT MODE...
- Page 39 ·When TRIGGER is MANUAL, Rotate ''SELECT knob'' to select CCT, FLASH TIMES, then rotate “middle knob” to set the parameters of the corresponding options. Press ''SELECT knob'' to trigger STORM effect. EFFECT MODE FULL EFFECT MODE FULL DIM: 100.0% EFFECT: STORM DIM: 100.0% EFFECT: STORM TRIGGER:...
- Page 40 ⑦ POLICE CAR POLICE CAR setting, Rotate ''SELECT knob'' to select COLOR, MODE, SPEED (Range: 1-100). COLOR: BLUE, RED&BLUE, BLUE&WHITE, RED&BLUE&WHITE, MODE: SINGLE, DOUBLE, TRIPLE, QUAD. EFFECT MODE FULL EFFECT MODE FULL DIM: 100.0% EFFECT: POLICE CAR DIM: 100.0% EFFECT: POLICE CAR COLOR: RED &...
- Page 41 ⑧ TV setting, Rotate ''SELECT knob'' to select COLOR. COLOR: CCT and HSI. ·When COLOR is CCT, rotate ''SELECT knob'' to select CCT, G/M, CCT SHIFT (Range:0K-3000K), SPEED (Range: 1-100), DIMMING RANGE, then rotate “middle knob” to set the parameters of the corresponding options. EFFECT MODE FULL EFFECT MODE...
- Page 42 ⑨ PAPARAZZI PAPARAZZI setting, Rotate ''SELECT knob'' to select CCT, G/M, SPEED (Range: 1-100), then rotate “middle knob” to set the parameters of the corresponding options. EFFECT MODE FULL EFFECT MODE FULL DIM: 100.0% EFFECT: PAPARAZZI DIM: 100.0% EFFECT: PAPARAZZI CCT: 5600K G/M: 0...
- Page 43 ⑩ CANDLE/FIRE CANDLE/FIRE setting, Rotate ''SELECT knob'' to select COLOR. COLOR: CCT and HSI. ·When COLOR is CCT, rotate ''SELECT knob'' to select CCT (Range:1800K-7500K), G/M, SPEED (Range: 1-100), CCT SHIFT (Range: 0K-3000K), DIMMING RANGE, FLASH, then rotate “middle knob” to set the parameters of the corresponding options. EFFECT MODE FULL EFFECT MODE...
- Page 44 ⑪ DISCO DISCO setting, Rotate ''SELECT knob'' to select COLOR. COLOR: DEFAULT and MANUAL. ·When the COLOR is DEFAULT, rotate ''SELECT knob'' to select AMOUNT (Range: 3, 6, 9,12, 15, 18, 21, 24), SPEED (Range: 1-100), SAT, then rotate “middle knob” to set the parameters of the corresponding options. EFFECT MODE FULL EFFECT MODE...
- Page 45 ·When the COLOR is MANUAL, rotate ''SELECT knob'' to select AMOUNT (Range: 1-6), SPEED (Range: 1-100), SAT. Different AMOUNT displays different HUE. For example, AMOUNT is 1, C1 is dispayed at the bottom of the screen; AMOUNT is 2,C1, C2 are dispayed at the bottom of the screen, and so on. The range of C1-C6 is 0-360, then rotate “middle knob”to set the parameters of the corresponding options.
- Page 46 ⑫ BAD BULB BAD BULB setting: Rotate ''SELECT knob'' to select COLOR. COLOR: CCT and HSI. ·When the COLOR is CCT, rotate ''SELECT knob'' to select CCT, G/M, INTENSITY (Range:1-100), SPEED (Range:1-100), then rotate “middle knob” to set the parameters of the corresponding options. EFFECT MODE FULL EFFECT MODE...
- Page 47 ⑬ FIREWORK FIREWORK setting: Rotate ''SELECT knob'' to select COLOR. COLOR: DEFAULT, MANUAL and CCT. ·When the COLOR is DEFAULT, rotate ''SELECT knob'' to select AMOUNT (Range: 3, 6, 9, 12, 15, 18, 21, 24), SPEED (Range: 1-100), DECAY (Range: 1-100), SAT, then rotate “middle knob”...
- Page 48 ·When the COLOR is MANUAL, rotate ''SELECT knob'' to select AMOUNT (Range: 1-6), SPEED (Range: 1-100), SAT. Different AMOUNT displays different HUE. For example, AMOUNT is 1, C1 is dispayed at the bottom of the screen; AMOUNT is 2,C1, C2 are dispayed at the bottom of the screen, and so on. The range of C1-C6 is 0-360, then rotate “middle knob”to set the parameters of the corresponding options.
- Page 49 ·When the COLOR is CCT, rotate ''SELECT knob'' to select CCT, G/M, CCT SHIFT (0-3000K), SPEED (Range: 1-100), DECAY (Range: 1-100), then rotate “middle knob”to set the parameters of the corresponding options. EFFECT MODE FULL EFFECT MODE FULL DIM: 100.0% EFFECT: FIREWORK DIM: 100.0% EFFECT: FIREWORK...
- Page 50 ⑭ EXPLOSION EXPLOSION setting: Rotate ''SELECT knob'' to select TRIGGER, COLOR. TRIGGER: AUTO and MANUAL, COLOR: CCT and HSI. ·When the TRIGGER is AUTO and the COLOR is CCT, rotate ''SELECT knob'' to select CCT, G/M, SPEED (Range: 1-100), DECAY (Range: 1-100), then rotate “middle knob”...
- Page 51 ·When the TRIGGER is MANUAL and the COLOR is CCT, rotate ''SELECT knob'' to select CCT, G/M, DECAY (Range: 1-100), then rotate “middle knob” to set the parameters of the corresponding options. Press ''SELECT knob'' to trigger EXPLOSION. EFFECT MODE FULL EFFECT MODE FULL...
- Page 52 ·When the COLOR is HSI, rotate ''SELECT knob'' to select HUE, SAT, SPEED (Range: 1-100), DIMMING RANGE, PAUSE, then rotate “middle knob” to set the parameters of the corresponding options. (Same operation as CCT) Note: PAUSE: ON and OFF. When PAUSE is ON, WELDING effect PAUSE. ·Lighting effects and additional function maybe added with future firmware updates, for details please check from www.nanlux.com.
-
Page 53: Preset Key
7. PRESET Key: Press PRESET key to enter the operation interface of PRESET. PRESET FULL MANAGE PRESET... (Left knob) (Middle knob) (SELECT knob) LONG PRESS ”PRESET” TO SAVE CN: 512 ·Switch MANAGE PRESET or EXIT MANAGE. PRESET FULL PRESET FULL MANAGE PRESET... - Page 54 PRESET FULL PRESET FULL SPACE SPACE CANCEL SAVE CANCEL SAVE CN: 512 CN: 512 通道:512 通道:512 Rotate ''SELECT knob'' to select the number or letter according to demands. PRESET FULL PRESET FULL SPACE SPACE CANCEL SAVE CANCEL SAVE CN: 512 CN: 512 通道:512 通道:512...
- Page 55 ② TRIGGER PRESET LIGHTING: Press PRESET key to enter the interface of PRESET, rotate ''SELECT knob'' to select preset lighting, press ''SELECT knob'' to trigger preset lighting, the screen displays the interface of the saved lighting mode. CCT MODE - STANDARD FULL PRESET FULL...
- Page 56 ③ Rename or delete saved preset lighting: Press PRESET key to enter the interface of PRESET, rotate ''SELECT knob'' to select MANAGE PRESET, press “SELECT knob" to switch to EXIT MANAGE, then rotate ''SELECT knob'' to select rename or delete saved preset lighting. EFFECT MODE FULL PRESET...
- Page 57 PRESET FULL PRESET FULL MANAGE PRESET MANAGE PRESET LONG PRESS ”PRESET” TO SAVE CN: 512 LONG PRESS ”PRESET” TO SAVE CN: 512 Rotate ''SELECT knob'' to select rename or delete lighting PRESET. PRESET FULL PRESET FULL CONFIRM DELETING “2”? MANAGE PRESET LONG PRESS ”PRESET”...
-
Page 58: Menu Key
8. MENU Key: Press MENU key to access options. MENU FULL CCT LIGHTING MODE ADDRESS/DMX LUMENRADIO SETTINGS FAN CONTROL ROTATE SCREEN SCREEN BRIGHTNESS (Left knob) (Middle knob) (SELECT knob) CN: 512 ·Rotate ''SELECT knob'' to select setting item, press ''SELECT knob'' to enter corresponding secondary menu, rotate ''SELECT knob'' again to select coresponding option, press ''SELECT knob'' to set or press MENU key to return to the previous menu. -
Page 59: ②Address/Dmx
Notes: (1) Switched to CCT Standard Mode, brightness output in CCT mode has become standard, CCT range has become 2700K-20000K, G/M adjustment is different from CCT Boost Mode. (2) Switched to CCT Boost Mode, brightness output in CCT mode has increased by 30%, CCT range has become 2700K-7500K, G/M adjustment is different from CCT Standard Mode. -
Page 60: ⑤Rotate Screen
⑤ ROTATE SCREEN MENU FULL MENU FULL CCT LIGHTING MODE ADDRESS/DMX DO YOU WANT TO ROTATE SCREEN? LUMENRADIO SETTINGS FAN CONTROL ROTATE SCREEN SCREEN BRIGHTNESS CN: 512 PRESS ”MENU” TO RETURN CN: 512 Rotate ''SELECT knob'' to ROTATE SCREEN, press ''SELECT knob'' to enter corresponding secondary menu. MENU FULL DO YOU WANT TO ROTATE SCREEN? -
Page 61: ⑥Screen Brightness
⑥ SCREEN BRIGHTNESS MENU FULL MENU FULL CCT LIGHTING MODE ADDRESS/DMX SCREEN BRIGHTNESS LUMENRADIO SETTINGS FAN CONTROL ROTATE SCREEN SCREEN BRIGHTNESS CN: 512 PRESS ”MENU” TO RETURN CN: 512 Rotate ''SELECT knob'' to SCREEN BRIGHTNESS , press ''SELECT knob'' to enter corresponding secondary menu. MENU FULL MENU... -
Page 62: ⑦Button Backlight
⑦ BUTTON BACKLIGHT MENU FULL MENU FULL ADDRESS/DMX LUMENRADIO SETTINGS FAN CONTROL ROTATE SCREEN SCREEN BRIGHTNESS BUTTON BACKLIGHT CN: 512 PRESS ”MENU” TO RETURN CN: 512 Rotate ''SELECT knob'' to BUTTON BACKLIGHT, press ''SELECT knob'' to enter the corresponding secondary menu. MENU FULL MENU... -
Page 63: ⑧Language
⑧ LANGUAGE MENU FULL MENU FULL LUMENRADIO SETTINGS ENGLISH FAN CONTROL 简体中文 ROTATE SCREEN SCREEN BRIGHTNESS BUTTON BACKLIGHT LANGUAGE CN: 512 PRESS ”MENU” TO RETURN CN: 512 Rotate ''SELECT knob'' to LANGUAGE, press ''SELECT knob'' to enter corresponding secondary menu. MENU FULL MENU... -
Page 64: ⑨Reset All Settings
⑨ RESET ALL SETTINGS MENU FULL MENU FULL FAN CONTROL ROTATE SCREEN Reset all settings of this lighr? SCREEN BRIGHTNESS This will take up to about 1 minute. BUTTON BACKLIGHT LANGUAGE RESET ALL SETTINGS CN: 512 PRESS ”MENU” TO RETURN CN: 512 Rotate ''SELECT knob'' to RESET ALL SETTINGS, press ''SELECT knob'' to enter corresponding secondary menu. -
Page 65: ⑩Lock Key
9. LOCK Key: Long press LOCK key for 2s to lock function, now operation keys or adjustment knobs can not change the current function, long press LOCK key for 2s again to release lock status. 10. When the FAN works abnormally, the screen displays as below image, this time teh light has switched to OFF, press any key or knob to return. MENU FULL 菜单... -
Page 66: General Fault Detection And Diagnosis
General Fault Detection and Diagnosis Diagnosis Fault Detection 1. Please check whether the connection between power adapter, power cable and outlet connection is properly The light won't boot up properly connected or loose. 2. Please check wether the voltage value is within the specified parameters. The fixture can operate by manual, 1. -
Page 67: Product Includes
What's in the box? Please kindly check. Dyno 650C×1 Power Adapter×1 DC Connecting Cable×1 Power Cable×1 Light Stand Clamp×1 USB Flash Drive×1 DMX Channel Chart×1 User Manual×1 USER MANUAL USER MANUAL Dyno 650C/1200C Dyno 650C/1200C DMX REFERENCE GUIDE RGBWW LED SOFT PANEL LIGHT WWW.NANLUX.COM... - Page 68 Version: V2 2020-12-01 +86-754-85751187 +86-754-85300887 info@nanlux.com Zhanglin,324,Dongli Chenghai Shantou Guangdong China Guangdong NanGuang Photo&Video Systems Co., Ltd...
Need help?
Do you have a question about the Dyno 650C and is the answer not in the manual?
Questions and answers