Table of Contents
Advertisement
Quick Links
Advertisement
Table of Contents

Related Manuals for NANLUX Evoke 1200


Summary of Contents for NANLUX Evoke 1200
- Page 1 USER MANUAL Evoke 1200 LED SPOT LIGHT WWW.NANLUX.COM...
-
Page 2: Table Of Contents
Contents Product Diagram ........................①DAYLIGHT Key ..............2. EFFECT Key Technical Data ............................. 3. MENU Key Product Details ......................... ①ADDRESS/DMX ..........②WIRELESS PROTOCOL ............. Detailed Description ..........③LUMENRADIO SETTINGS Usage ............④FAN CONTROL ..1. Connection between the Light Fixture and Power Supply ............ -
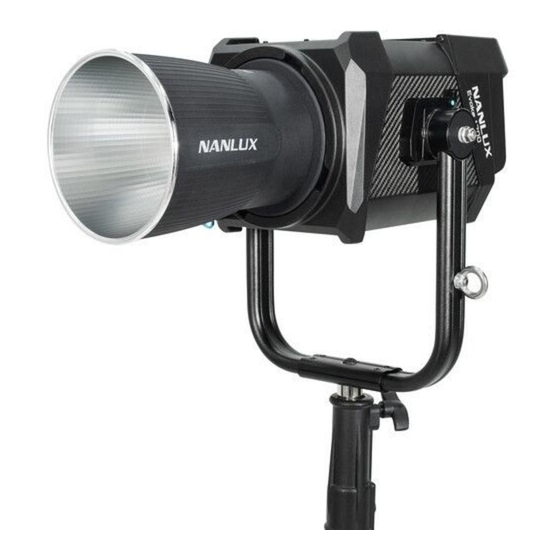
Page 3: Product Diagram
Evoke 1200 LED Spot Light Product Diagram Technical Data Rated power: 1200W Input voltage/current: DC48V/25A Max AC100-240V 50/60Hz CRI: 96 TLCI: 97 This manual applies to the light fixtures in 5600K and 3200K. -
Page 4: Product Details
Product Details 1. Quick Release Device 2. NL Mount 11. Fixture Body Handle 12. Kipp Handle 6. Display 7. Function Keys 13. Right Knob 8. Left Knob 14. Wire Control Socket 4. Eye Bolt 3. Lock Catch 15. DC IN 9. -
Page 5: Detailed Description
22. Power Supply Handle 17. Power Supply Hanging Point 24. Reflector 18. DC Power Output Socket 23. COB Protective Cap 19. LED Indicator 20. Power Switch 21. AC Power Input Socket Detailed Description 1. Quick release device: For quick installation and detachment of yoke. 2. -
Page 6: Usage
22. Power supply handle: For lifting the power supply. 23. COB protective cap: When not using the fixture, cover with the cap for protection. (Note: Take off the cap before using.) 24. Reflector: For concentrating light to improve central illumination. Usage 1. - Page 7 ▲Note: ① When connecting the power supply, please make sure the power, voltage and frequency are consistent with the provided power supply ② Make sure to use the provided power supply and power cable. The connection between the DC plug and the DC IN power input socket on the fixture should be connected as following.
-
Page 8: Installation And Detachment Of Yoke
2. Installation and Detachment of Yoke ① Quick release yoke diagram Quick release plate Quick release plate mount Quick release lever lock catch Quick release lever The side with kipp handle The side with damping... - Page 9 ② Installation of Yoke (Method One) Lay the light fixture, bottom up, on flat ground. Press the quick release lever lock catch to release it. Pull the quick release lever. Align and insert the quick release plates to both (Note: When installing the quick release plate, Firmly holding the yoke in place with one hand, mounts of the light fixture.
- Page 10 Mount the yoke on heavy-duty light stand. Secure When removing the yoke, remove the fixture from Press the quick release lever lock catch of the fixture the fixture by locking the fastening screws on the the heavy-duty light stand first and lay it down on on both sides, then release the quick release lever to stand.
- Page 11 ③ Installation of Yoke (Method Two) Mount the yoke on heavy-duty light stand. Secure Press the quick release lever lock catch, pull the Pull quick release lever lock catch on both side of the fixture by locking the fastening screws on the quick release lever, align and insert the the fixture to lock the plates in place.
-
Page 12: Installation And Detachment Of Reflector
3. Installation and Detachment of Reflector When installing the reflector, align the reflector’s bayonet lock to the light’s mount, rotate the reflector clockwise and fasten the reflector on the light. (Note: if the rotation is not smooth, pull the lock catch of the mount and rotate the reflector at the same time.) When removing the reflector, pull the lock catch of the mount, rotate the reflector anticlockwise and remove. -
Page 13: Installation Of Fl-35 Fresnel Lens And The Barndoor
4. Installation of FL-35 Fresnel Lens and the Barndoor ▲Note: When installing the Fresnel lens, please remove the fixture from the yoke first. When installing the Fresnel lens, align and Note: When installing the quick-release plates, Pull the quick release lever on both sides of the lens, insert both quick-release mounts of lens to the adjust the plates to the right directions first, then lock the quick-release plates in place and mount... - Page 14 When adjusting the lens to flood, hold the lens with hands and rotate it in the When adjusting the lens to spot, hold the lens with hands and rotate it in the direction of the arrow, to adjust the light in flood. direction of the arrow, to adjust the light in spot.
- Page 15 Lock Slot Slot Align the barndoor to the slots in front of the lens, Release the barndoor lock catch and lock the Put the safety loop on the barndoor into the eye bolt and insert the it to the slots from up to down. barndoor screw.
-
Page 16: Remote Control
Remote Control Evoke 1200 supports remote control via DMX, 2.4G, RDM and LUMENRADIO, and has built-in Bluetooth. ▲The ADDRESS needs to be set before operating the remote control via DMX, 2.4G, RDM and LUMENRADIO. 1. ADDRESS/DMX, including ADDRESS, DMX MODE and DMX DIMMING CURVE settings. - Page 17 MENU MENU CH: 512 CH: 512 ADDRESS DMX MODE ADDRESS DMX DIMMING CURVE PRESS “MENU” TO RETURN PRESS “MENU” TO RETURN Rotate ''Right knob'' to ADDRESS. Press ''Right knob'' to enter the corresponding third menu. MENU MENU CH: 512 CH: 512 ADDRESS PRESS “MENU”...
- Page 18 ② DMX MODE MENU MENU CH: 512 CH: 512 ADDRESS DAYLIGHT 8bit DMX MODE ULTIMATE DMX 8bit DMX DIMMING CURVE PRESS “MENU” TO RETURN PRESS “MENU” TO RETURN Rotate ''Right knob'' to DMX MODE. Press ''Right knob'' to enter the corresponding third menu. MENU MENU CH: 512...
-
Page 19: Dmx Remote Control
③ DMX DIMMING CURVE MENU MENU CH: 512 CH: 512 ADDRESS LINEAR DMX MODE EXPONET DMX DIMMING CURVE LOGARITHM S CURVE PRESS “MENU” TO RETURN PRESS “MENU” TO RETURN Rotate ''Right knob'' to DMX DIMMING CURVE. Press ''Right knob'' to enter the corresponding third menu. MENU MENU CH: 512... - Page 20 Set the address of the fixtutre. ④ Refer to the attached DMX reference guide and control the light via DMX/RDM console. (For specific operation methods, please refer to the DMX/RDM console operation manual.) Note: DMX reference guide《Evoke 1200 DMX REFERENCE GUIDE》please download it from www.nanlux.com.
-
Page 21: Remote Control
3. 2.4G Remote Control ·Set the address of the 2.4G remote controller to be consistent with the light fixture, enabling the Evoke 1200 to be remotely controlled by 2.4G remote controller or by APP via the transmitter box. ① Note: 2.4G remote controller and transmitter box are sold separately. -
Page 22: Rdm Remote Control
Control the fixture via a console with RDM function. (For specific operation methods, please refer to the RDM console operation manual.) Note: The UID format of the fixture is as follows: 0008 XXXX XXXX Serial number 0501:Evoke 1200 Manufacturer: Nanguang... -
Page 23: Lumenradio Remote Control
5. LUMENRADIO Remote Control ·Evoke 1200 has built-in CRMX TIMO TWO module, enabling it to receive CRMX wireless DMX signals. The Specific operation is as follows: ① RECEIVER MODE (1) RECEIVER MODE setting Press the MENU key to access options. - Page 24 MENU MENU CH: 512 CH: 512 RADIO MODE RECEIVER MODE UNLINK TRANSMITTER MODE PRESS “MENU” TO RETURN PRESS “MENU” TO RETURN Rotate "Right knob" to RADIO MODE. Press "Right knob" to enter next menu. MENU MENU CH: 512 CH: 512 RECEIVER MODE TRANSMITTER MODE PRESS “MENU”...
- Page 25 (2) UNLINK Setting MENU MENU CH: 512 CH: 512 RADIO MODE UNLINK DO YOU WANT TO UNLINK? PRESS “MENU” TO RETURN PRESS “MENU” TO RETURN Rotate "Right knob" to UNLINK. Press "Right knob" to enter next menu. MENU MENU CH: 512 CH: 512 DO YOU WANT TO UNLINK? PRESS “MENU”...
- Page 26 ② TRANSMITTER MODE (1) Set the RADIO MODE to TRANSMITTER MODE and connect with the DMX/RDM console. MENU MENU CH: 512 CH: 512 RADIO MODE RECEIVER MODE UNLINK TRANSMITTER MODE PRESS “MENU” TO RETURN PRESS “MENU” TO RETURN Rotate "Right knob" to RADIO MODE. Press "Right knob" to enter next menu. MENU MENU CH: 512...
- Page 27 (2) The fixture can set the RF OUTPUT POWER when in TRANSMITTER MODE. The setting methods is as follows: MENU MENU CH: 512 CH: 512 RADIO MODE 20dBm RF OUTPUT POWER 16dBm LINK 11dBm 5dBm PRESS “MENU” TO RETURN PRESS “MENU” TO RETURN Rotate "Right knob"...
- Page 28 (4) Connect the fixture set in TRANSMITTER MODE with the fixture set in RECEIVER MODE. When in TRANSMITTER MODE, the signal from the DMX/RDM console or DMX-based APP will be sent to the fixtures set to RECEIVER MODE. The fixtures set to RECEIVER MODE should be set as follows: MENU MENU CH: 512...
-
Page 29: Operating Instructions
1. First, be sure that the power switch of the control unit is in the "off " position. Now it is safe to connect the power supply and power the unit on. If the power indicator is on that means the power supply is normal, the screen will display "NANLUX". -
Page 30: Effect Key
Right knob DAYLIGHT EFFECT MENU LOCK ·Evoke 1200 has built-in effects including: INT LOOP, FLASH, PULSE, STORM AUTO, STORM MANUAL, TV, PAPARAZZl, CANDLE/FIRE, BAD BULB, FIREWORK, EXPLOSION AUTO, EXPLOSION MANUAL and WELDING. EFFECT MODE EFFECT MODE CH: 512 CH: 512 通道:512... - Page 31 ① INT LOOP For INT LOOP settings, rotate "Right knob" to select DIM and SPEED (Range: 2S-30S), then rotate "Left knob" to set the corresponding parameters. EFFECT MODE EFFECT MODE CH: 512 CH: 512 EFFECT: INT LOOP EFFECT: INT LOOP DIM: 0.0% - 100.0%...
- Page 32 ② FLASH For FLASH settings, rotate "Right knob" to select DIM, INTERVALS (Range: 0.1s-10.0s) and FLASH RATIO (Range: 0% -100%), then rotate "Left knob" to set the corresponding parameters. EFFECT MODE EFFECT MODE CH: 512 CH: 512 EFFECT: FLASH EFFECT: FLASH DIM: 100.0% DIM: 100.0%...
- Page 33 ③ PULSE For PULSE settings, rotate "Right knob" to select DIM and PULSES/MIN (Range: 1-240), then rotate "Left knob" to set the corresponding parameters. EFFECT MODE EFFECT MODE CH: 512 CH: 512 EFFECT: PULSE EFFECT: PULSE DIM: 100.0% DIM: 100.0% PULSES/MIN: 40 PULSES/MIN: Rotate ''Right knob'' to select DIM and PULSES/MIN.
- Page 34 ④ STORM AUTO For STORM AUTO settings, rotate "Right knob" to select DIM, INTVL RANGE (Range: 1s-60s), then rotate "Left knob" to set the corresponding parameters. EFFECT MODE EFFECT MODE CH: 512 CH: 512 EFFECT: STORM AUTO EFFECT: STORM AUTO DIM: 100.0% DIM: 100.0%...
- Page 35 ⑤ STORM MANUAL For STORM MANUAL settings, rotate "Right knob" to select DIM, then rotate "Left knob" to set the corresponding parameters and press "Right knob" to trigger storm. EFFECT MODE EFFECT MODE CH: 512 CH: 512 EFFECT: STORM MANUAL EFFECT: STORM MANUAL DIM: 100.0% DIM:...
- Page 36 ⑥ For TV settings, rotate "Right knob" to select DIM and SPEED (Range:1-100). Then rotate "Left knob" to set the corresponding parameters. EFFECT MODE EFFECT MODE CH: 512 CH: 512 EFFECT: TV EFFECT: TV DIM: 0.0% - 100.0% DIM: 0.0% - 100.0% SPEED: 50 SPEED: 50...
- Page 37 ⑦ PAPARAZZI For PAPARAZZI settings, rotate the "Right knob" to select DIM and SPEED (Range:1-100), then rotate "Left knob" to set the corresponding parameters. EFFECT MODE EFFECT MODE CH: 512 CH: 512 EFFECT: PAPARAZZI EFFECT: PAPARAZZI DIM: 100.0% DIM: 100.0% SPEED: 50 SPEED: Rotate "Right knob"...
- Page 38 ⑧ CANDLE/FIRE For CANDLE/FIRE settings, rotate "Right knob" to select DIM and SPEED (Range: 1-100), then rotate "Left knob" to set the corresponding parameters. EFFECT MODE EFFECT MODE CH: 512 CH: 512 EFFECT: CANDLE/FIRE EFFECT: CANDLE/FIRE DIM: 0.0% - 100.0% DIM: 0.0% - 100.0% SPEED: 50...
- Page 39 ⑨ BAD BULB For BAD BULB settings, rotate "Right knob" to select DIM, INTENSITY (Range: 1-100) and SPEED (Range: 1-100), then rotate "Left knob" to set the corresponding parameters. EFFECT MODE EFFECT MODE CH: 512 CH: 512 EFFECT: BAD BULB EFFECT: BAD BULB DIM: 100.0%...
- Page 40 ⑩ FIREWORK For FIREWORK settings, rotate "Right knob" to select DIM and SPEED (Range: 1-100) and DECAY (Range: 1-100), then rotate "Left knob" to set the corresponding arameters. EFFECT MODE EFFECT MODE CH: 512 CH: 512 EFFECT: FIREWORK EFFECT: FIREWORK DIM: 100.0% DIM: 100.0%...
- Page 41 ⑪ EXPLOSION AUTO For EXPLOSION AUTO settings, rotate "Right knob" to select DIM, SPEED (Range:1-100) and DECAY (Range:1-100), then rotate "Left knob" to set the corresponding parameters. EFFECT MODE EFFECT MODE CH: 512 CH: 512 EFFECT: EXPLOSION AUTO EFFECT: EXPLOSION AUTO DIM: 100.0% DIM: 100.0%...
- Page 42 ⑫ EXPLOSION MANUAL For EXPLOSION MANUAL settings, rotate "Right knob" to select DIM and DECAY (Range: 1-100), then rotate "Left knob" to set the corresponding parameters. Press "Right knob" to trigger EXPLOSION. EFFECT MODE EFFECT MODE CH: 512 CH: 512 EFFECT: EFFECT: EXPLOSION MANUAL...
- Page 43 ⑬ WELDING For WELDING settings, rotate "Right knob" to select DIM, SPEED (Range: 1-100) and PAUSE (ON/OFF), then rotate "Left knob" to set the corresponding parameters. EFFECT MODE EFFECT MODE CH: 512 CH: 512 EFFECT: WELDING EFFECT: WELDING DIM: 0.0% - 100.0% DIM: 0.0% - 100.0%...
-
Page 44: Menu Key
3. MENU Key: Press the MENU key to enter the menu. MENU CH: 512 ADDRESS/DMX WIRELESS PROTOCOL LUMENRADIO SETTINGS FAN CONTROL ROTATE SCREEN SCREEN BRIGHTNESS Left knob Right knob DAYLIGHT EFFECT MENU LOCK ·Rotate "Right knob" to select the setting item and press "Right knob" to enter the corresponding secondary menu. Then rotate "Right knob" again to select corresponding options and press "Right knob"... -
Page 45: ④Fan Control
④ FAN CONTROL MENU MENU CH: 512 CH: 512 ADDRESS/DMX WIRELESS PROTOCOL LUMENRADIO SETTINGS FAN CONTROL ROTATE SCREEN SCREEN BRIGHTNESS PRESS “MENU” TO RETURN Rotate "Right knob" to FAN CONTROL. Press "Right knob" to enter the corresponding secondary menu. MENU MENU CH: 512 CH: 512... -
Page 46: ⑤Rotate Screen
⑤ ROTATE SCREEN MENU MENU CH: 512 CH: 512 ADDRESS/DMX WIRELESS PROTOCOL Do you want to rotate screen LUMENRADIO SETTINGS FAN CONTROL ROTATE SCREEN SCREEN BRIGHTNESS PRESS “MENU” TO RETURN Rotate "Right knob" to ROTATE SCREEN. Press "Right knob" to enter the corresponding secondary menu. MENU MENU CH: 512... -
Page 47: ⑥Screen Brightness
⑥ SCREEN BRIGHTNESS MENU MENU CH: 512 CH: 512 ADDRESS/DMX WIRELESS PROTOCOL SCREEN BRIGHTNESS LUMENRADIO SETTINGS FAN CONTROL ROTATE SCREEN SCREEN BRIGHTNESS PRESS “MENU” TO RETURN Rotate ''Right knob'' to SCREEN BRIGHTNESS. Press ''Right knob'' to enter the corresponding secondary menu. MENU MENU CH: 512... -
Page 48: ⑦Button Backlight
⑦ BUTTON BACKLIGHT MENU MENU CH: 512 CH: 512 WIRELESS PROTOCOL LUMENRADIO SETTINGS FAN CONTROL ROTATE SCREEN SCREEN BRIGHTNESS BUTTON BACKLIGHT PRESS “MENU” TO RETURN Rotate ''Right knob'' to BUTTON BACKLIGHT. Press ''Right knob'' to enter the corresponding secondary menu. MENU MENU CH: 512... -
Page 49: ⑧Language
⑧ LANGUAGE MENU MENU CH: 512 CH: 512 LUMENRADIO SETTINGS ENGLISH FAN CONTROL 简体中文 ROTATE SCREEN SCREEN BRIGHTNESS BUTTON BACKLIGHT LANGUAGE PRESS “MENU” TO RETURN Rotate ''Right knob'' to LANGUAGE. Press ''Right knob'' to enter the corresponding secondary menu. MENU MENU CH: 512 CH: 512... -
Page 50: ⑨Version
USB drive that has BUTTON BACKLIGHT new firmware, and restart the light. LANGUAGE www.nanlux.com VERSION PRESS “MENU” TO RETURN Rotate "Right knob" to VERSION. Press "Right knob" to check the current version. 4. Lock Key: Press and hold the "Lock Key" to lock all functions. Operation key or adjustment knobs can not change the current function. Press and hold the Lock key again to release the Lock status. -
Page 51: Safety Precautions
Safety Precautions 1. Please open the package to check for possible damage. If damaged, do not use. Please contact your distributor or the manufacturer as soon as possible. 2. Please do not use power cable which are faulty or have insulation damage. Please be careful when unplugging and do not drag the power cable. 3. -
Page 52: Product Includes
What's in the box? Please kindly check. Evoke 1200 ×1 Yoke ×1 Power Supply ×1 Reflector ×1 Power cable 4.5M ×1 USB Flash Drive ×1 DMX Reference Guide ×1 User Manual ×1 Thank-you Card ×1 Connecting cable 5M ×1 USER MANUAL... - Page 53 Version: V2 2021-06-22 +86-754-85751187 +86-754-85300887 info@nanlux.com Zhanglin,324,Dongli Chenghai Shantou Guangdong China Guangdong NanGuang Photo&Video Systems Co., Ltd...
Need help?
Do you have a question about the Evoke 1200 and is the answer not in the manual?
Questions and answers