KEHUA TECH SPI-B X2 Series User Manual
Pv grid-tied inverter 8k-25k
Hide thumbs
Also See for SPI-B X2 Series:
- User manual (149 pages) ,
- User manual (58 pages) ,
- User manual (70 pages)
Table of Contents
Advertisement
Quick Links
Advertisement
Table of Contents
Troubleshooting

Related Manuals for KEHUA TECH SPI-B X2 Series


Summary of Contents for KEHUA TECH SPI-B X2 Series
- Page 1 PV Grid-tied Inverter SPI-B X2 Series (8K-25K) User Manual...
- Page 3 Copyright © Xiamen Kehua Digital Energy Tech Co., Ltd. 2023. All rights reserved. No part of this document may be reproduced or transmitted in any form or by any means without prior written consent of Xiamen Kehua Digital Energy Tech Co., Ltd. Trademarks and Permissions and other Kehua trademarks are the licensed trademarks of Xiamen Kehua Digital Energy Tech Co., Ltd.
- Page 4 PV Grid-tied Inverter SPI-B X2 Series (8K-25K) Foreword User Manual Foreword Summaries Thank you for choosing the PV grid-tied inverter (hereinafter referred to as inverter)! This document gives a description of the inverter, including appearance, features, working principles, installation, electrical connection, operation, maintenance and storage, etc.
- Page 5 PV Grid-tied Inverter SPI-B X2 Series (8K-25K) User Manual Foreword Symbol Description Alerts you to a high risk hazard that will, if not avoided, result in serious injury or death. Alerts you to a medium low risk hazard that could, if not avoided, result in moderate or minor injury.
-
Page 6: Table Of Contents
PV Grid-tied Inverter SPI-B X2 Series (8K-25K) Contents User Manual Contents 1 Safety Description......................... 1 1.1 Safety Announcements ............................. 1 1.1.1 Use Announcements ..........................1 1.1.2 PV String Protection ..........................2 1.1.3 ESD Protection ............................3 1.1.4 Grounding Requirements ........................3 1.1.5 Moistureproof Protection ........................ - Page 7 PV Grid-tied Inverter SPI-B X2 Series (8K-25K) User Manual Contents 3.2.2 Installation Environment ........................12 3.2.3 Installation Clearance ..........................13 3.2.4 Installation Method ..........................14 3.3 Transportation and Unpacking ........................14 3.3.1 Transportation ............................14 3.3.2 Unpacking and Checking ........................14 3.4 Inverter Installation ............................
- Page 8 PV Grid-tied Inverter SPI-B X2 Series (8K-25K) Contents User Manual 7.1 Stop Running ..............................54 7.2 Dismantle the Inverter ............................ 55 7.3 Discard the Inverter ............................55 8 Package, Transportation, Storage ..................... 56 8.1 Package ................................56 8.2 Transportation ..............................56 8.3 Storage ................................
-
Page 9: Safety Description
PV Grid-tied Inverter SPI-B X2 Series (8K-25K) User Manual 1 Safety Description 1 Safety Description This chapter mainly introduces the safety announcements. Prior to performing any work on the device, please read the user manual carefully, follow the operation and installation instructions and observe all danger, warning and safety information. -
Page 10: Pv String Protection
PV Grid-tied Inverter SPI-B X2 Series (8K-25K) 1 Safety Description User Manual There is no operational part inside the inverter. Please do not open the cap of the inverter by yourself, or it may cause electric shock. The device damage caused by illegal operation is out of the guarantee range. -
Page 11: Esd Protection
PV Grid-tied Inverter SPI-B X2 Series (8K-25K) User Manual 1 Safety Description There exists dangerous voltage between the positive and negative of PV string! When installing the device, make sure that the connection between inverter and PV string has been disconnected completely. -
Page 12: Warning Mark Setting
PV Grid-tied Inverter SPI-B X2 Series (8K-25K) 1 Safety Description User Manual When the air humidity is more than 95%, don't open the door of the inverter. In the wet or damp weather, don't open the door of the inverter to maintain or repair. -
Page 13: Operator Requirements
PV Grid-tied Inverter SPI-B X2 Series (8K-25K) User Manual 1 Safety Description 1.2 Operator Requirements The operation and wiring for inverter should be performed by qualified person, which is to ensure that the electrical connection meets the related standards. The professional technicist must be trained strictly, understand all safety announcements, master correct operations and meet the following requirements: ... -
Page 14: Overview
PV Grid-tied Inverter SPI-B X2 Series (8K-25K) 2 Overview User Manual 2 Overview This chapter mainly introduces product appearance, structure, working principles and grid form, etc. 2.1 Product Intro The inverter converts the DC energy from PV string into AC energy and then feedbacks to power grid, which is suitable for the commercial roof grid-tied system and large power station grid-tied system. -
Page 15: Model Meaning
2 Overview For type TT grid, the effective value of the neutral and grounding voltage must be less than 20V. 2.1.1 Model Meaning The model meaning of SPI-B X2 series (8K-25K) is as shown in Figure2-3. SPI □K-B X2 Second generation When it is X2P, it means the inverter can be equipped with large current PV string. -
Page 16: Apperance And Structure
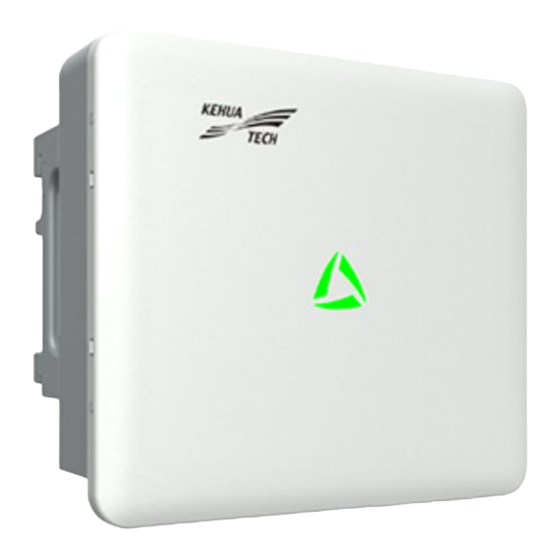
2 Overview User Manual 2.2 Apperance and Structure The appearance of SPI-B X2 series (8K-25K) is as shown in Figure2-4. Figure2-4 Appearance 2.2.1 LED Indicator The LED indicator on the front panel of inverter shows the inverter status, as shown in Table2-1. -
Page 17: External Terminal Illustration
PV Grid-tied Inverter SPI-B X2 Series (8K-25K) User Manual 2 Overview 2.2.2 External Terminal Illustration The external terminals are all located at the bottom of the inverter, including battery input, PV input, AC output, DC switch and communication interface, etc. as shown in Figure2-5. -
Page 18: Working Principle
PV Grid-tied Inverter SPI-B X2 Series (8K-25K) 2 Overview User Manual When the inverter works normally, the DC switch must be ON. When installation and wiring, the DC switch must be OFF. Before maintenance, the DC switch must be OFF for 20 minutes, and measure the voltage of inner DC busbar by multimeter, only when the voltage is less than 10V, the maintenance can be done. -
Page 19: Installation
PV Grid-tied Inverter SPI-B X2 Series (8K-25K) User Manual 3 Installation 3 Installation This chapter mainly introduces the inverter's installation, including installation process, installation preparation, transportation and unpacking, installation procedures, electrical connection. check the installation, etc. 3.1 Installation Process Start... -
Page 20: Installation Environment
PV Grid-tied Inverter SPI-B X2 Series (8K-25K) 3 Installation User Manual Tools The installation tools need to be insulated to avoid electric shock. 3.2.2 Installation Environment Do not install the inverter in the place with poor ventilation. -
Page 21: Installation Clearance
PV Grid-tied Inverter SPI-B X2 Series (8K-25K) User Manual 3 Installation Ensure that there has sufficient fresh-air supply around the inverter. The inverter must be installed on the wall or bracket with enough bearing capacity. The inverter is rated at IP66. Avoid installing the inverter under sunshine. -
Page 22: Installation Method
PV Grid-tied Inverter SPI-B X2 Series (8K-25K) 3 Installation User Manual 3.2.4 Installation Method Figure3-4 Installation method 3.3 Transportation and Unpacking 3.3.1 Transportation The inverter should be transported by trained professional. During transporting, please take care and avoid impacting or dropping. - Page 23 PV Grid-tied Inverter SPI-B X2 Series (8K-25K) User Manual 3 Installation Figure3-5 Packing list of the inverter Figure3-6 Packing list of option 1 Figure3-7 Packing list of option 2...
-
Page 24: Inverter Installation
PV Grid-tied Inverter SPI-B X2 Series (8K-25K) 3 Installation User Manual There are four pairs of PV connectors and one pair of energy storage connector (optional), the actual configuration in order to prevail in kind. PV connectors and energy storage connectors have similar structures and different colors, PV connectors are black and energy storage connectors are blue. - Page 25 PV Grid-tied Inverter SPI-B X2 Series (8K-25K) User Manual 3 Installation Step 2 Mark the position of installation holes on the wall according to the dimensions of the fixing holes of the installation holder (as shown in Figure3-9), and drill three holes of Φ10.5mm on the wall according to marked position, as shown in Figure3-10.
- Page 26 PV Grid-tied Inverter SPI-B X2 Series (8K-25K) 3 Installation User Manual Figure3-11 Install expansion bolts Step 4 Align the holes of installation holder with the expansion bolts and install the flat gasket, spring gasket and nut into the expansion plugs and fasten them by wrench, as shown in Figure3-12.
-
Page 27: Electrical Connection
PV Grid-tied Inverter SPI-B X2 Series (8K-25K) User Manual 3 Installation Figure3-13 Hang the inverter to installation holder Step 6 Fasten the inverter to the installation holder by the equipped stainless steel combination bolt M5*16 and then lock it, as shown in Figure3-14. -
Page 28: External Grounding Connection
PV Grid-tied Inverter SPI-B X2 Series (8K-25K) 3 Installation User Manual Table3-1 Wire specification Wire name Recommended cross-sectional area of wire Battery wire 10 mm PV string input wire 4 mm ~6 mm 5*4mm and above multi-core wire (SPI8K-B X2, SPI10K-B X2, SPI12K-B X2) . - Page 29 PV Grid-tied Inverter SPI-B X2 Series (8K-25K) User Manual 3 Installation Figure3-15 Crimp the grounding wire (unit: mm) Step 2 Connect the crimped grounding wire to the external grounding terminal at the side of the inverter by equipped stainless steel combination bolt M5*12, as shown in Figure3-16.
-
Page 30: Pv String Input Connection
PV Grid-tied Inverter SPI-B X2 Series (8K-25K) 3 Installation User Manual × Inverter Lightning √ Grounding system Figure3-17 The grounding of inverter ----End 3.5.3 PV String Input Connection When installing, use the equipped DC terminals and PV connectors to avoid inverter damage. - Page 31 PV Grid-tied Inverter SPI-B X2 Series (8K-25K) User Manual 3 Installation During the connection of the PV strings, the following requirements need to be met, otherwise the inverter may be irreversibly damaged, and such damage would be excluded from the warranty.
- Page 32 PV Grid-tied Inverter SPI-B X2 Series (8K-25K) 3 Installation User Manual Step 1 Strip the insulation layer of the PV sting input positive and negative wires for 7mm by wire stripper, as shown in Figure3-18. Figure3-18 Strip the PV string input wires (unit: mm) It is recommended to use red wires for PV positive and black wires for PV negative to avoid wrong connection.
- Page 33 PV Grid-tied Inverter SPI-B X2 Series (8K-25K) User Manual 3 Installation Figure3-21 Tighten the lock nut Step 5 Check whether the polarity of the PV string is correct, and ensure that the open-circuit voltage in any case does not exceed the max. input voltage of the inverter.
-
Page 34: Ac Output Connection
PV Grid-tied Inverter SPI-B X2 Series (8K-25K) 3 Installation User Manual Figure3-23 Connect PV connectors Figure3-24 PV connector installation method ----End 3.5.4 AC Output Connection It's forbidden that several inverters share an AC switch. It's forbidden to connect with load between inverter and the AC switch. - Page 35 PV Grid-tied Inverter SPI-B X2 Series (8K-25K) User Manual 3 Installation Table3-3 Recommended AC switch specification Model Specification SPI8K-B X2 SPI10K-B X2 SPI12K-B X2 SPI15K-B X2 SPI17K-B X2 SPI20K-B X2 SPI23K-B X2 SPI25K-B X2 SPI25K-B X2P During wiring, please pay attention to distinguish the AC live wire, neutral wire and grounding wire.
- Page 36 PV Grid-tied Inverter SPI-B X2 Series (8K-25K) 3 Installation User Manual Step 2 Draw the AC output wire through the AC output waterproof cover, crimp them to the tube terminals, and then fasten them to corresponding wiring terminal by screwdriver, as shown in Figure3-26.
-
Page 37: Wifi/4G (Optional) Communication Connection
PV Grid-tied Inverter SPI-B X2 Series (8K-25K) User Manual 3 Installation 3.5.5 WIFI/4G (Optional) Communication Connection Insert the WIFI /4G (optional) stick to the WIFI/4G interface (as shown in Figure3-28) , user can monitor the inverter running information through WiseSolar Plus APP or "Energy Cloud" to realize the internet monitoring, the monitoring scheme is as shown in Figure3-29. -
Page 38: Com. Communication Connection
PV Grid-tied Inverter SPI-B X2 Series (8K-25K) 3 Installation User Manual WiseSolar Plus APP can communicate with inverter through WIFI /4G (optional) stick to realize the local and remote maintenance. User can perform the information query, alarm query, event query, parameter setting, etc. - Page 39 PV Grid-tied Inverter SPI-B X2 Series (8K-25K) User Manual 3 Installation RS485 communication interface RS485 communication interface is used to communicate with smart meter to achieve anti-backflow function. The connection between smart meter and inverter and grid is as shown in Figure3-31.
- Page 40 PV Grid-tied Inverter SPI-B X2 Series (8K-25K) 3 Installation User Manual Illustration Connect to AC OUTPUT phase-U of the inverter and phase-U of grid. Connect to AC OUTPUT phase-V of the inverter and phase-V of grid. Connect to AC OUTPUT phase-W of the inverter and phase-W of grid.
-
Page 41: Energy Storage Connection (Optional)
PV Grid-tied Inverter SPI-B X2 Series (8K-25K) User Manual 3 Installation Figure3-33 COM. communication wire connection ----End 3.5.7 Energy Storage Connection (Optional) When installing, use the equipped terminals and connectors to avoid inverter damage. Switch off the DC switch before connecting the battery box. - Page 42 PV Grid-tied Inverter SPI-B X2 Series (8K-25K) 3 Installation User Manual The battery wires at the inverter side use the energy storage connectors and terminals in the accessories. There are two types of the energy storage connectors: positive connector and negative connector, which respectively use positive metal terminal and negative metal terminal.
- Page 43 PV Grid-tied Inverter SPI-B X2 Series (8K-25K) User Manual 3 Installation Figure3-36 Fix the metal terminals Step 4 Tighten the locking nuts of the energy storage positive and negative connectors and the battery positive and negative connectors to corresponding insulating shells, as shown in Figure3-37.
- Page 44 PV Grid-tied Inverter SPI-B X2 Series (8K-25K) 3 Installation User Manual Figure3-38 Battery wires connection Figure3-39 Energy storage connector installation method Please see the battery documents to get detailed battery information.
-
Page 45: Check The Installation
PV Grid-tied Inverter SPI-B X2 Series (8K-25K) User Manual 3 Installation ----End 3.6 Check the Installation After finishing the installation, check the following items: Check if the PV string input wire, battery wire, AC output wire and communication wire are connected rightly. -
Page 46: App Operation
PV Grid-tied Inverter SPI-B X2 Series (8K-25K) 4 APP Operation User Manual 4 APP Operation This chapter mainly introduces the operation of APP. 4.1 First Startup Step 1 Enter website http://energy.kehua.com, select Owner, and scan QR code, as shown in Figure4-1. - Page 47 PV Grid-tied Inverter SPI-B X2 Series (8K-25K) User Manual 4 APP Operation Figure4-2 Download APP Step 3 Register, as follows. 1. Open the APP. 2. Click Register button. 3. Select Tel or E-mail according to actual condition. 4. Enter corresponding information according to prompting.
- Page 48 PV Grid-tied Inverter SPI-B X2 Series (8K-25K) 4 APP Operation User Manual Figure4-3 Login page Step 5 After entering the main page, click to build a new station, as shown in Figure4-4. Figure4-4 Main page Step 6 After entering corresponding information, select Save button, as shown in Figure4-5.
- Page 49 PV Grid-tied Inverter SPI-B X2 Series (8K-25K) User Manual 4 APP Operation Figure4-5 Create your plant page The item with “*”is required. On-grid type can select the surplus internet access, off-grid, energy storage, ground full on-grid or distributed full on-gird. We suggest selecting the distributed full on-grid.
- Page 50 PV Grid-tied Inverter SPI-B X2 Series (8K-25K) 4 APP Operation User Manual Figure4-6 Edit price Step 7 Back to main page and click the built power station, as shown in Figure4-7. Figure4-7 Plant details page Step 8 Select to add device, scan the QR code of the logger, the device will be added to the built plant, as...
- Page 51 PV Grid-tied Inverter SPI-B X2 Series (8K-25K) User Manual 4 APP Operation When the surrounding is dark, please click the Light on button at the bottom corner to start the flashlight to enhance the brightness. Figure4-8 Add new device Step 9...
- Page 52 PV Grid-tied Inverter SPI-B X2 Series (8K-25K) 4 APP Operation User Manual Step 10 Click Connect to device, it will enter the WiFi connection page. Clilck Logger WiFi settings, select a available WiFi in hotspot list, when it prompts: WiFi connected successfully, click OK. At this time, the currently connected WiFi should show Connected, as shown in Figure4-10.
-
Page 53: Battery Verification
PV Grid-tied Inverter SPI-B X2 Series (8K-25K) User Manual 4 APP Operation ----End 4.2 Battery Verification Step 1 In the device list of main page, click the device with matching SN. In the device page, click icon, select System setting, set the DCDC module quantity according to the battery quantity, set the Optical storage interface enable to enable, and set the work mode to Photovoltaic absorption, as shown in Figure4-12. - Page 54 PV Grid-tied Inverter SPI-B X2 Series (8K-25K) 4 APP Operation User Manual Figure4-13 Battery power-on setting ----End...
-
Page 55: Startup And Shutdown
PV Grid-tied Inverter SPI-B X2 Series (8K-25K) User Manual 5 Startup and Shutdown 5 Startup and Shutdown This chapter mainly introduces how to start and shut down the inverter. 5.1 Check Before Startup Before starting inverter at the first time, please check the following items. -
Page 56: Shut Down Inverter
PV Grid-tied Inverter SPI-B X2 Series (8K-25K) 5 Startup and Shutdown User Manual Step 1 Switch on the DC switch on the inverter and the project site. When the PV string provides enough startup voltage, the inverter will start and the indicator will be on. -
Page 57: Maintenance And Troubleshooting
PV Grid-tied Inverter SPI-B X2 Series (8K-25K) User Manual 6 Maintenance and Troubleshooting 6 Maintenance and Troubleshooting This chapter mainly introduces the maintenance and troubleshooting. 6.1 Maintenance 6.1.1 Inverter Maintenance Do not perform the maintenance until the inverter is powered off for 20 minutes and all power sources are disconnected. -
Page 58: Fan Maintenance
PV Grid-tied Inverter SPI-B X2 Series (8K-25K) 6 Maintenance and Troubleshooting User Manual 6.1.2 Fan Maintenance The inverter has build-in fans to cool during operation. If the fan does not work properly, then the inverter does not cool effectively, that the inverter's efficiency may be affected or cause derating. -
Page 59: Troubleshooting
PV Grid-tied Inverter SPI-B X2 Series (8K-25K) User Manual 6 Maintenance and Troubleshooting Step 7 Loosen the screws that fixed the fan and take out fans, as shown in Figure6-3. Figure6-3 Dismantle fan Step 8 Clean the fan with a soft brush or vacuum cleaner; Or replace the damaged fan (wind direction: up). - Page 60 PV Grid-tied Inverter SPI-B X2 Series (8K-25K) 6 Maintenance and Troubleshooting User Manual Fault information Solution abnormal requirements of the local grid connection and check the frequency of the local power grid. If the above is normal, please contact your local agency or service center.
- Page 61 PV Grid-tied Inverter SPI-B X2 Series (8K-25K) User Manual 6 Maintenance and Troubleshooting Fault information Solution over-current please contact your local agency or service center. Branch x reverse Check whether the branch x is connected in reverse, if the above is connected normal, please contact your local agency or service center.
-
Page 62: Stop Running, Dismantle, Discard Inverter
PV Grid-tied Inverter SPI-B X2 Series (8K-25K) 7 Stop Running, Dismantle, Discard Inverter User Manual 7 Stop Running, Dismantle, Discard Inverter This chapter introduces the dispose way for stop running, dismantling, discarding the inverter. 7.1 Stop Running Normally, the inverter don't need to be shut down, but when maintenance, it is necessary to shut down the inverter. -
Page 63: Dismantle The Inverter
PV Grid-tied Inverter SPI-B X2 Series (8K-25K) User Manual 7 Stop Running, Dismantle, Discard Inverter 7.2 Dismantle the Inverter After the connection among inverter and grid and PV string is completely disconnected and wait for 20mins at least, ensure that the inner capacitor discharge completely and check that there is no voltage and current in the inverter by the detection equipment, and then the inverter can be dismantled. -
Page 64: Package, Transportation, Storage
PV Grid-tied Inverter SPI-B X2 Series (8K-25K) 8 Package, Transportation, Storage User Manual 8 Package, Transportation, Storage This chapter mainly introduces the package, transportation and storage. 8.1 Package The package of product is carton. When packing, pay attention to the placing direction requirements. -
Page 65: A Technical Specifications
PV Grid-tied Inverter SPI-B X2 Series (8K-25K) User Manual A Technical Specifications Technical Specifications A.1 SPI-B X2 Series (8K-15K) Model SPI8K-B X2 SPI10K-B X2 SPI12K-B X2 SPI15K-B X2 Item DC input Max. input power (kW) 10.8 13.5 16.2 20.3 Max. PV array open circuit... - Page 66 PV Grid-tied Inverter SPI-B X2 Series (8K-25K) A Technical Specifications User Manual Model SPI8K-B X2 SPI10K-B X2 SPI12K-B X2 SPI15K-B X2 Item Max. output current (A) 12.7 15.9 19.1 23.8 Rated grid frequency (Hz) 50/60 Grid frequency range (Hz) 45-55/55-65 Power factor (rated power) >0.99...
- Page 67 PV Grid-tied Inverter SPI-B X2 Series (8K-25K) User Manual A Technical Specifications Model SPI8K-B X2 SPI10K-B X2 SPI12K-B X2 SPI15K-B X2 Item Installation method Wall-mounting Isolation method No transformer Degree of protection IP66 Self-consumption at night <1W -35~60℃ (>40℃ derating)
- Page 68 PV Grid-tied Inverter SPI-B X2 Series (8K-25K) A Technical Specifications User Manual SPI17K-B SPI20K-B SPI23K-B SPI25K-B SPI25K-B Model Item Max. PV array open circuit 1100 voltage (V) MPPT voltage range (V) 180-1000 Rated input voltage (V) Startup voltage (V) No. of MPPTs Strings per MPPT Max.
- Page 69 PV Grid-tied Inverter SPI-B X2 Series (8K-25K) User Manual A Technical Specifications SPI17K-B SPI20K-B SPI23K-B SPI25K-B SPI25K-B Model Item Efficiency Max. efficiency 98.5% Europe efficiency 98.0% Protection reverse connection protection <2s Islanding protection AC short-circuit protection Residual current protection DC switch...
- Page 70 PV Grid-tied Inverter SPI-B X2 Series (8K-25K) A Technical Specifications User Manual SPI17K-B SPI20K-B SPI23K-B SPI25K-B SPI25K-B Model Item Noise <50dB@ 1m Display RS485, WIFI, 4G (optional), smart meter (optional), anti-backflow (optional), Communication method energy storage (optional) AC terminal Wiring terminal bars...
-
Page 71: B Acronyms And Abbreviations
PV Grid-tied Inverter SPI-B X2 Series (8K-25K) User Manual B Acronyms and Abbreviations Acronyms and Abbreviations Alternating Current Direct Current Liquid Crystal Display Light-emitting Diode MPPT Maximum Power Point Tracking Protective Earthing Photovoltaic... - Page 72 PV Grid-tied Inverter SPI-B X2 Series (8K-25K) B Acronyms and Abbreviations User Manual RS485 Recommend Standard485...
- Page 73 4402-04048 005...
Need help?
Do you have a question about the SPI-B X2 Series and is the answer not in the manual?
Questions and answers