Table of Contents
Advertisement
Available languages
Available languages
Quick Links
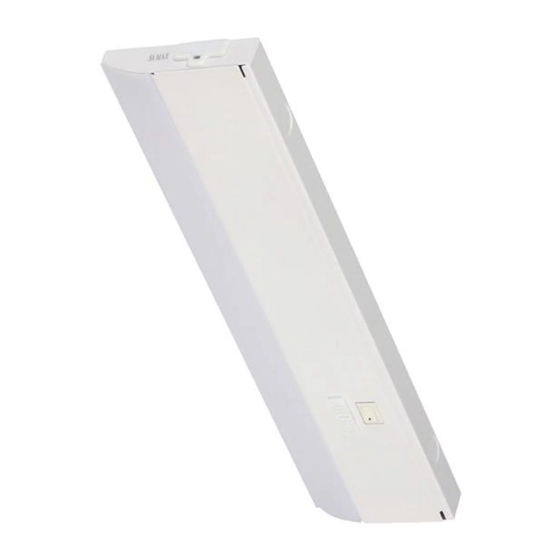
Pre-installed Captive Screws
Vis captives installées préalablement
Tornillos cautivos preinstalados
Light Setting Slide Switch
Diffuser
Diffuseur
Interrupteur à glissière pour le réglage d'éclairage
Difusor
Interruptor deslizante para la configuración de luz
WARNING: SHUT OFF POWER AT THE CIRCUIT BREAKER OR FUSE PANEL BEFORE REMOVING THE OLD
FIXTURE OR INSTALLING A NEW ONE.
READ ENTIRE INSTALLATION PROCEDURE BEFORE
YOU BEGIN!
THIS FIXTURE IS DIMMABLE BY SPECIFIC FORWARD PHASE
ELECTRONIC (TRIAC) DIMMERS. Dimmers tested to be compatible with this
fixture are the Lutron: Skylark
®
MACL-153M, Toggler
TGCL-153P, Lumea
®
and Eaton Halo
SAL006P. (This list of dimmers does not imply any guarantee
®
or warranty of compatibility with a particular application. Dimmers not listed do
not imply non-compatibility.)
If unsure if the electrical box is properly grounded, or the box is plastic
and has no ground wire, or are unfamiliar with the methods of properly
grounding fixture, consult a qualified electrician.
TURN POWER OFF AT BREAKER BOX/FUSE BOX. TURN WALL SWITCH TO JUNCTION BOX OFF
Remove the access cover by loosening the locking screw and slide the keyhole slot over the screw head, until it reaches to the large end of the
keyhole slot. As the access cover is removed from the fixture, the ends of the wires/wire connectors will be pulled out with it. Carefully, pull the ends
out about 3 inches and clip the zip tie that is attaching them to the access door.
Determine which corresponding knock-out is closest to the supply wire feed and remove it. CAREFULLY REMOVE THE KNOCK-OUT BY
HAMMERING A FLAT HEAD SCREWDRIVER OR PUNCH UNTIL THE SURFACE BREAKS. If the knock-out did not break free, use pliers (not
included) and bend it back and forth until it snaps off.
Option A (NM Cable): Attach the round plastic strain relief (CC) by pushing the wedge base into the knock-out hole until it locks into position. Push
the NM cable through the strain relief, allowing enough wire length to make the connections.
Option B (Flexible Whip): Attach the metal strain relief (BB) to the end of the flexible whip and turn until the strain relief (BB) is fully engaged with
the end of the cable. Push the strain relief (BB) and cable into the knock out and lock into position (allow enough wire length to make the connection).
Fixture must be properly grounded. Insert ground supply lead into connector on ground fixture wires.The ground wires can be either green or bare
copper. Insert black supply lead into connector on black fixture wires and white supply lead into connector on white wires.
Push excess wire into the wire compartment. Re-attach the access cover by sliding the access cover away from the screw head until the screw head
is captured by the narrow end of the keyhole slot. Tighten the locking screw back down.
OPTIONAL WIRING METHOD
Access Cover
ON/OFF Rocker Switch
Couvercle pour l'accèsr
Interrupteur à bascule
Cubierta de acceso
Interruptor oscilante
de encendido/apagado
SCL-153P, Diva® DVCL-153P, Maestro
LECL-153P, Caseta
PD-6WCL,
®
®
CCx1
RAMPE D'ÉCLAIRAGE À DEL À INSTALLER SOUS UNE ARMOIRE (Page xx)
BARRA CON LUZ LED PARA DEBAJO DEL GABINETE (Página xx)
Model / Model / Modelo # UC1299-WH1-12LF0-G, UC1299-WH1-18LF0-G,
Plastic screw cover
Caches des vis
Cubiertas de tornillo
1. Do not look directly at exposed LEDs for extended period of time.
2. LEDs gradually emit less light over their lifetime.
3. Do not use in wet locations. FOR INDOOR USE ONLY.
4. Do NOT mount to surfaces less than ¼ in.
5. For electrical requirements, see fixture. Minimum 90°C supply conductors.
®
6. Do NOT mount over sinks or stoves.
7. Do NOT install these lights inside of enclosed cabinets.
8. Turn power off before servicing.
9. Do not leave bare wires exposed.
10. Not intended for recessed installation in ceiling or soffits.
11. Maximum number of LED cabinet lighting fixtures per run should not exceed power supply
wattage rating. Maximum 360 watts.
OPTION A
OPTION B
BBx1
Optional Wiring method: To pass through wiring with power
feeding back out to the next fixture the following is provided. For NM
cable or Flexible whip, use a second strain relief and the second KO
in the access cover. Push the second set of wires into the
corresponding quick connect with black to black, white to white and
ground to ground.
LED UNDER CABINET BAR (Page 1)
UC1299-WH1-24LF0-G, UC1299-WH1-30LF0-G
AAx2
BBx2
CCx2
* Actual hardware may differ from illustration.
* La quincaillerie incluse peut être différente de l'illustration.
* Los aditamentos reales pueden diferir de los que se muestran en la ilustración.
Required/ Nécessaire/ Obligatorio
Linking cord
Cordon de raccordement
Cable de enlace
Advertisement
Table of Contents

Subscribe to Our Youtube Channel
Related Manuals for Good Earth Lighting UC1299-WH1-12LF0-G


Summary of Contents for Good Earth Lighting UC1299-WH1-12LF0-G
- Page 1 LED UNDER CABINET BAR (Page 1) RAMPE D’ÉCLAIRAGE À DEL À INSTALLER SOUS UNE ARMOIRE (Page xx) BARRA CON LUZ LED PARA DEBAJO DEL GABINETE (Página xx) Model / Model / Modelo # UC1299-WH1-12LF0-G, UC1299-WH1-18LF0-G, UC1299-WH1-24LF0-G, UC1299-WH1-30LF0-G Access Cover Pre-installed Captive Screws ON/OFF Rocker Switch Couvercle pour l’accèsr...
- Page 2 FCC responsible party name : Good Earth Lighting, Inc. Address: 1400 E Business Center Drive, STE 108, Mount Prospect IL 60056, USA Telephone number: 1-800-291-8838 Before doing any work on the fixture, shut off power supply at the circuit breaker panel to avoid electrical shock.
- Page 3 AVERTISSEMENT : METTEZ HORS TENSION AU NIVEAU DU DISJONCTEUR OU DU PANNEAU DE FUSIBLES AVANT DE RETIRER L’ANCIEN LUMINAIRE OU D’EN INSTALLER UN NOUVEAU. WARNINGS AND CAUTIONS INFORMATIONS IMPORTANTES RELATIVES À LA SÉCURITÉ LISEZ TOUTE LA PROCÉDURE D’INSTALLATION 2. Les ampoules à DEL émettent progressivement moins de lumière au cours de leur durée de vie. AVANT DE COMMENCER ! 3.
- Page 4 Nom de la partie responsable FCC: Good Earth Lighting, Inc. Adresse: 1400 E Business Center Drive, STE 108, Mount Prospect IL 60056, USA Numéro de téléphone: 1-800-291-8838 Avant de manipuler le luminaire, coupez l’alimentation électrique sur le panneau central de disjoncteurs pour...
- Page 5 ADVERTENCIA: DESCONECTE LA ALIMENTACIÓN ELÉCTRICA EN EL PANEL DE CORTACIRCUITOS O DE FUSIBLES ANTES DE RETIRAR EL ACCESORIO PARA ILUMINACIÓN VIEJO O INSTALAR UNO NUEVO. WARNINGS AND CAUTIONS IMPORTANT SAFETY INFORMATION 1. No mire directamente las luces LED durante un período largo. ¡LEA TODO EL PROCEDIMIENTO DE INSTALACIÓN ANTES DE 2.
- Page 6 4) Solicite ayuda al distribuidor o a un técnico con experiencia en radio/TV. Nombre de la parte responsable de la FCC : Good Earth Lighting, Inc. Dirección: 1400 E Business Center Drive, STE 108, Mount Prospect IL 60056, USA Número de teléfono: 1-800-291-8838 Antes de realizar cualquier trabajo en la lámpara, corte el suministro de electricidad en el panel del interruptor...
Need help?
Do you have a question about the UC1299-WH1-12LF0-G and is the answer not in the manual?
Questions and answers