Advertisement
Quick Links
2023-10-31 08:45
SWM 4131 Series
Full Installation Guide
Everything you need to get your Era 300 mounted, in no time
Before you start
...we just wanted to say thanks for choosing Vogel's. Smart choice.
And you're already making another smart choice – reading the manual! Keep reading to learn all about safe, efficient installation, and how to
use your new mount.
Stay safe
Warning
Always read these safety instructions carefully before installing and using this product.
Following these instructions is strictly required. Incorrect mounting and/or installation could put you, your speaker, and your family at
substantial risk.
Don't dare risk it... Read all
https://manuals.vogels.com/en-us/swm4131.html
SWM 4131 Series
1/12
Advertisement

Subscribe to Our Youtube Channel
Related Manuals for vogel's SWM 4131 Series


Summary of Contents for vogel's SWM 4131 Series
- Page 1 2023-10-31 08:45 SWM 4131 Series SWM 4131 Series Full Installation Guide Everything you need to get your Era 300 mounted, in no time Before you start …we just wanted to say thanks for choosing Vogel’s. Smart choice. And you’re already making another smart choice – reading the manual! Keep reading to learn all about safe, efficient installation, and how to use your new mount.
-
Page 2: What's In Your Box
2023-10-31 08:45 SWM 4131 Series Vogel’s recommends that the mounting and/or installation of this product should be carried out by a suitably qualified expert. Vogel’s cannot be held responsible for any injury and/or damage caused by incorrect installation. The wall mounting accessories provided are exclusively intended for installation on walls made of solid brick, solid concrete or solid wood columns. - Page 3 2023-10-31 08:45 SWM 4131 Series Got your tools ready? Don’t start without all the necessary tools: Drilling machine Pencil For walls with wooden studs: 3mm or 1/9” wood drill For walls with wooden studs: Stud finder For concrete/brick walls: 8mm or 5/16” concrete/brick drill No.3 Allen key (provided)
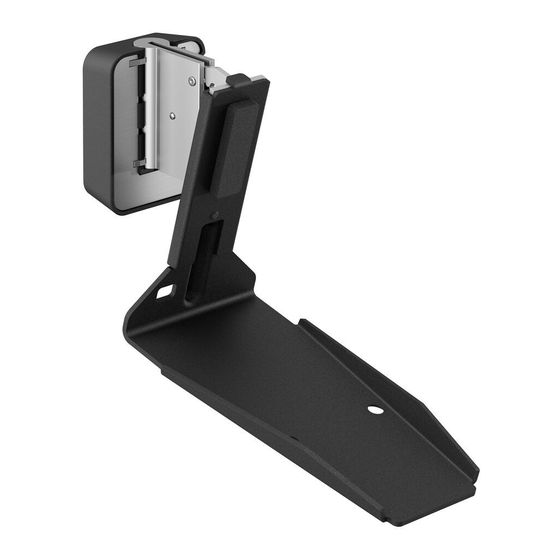
- Page 4 2023-10-31 08:45 SWM 4131 Series Ready… set… get installing! Step 1: Assemble the speaker mount 1. Slide the tilt module Ⓐ and the speaker bracket Ⓒ in the tilt bracket Ⓑ. 2. Attach the speaker bracket Ⓒ, the tilt module Ⓐ and the tilt bracket Ⓑ to each other by screwing the 1x M4*5mm bolt Ⓕ into the speaker bracket Ⓒ.
- Page 5 2023-10-31 08:45 SWM 4131 Series Step 3: Attach the wall mount to the wall Your speaker can be mounted upside down, consider this when deciding where you want to mount your speaker and where its controls will be. How well do you know your walls? What they’re made of matters more than you think…...
- Page 6 2023-10-31 08:45 SWM 4131 Series How deep do you drill? Check the length of the screw (not the plug!) to find the right depth – this stops things from breaking. 3. Mark the drill at the length of the screw Ⓗ.
- Page 7 2023-10-31 08:45 SWM 4131 Series Walls with wooden studs 1. Don’t just guess! Always use a stud finder to determine the position of studs. 2. Decide how high you want the wall mount Ⓓ to be. 3. Hold the wall mount Ⓓ against the wall and mark the location of the 2 holes.
- Page 8 2023-10-31 08:45 SWM 4131 Series 6. Attach the wall mount Ⓓ to the wall with the screws Ⓗ. Use the integrated spirit level to tilt the wall mount Ⓓ until it is level. Make sure the wall mount is mounted with the opening pointing towards the ceiling.
- Page 9 2023-10-31 08:45 SWM 4131 Series 1. Lift the speaker and put the tilt module Ⓐ in the wall mount Ⓓ. 2. Slightly lift and tilt the speaker to your desired angle. 3. Fasten the speaker by tightening the setscrew on the side of the tilt module Ⓐ.
- Page 10 2023-10-31 08:45 SWM 4131 Series 2. Slightly lift and tilt the speaker to your desired angle. 3. Fasten the speaker by tightening the setscrew on the side of the tilt module Ⓐ. Job done now! Enjoy listening to your speaker! Having a cable mess? Do you need inspiration about how to hide and guide your cables? Take a look at our website vogels.com...
-
Page 11: Simple Troubleshooting
2023-10-31 08:45 SWM 4131 Series 1. Lift the speaker out of the wall mount Ⓓ. 2. Unscrew the 2x M5*20mm Ⓖ from the speaker bracket Ⓒ to remove the speaker. 3. Disconnect the plug from the Era speaker. Confused? Unsure? Going crazy? There’s plenty of help waiting for you, online:... - Page 12 Vogel’s guarantee shall lapse in the following cases: If the product has not been installed or used in accordance with the instructions; If applicable, if the holes in the wall have not been properly drilled in accordance with the Vogel's installation instructions for the applicable wall type;...
Need help?
Do you have a question about the SWM 4131 Series and is the answer not in the manual?
Questions and answers