Table of Contents
Advertisement
Available languages
Available languages
Quick Links
Cat. No. / No de cat.
2482-20, 2483-20
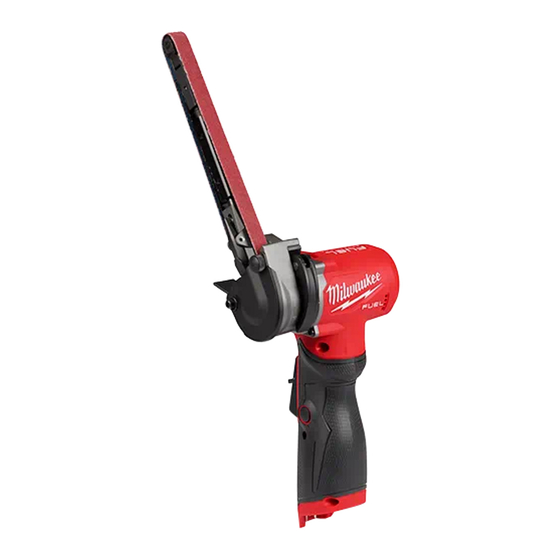
M12 FUEL™ 1/2" x 18" BANDFILE & 3/8" x 13" BANDFILE
PONCEUSE À BANDE DE 13 mm x 457 mm (1/2" x 18") ET
PONCEUSE À BANDE DE 10 mm x 330 mm (3/8" x 13") M12 FUEL™
LIJADORA DE BANDA DE 13 mm x 457 mm (1/2" x 18") Y
LIJADORA DE BANDA DE 10 mm x 330 mm (3/8" x 13") M12 FUEL™
WARNING
WARNING
AVERTISSEMENT
AVERTISSEMENT
comprendre le manuel.
comprendre le manuel.
ADVERTENCIA
ADVERTENCIA
To reduce the risk of injury, user must read and understand operator's manual.
To reduce the risk of injury, user must read and understand operator's manual.
Afin de réduire le risque de blessures, l'utilisateur doit lire et bien
Afin de réduire le risque de blessures, l'utilisateur doit lire et bien
Para reducir el riesgo de lesiones, el usuario debe leer y entender el manual.
Para reducir el riesgo de lesiones, el usuario debe leer y entender el manual.
OPERATOR'S MANUAL
MANUEL de L'UTILISATEUR
MANUAL del OPERADOR
Advertisement
Table of Contents

Related Manuals for Milwaukee M12 FUEL 2482-20


Summary of Contents for Milwaukee M12 FUEL 2482-20
- Page 1 OPERATOR'S MANUAL MANUEL de L'UTILISATEUR MANUAL del OPERADOR Cat. No. / No de cat. 2482-20, 2483-20 M12 FUEL™ 1/2" x 18" BANDFILE & 3/8" x 13" BANDFILE PONCEUSE À BANDE DE 13 mm x 457 mm (1/2" x 18") ET PONCEUSE À...
-
Page 2: General Power Tool Safety Warnings
GENERAL POWER TOOL attached to a rotating part of the power tool may result in personal injury. SAFETY WARNINGS • Do not overreach. Keep proper footing and Read all safety warnings, instruc- WARNING balance at all times. This enables better control tions, illustrations and specifica- of the power tool in unexpected situations. -
Page 3: Functional Description
Do not use this tool if you do not understand these operating instructions or you feel the work is beyond your capability; contact Milwaukee Tool or a trained professional for additional information or training. 9. Speed indicator •... -
Page 4: Specifications
4. Tighten the arm adjust clamp securely. If the SPECIFICATIONS bandfile arm becomes loose under load, close the Volts.............. 12 DC arm adjust clamp, tighten the adjustment screw to Battery Type ..........M12™ 5.5-7.5 in-lbs with a 3 mm hex key wrench. Charger Type..........M12™... - Page 5 Installing/Changing the Contact Wheel 3. Push the arm against a hard surface until the safety latch clicks into the locking position. 1. Remove battery pack. 2. Unfasten the thumbscrew. 3. Push the arm against a hard surface until the safety latch clicks into the locking position. 4.
-
Page 6: Operation
Adjusting the Bandfile Belt OPERATION Adjusting when the belt drifts left: To reduce the risk of injury, always WARNING 1. Run the bandfile with no load and let the belt free wear proper eye protection marked run on the tool. to comply with ANSI Z87.1. -
Page 7: Maintenance
Subject to certain exceptions, performing any maintenance. Never disassemble MILWAUKEE will repair or replace any part on this power tool which, the tool, battery pack or charger. Contact a after examination, is determined by MILWAUKEE to be defective in material or workmanship for a period of five (5) years after the MILWAUKEE service facility for ALL repairs. -
Page 8: Sécurité Électrique
des bottes de sécurité antidérapantes, un casque RÈGLES DE SÉCURITÉ GÉNÉRALES protecteur ou une protection auditive afin de réduire RELATIVES AUX OUTILS ÉLECTRIQUES les blessures. Lire toutes les consignes • Empêcher les démarrages accidentels. S'assurer AVERTISSEMENT de sécurité, consignes, que la gâchette est en position d'arrêt avant de illustrations et spécifications fournies avec cet brancher l'outil à... -
Page 9: Utilisation Et Entretien De La Batterie
Si elles sont illisibles ou manquantes, contacter ou d'autres petits objets métalliques qui pourraient un centre de services et d'entretien MILWAUKEE pour connecter les bornes. Le court-circuitage des bornes un remplacement gratuit. -
Page 10: Description Fonctionnelle
L'emploi d'accessoires DESCRIPTION FONCTIONNELLE AVERTISSEMENT autres que ceux qui sont expressément recommandés pour cet outil peut comporter des risques. Réglage de la position du bras du fichier de bande 1. Retirer le bloc-piles. 2. Desserrer la bride d'ajustage du bras. 3. - Page 11 6. Assurez-vous que la courroie est centrée sur la Ces bandes sont idéales pour meuler et ébavurer des aciers à haute teneur en carbone, des matériaux roue de contact. métallurgiques et pour poncer des bois durs. Les 7. Relâchez le loquet de sécurité à l'aide du bouton de déverrouillage du bras, comme indiqué...
- Page 12 Tournevis Phillips Clé hexagonale Pour réduire le risque de 6. Détachez la vis avec un tournevis à tête plate. AVERTISSEMENT blessure, retirez toujours 7. Retirez et remplacez la molette de contact. la batterie et maintenez l'outil en position de 8. Faites pivoter le protège-ceinture en position et stockage pendant le transport et le stockage.
- Page 13 Il faudra retourner l’outil électrique à un centre de service en usine MILWAUKEE ou à un poste ENTRETIEN d’entretien agréé MILWAUKEE, en port prépayé et assuré. Une copie de la preuve d’achat doit être présentée lors du retour du produit.
-
Page 14: Seguridad En El Área De Trabajo
Un momento de Veuillez consulter l’onglet « Trouver un centre Service », dans la section « Pièces et service » du site web de MILWAUKEE, à distracción al utilizar herramientas eléctricas puede l’adresse www.milwaukeetool.com, ou composer le 1.800.SAWDUST ocasionar lesiones personales graves. -
Page 15: Uso Y Cuidado De Las Herramientas Eléctricas
Milwaukee Tool o con • Cuando la batería no esté en uso, manténgala un profesional capacitado para recibir capacitación o alejada de otros objetos metálicos como sujeta-... -
Page 16: Descripcion Funcional
SIMBOLOGÍA • plomo de pintura basada en plomo • dióxido de silicio de los ladrillos y el cemento y otros Volts productos de albañilería y • arsénico y cromo de madera con tratamiento químico. Su riesgo por estas exposiciones varía, dependiendo Corriente continua de la frecuencia con que realice este tipo de trabajo. - Page 17 Instalación / retiro de las bandas 3. Gire el cabezal de la lijadora de banda hacia la posición de lijado deseada. 1. Quite la batería. 2. Afloje el protector del cinturón girando el tornillo del pulgar en sentido contrario a las agujas del reloj y gire el protector fuera del camino.
- Page 18 8. Gire el protector del cinturón de nuevo en su 9. Instale la correa y alinee la correa en la rueda posición y gire el tornillo del pulgar en el sentido motriz y la rueda de contacto. de las agujas del reloj. 10.
-
Page 19: Operación
1 800 diferentes velocidades máxi- y la batería, a un centro de servicio MILWAUKEE. mas. La velocidad máxima no 3 600 se puede ajustar mientras la Para reducir el riesgo de le- ADVERTENCIA correa se está... - Page 20 Al devolver la herramienta Para hacer válida esta garantía, presente esta tarjeta de garantía, eléctrica a un centro de servicio de fábrica de MILWAUKEE o a una cerrada/sellada por el distribuidor o la tienda donde compró el pro- estación de servicio autorizada de MILWAUKEE, es necesario que la...
Need help?
Do you have a question about the M12 FUEL 2482-20 and is the answer not in the manual?
Questions and answers