Advertisement
Table of Contents
Advertisement
Table of Contents

Related Manuals for NBB SR8299


Summary of Contents for NBB SR8299
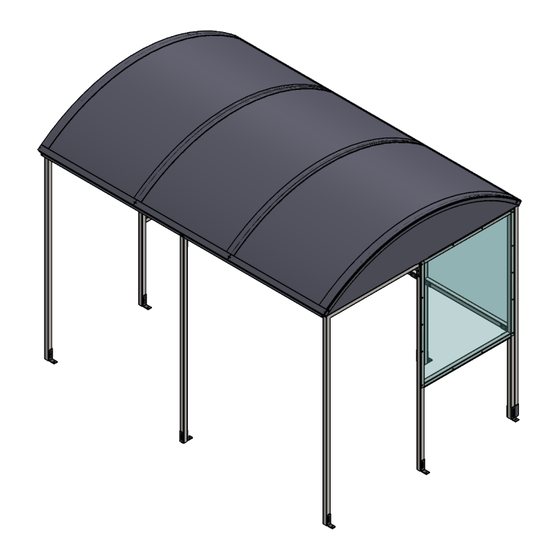
- Page 1 Assembly Instructions Shelter Type: SR8299 SR8299-01-28102021-USA...
-
Page 2: Exploded View
EXPLODED VIEW... -
Page 3: Parts List
PARTS LIST PART ITEM Size (inch) IMAGE DESCRIPTION QTY. 78.74 x 40.74 Full Frame 4.3 x 4.3 x 1.57 Corner Bracket - CB1 4.33 x 1.57 Joint Flat - JF1 78.74 x 40.74 Post Frame - P1 60.75 ST5 Roof Tie Bar 77.15 x 1.57 x P5 POST 1.57... - Page 4 FIXINGS Fittings Bolt set M10 BTANCM12100 1.5" M10/12 x 100 mm 1" Tech Black M10 x 60mm Washer Tech screw Caps Concrete Bolt screw Pack A+B Image Tools required: Drill/Screwdriver 17mm Wrench Mallet T25 Torx bit...
- Page 5 Step 1 Assemble S1 frames to make up the main structure using CB1 brackets for the corners and JF1 brackets for the straight joints. Attach P1 post to the S1C Frame using CB1 and JF1 brackets. Brackets as shown below. Please note 1.5"...
- Page 6 Step 2 Attach DR2R rafters using DR brackets. Secure the END PANELS (DR2I) to frames using tec screws. The end rafters need to be placed in position at the same time as the DR2I DR2R DR2R DR2R DR2I DR2R DR BRACKET DR2I RAFTER PLACEMENT 40.75...
- Page 7 Step 3 Attach the DR2PO and DR2PI Panels to the top of the rafters, with the DR2PO on either end and the DR2PI in between. Seal the gap between the panels using the DR2T strips. Attach the DRATO and DRATI Trim parts to the lower part of the rafters as shown below.
- Page 8 Step 4 Move the shelter into its desired position and attach the foot brackets FT1/FT3 before fixng in place. FT3 x4 FT1 x5...
- Page 9 PLAN VIEW OVERALL DIMENSIONS AND GROUND FIXING POSITIONS Suggested size for concrete base: 8" oversized on all 4 sides. 41.12 39.17 38.27 77.44...
-
Page 10: Maintenance
THANK YOU FOR PURCHASING THIS PRODUCT MAINTENANCE: To ensure your products give you many years of use we recommend that you: • Clean panels regularly with soapy water • Ensure all fittings are tight (for example after a big storm) •...
Need help?
Do you have a question about the SR8299 and is the answer not in the manual?
Questions and answers