
Related Manuals for SKAARHOJ RC-SK5


Summary of Contents for SKAARHOJ RC-SK5
- Page 1 RC-SK5 Exclusively for Canon User Guide | January 2024 Get the latest version of this User Guide at: https://www.skaarhoj.com/support/manuals/...
-
Page 2: Table Of Contents
Contents Introduction What’s In the Box Overview System Configuration Setup Power Setup Identifying the IP Address Logging into the RC-SK5 Web UI Update the Software Configurations Discovering Cameras Adding Cameras Manually Managing Cameras Manage Projects Customizing the Settings Undo More information... - Page 3 SKAARHOJ Ecosystem Control Hub Software Applications Important Information Legal Notice Warnings Maintenance Precautions Regulatory Compliance...
-
Page 4: Introduction
Introduction What’s In the Box 1 x RC-SK5 Controller 1 x 12V DC Power Supply including power plug for EU, UK and US Overview This user guide is suitable for the following models RC-SK5 RC-SK5 Pro License Frame Shot Pro - Red Edition... -
Page 5: System Configuration
System Configuration Setup • Connecting the Control Panel: Use a Cat6 cable (or higher grade) to connect the RC-SK5 control panel to a Power over Ethernet (PoE) capable ethernet switch. • Camera Connection: Connect your Canon cameras to the same ethernet switch to ensure network integration. -
Page 6: Logging Into The Rc-Sk5 Web Ui
Password: skaarhoj • Security Recommendation: If you are operating the RC-SK5 on an insecure network, it is strongly recommended to change the default username and password. This can be done in the Settings tab. After logging in, you will be directed to the Home screen of Reactor, where most configuration settings... -
Page 7: Update The Software
Update the Software We advise you to promptly updating the software on your RC-SK5. The process is straightforward and can be done via the Packages tab. Please follow these steps: • Internet Connection Check: Ensure that the RC-SK5 is connected to the internet. A green tower icon in the upper right corner indicates an active internet connection. -
Page 8: Configurations
Configurations The Reactor Home screen is where you initiate the setup for the RC-SK5. Your screen should resemble the following view: The dropdown menu labeled "RC-SK5 - Standard Config" is where you choose the operational setup for your RC-SK5. This manual details the functionality of this particular configuration. In the standard RC-SK5 version, this is the default configuration, with the only other option being the configuration that... - Page 9 Click "Install" for each camera you want to add to RC-SK5, holding down Shift to select multiple cameras simultaneously. After adding your cameras, they will receive a unique Device ID. For some models, like the EOS-C300, you may need to enter additional details like username and password, as indicated in the Devices tab on the...
-
Page 10: Adding Cameras Manually
Cameras can also be added using the "Add Device" button found in the Devices tab. When a device is added this way, it connects to the RC-SK5, but it isn't automatically included in the camera selector. Cameras are only added to the selector when listed next to the blue "Camera Selector" button. This approach allows for flexible design of the camera selector, including the option to exclude certain... - Page 11 The screenshot below illustrates a scenario where multiple cameras are added. The CR-N100 and CR- N700 are connected, while the EOS-C300 requires a password and the CR-X300 is pending IP address assignment. Additionally, 10 cameras have been integrated into the controller's camera selector.
- Page 12 On the controller, the cameras selector would look like this on the first page: The second page would look like this:...
-
Page 13: Managing Cameras
Manage your cameras in list format by clicking the Camera Selector button; here, you can adjust the order as displayed on the RC-SK5. Muting a camera will hide it from the selector, leaving its button blank, while editing the Camera Name will update the button's label on the displays. -
Page 14: Manage Projects
This feature allows you to set up projects for different locations, enabling easy portability of the RC-SK5 and quick application in various contexts. For this and many more features in Reactor, please consult the general guides on SKAARHOJ's products... -
Page 15: Customizing The Settings
RC-SK5 Pro License, which offers unlimited configuration options. With the standard version of the RC-SK5, changes to settings are restricted to the menu pages. These can be accessed directly on the RC-SK5 or selected through the menu selector at the bottom of the configuration screen. - Page 16 We suggest activating the gray toggle labeled "Group by device core" in the upper right corner. This setting ensures that the parameters automatically apply to the camera currently selected on the controller, rather than being fixed to a specific camera as listed above. In the example below, we change the behavior for the Shooting Mode knob to Metering Mode instead.
-
Page 17: Undo
Undo In the Configuration section, the ability to revert to a previous state can be crucial if unexpected changes occur. On the right side of the menu bar, above the Controller Tab, you'll find Undo and Redo buttons accompanied by a history overview. Additionally, pay attention to the question mark icon; it provides guidance on navigating the canvas within the Configuration section. -
Page 18: More Information
For detailed guidance on configuring your RC-SK5, please refer to SKAARHOJ's comprehensive resources on Reactor and configuration techniques. It's important to note that the standard RC-SK5 has limited configuration capabilities. Many options and features seen in other resources, which may currently seem unavailable, can be unlocked for your RC-SK5 with the purchase of the RC-SK5 Pro License. -
Page 19: The Standard Config
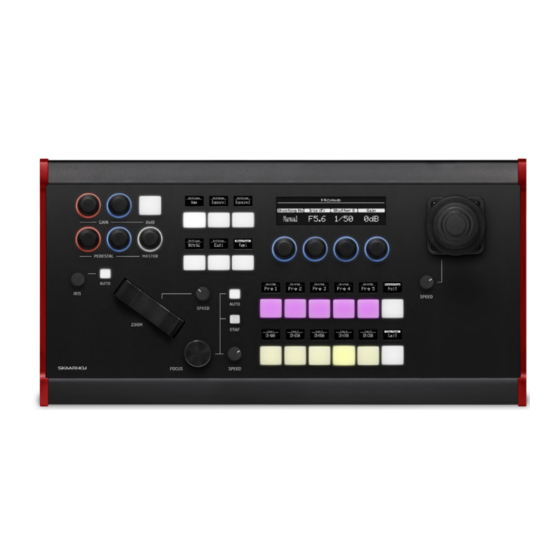
The Standard Config Introduction In the subsequent pages, you will find a comprehensive description of the functions for every knob and menu item in the default configuration of the RC-SK5. - Page 20 SKAARHOJ RC-SK5 PTZ Controller Functional Overview This is an overview of the SKAARHOJ RC-SK5, a sophisticated PTZ camera controller. Upon powering up, the controller defaults to this main interface, providing a user-friendly and visually clear overview of the primary functions and settings.
- Page 21 36-40: Preset Recall and Store Buttons: Recall a preset by pressing a button. Hold for 1 second to store the current camera position as a preset. Preset status is indicated by a pink color, and storing confirmation by a brief green blink. With the RC-SK5 Pro License, you can customize the display labels for each camera individually.
- Page 22 Home Menu This menu provides settings crucial for basic camera operations and image quality. The Auto/Manual Shooting Mode Selector allows users to switch between automatic and manual modes, impacting other camera settings. The Iris Control mirrors the Iris Dial, essential for managing light entry, depth of field, and exposure. The Shutter Speed Setting is key for controlling exposure time and motion blur, offering options for both fast and slow shutter speeds.
- Page 23 Exposure 1 Menu This menu focuses on exposure settings. The Auto/Manual Iris Toggle provides flexibility in aperture control, while the Iris Control enables precise adjustments. The Shutter Speed Mode offers a variety of options for different filming requirements, and the Shutter Speed Setting allows for detailed adjustments to achieve desired motion effects and exposure levels.
- Page 24 Exposure 2 Menu In this menu, users can manage light sensitivity and exposure. The Gain Mode Selection switches between manual and automatic modes for light sensitivity. Video Gain Setting is crucial for brightening images in low-light conditions. The Auto Exposure Gain Limit sets a maximum for auto exposure gain to prevent overly bright or noisy images. The ND Filter Selection allows users to choose the right Neutral Density filter to control light entry and manage exposure in bright environments.
- Page 25 White Balance Menu This menu enables accurate color reproduction under different lighting conditions. The White Balance Mode Selection offers a range of settings for color temperature adjustment. Kelvin White Balance Adjustment/White Balance Reading Trigger allows for precise control in Kelvin mode or initiates a white balance reading in WB A or WB B mode. The Red and Blue Gain Settings are essential for color correction, adjusting red and blue color gains respectively.
- Page 26 Black 1 Menu This menu focuses on the adjustment of black and darker areas in the image. The Master Pedestal Setting controls the brightness of black areas, while the Red, Green, and Blue Pedestal Settings allow for fine-tuning of respective color tones in darker regions, ensuring balanced color representation and natural-looking shadows.
- Page 27 Black 2 Menu This menu focuses on image sharpness and shadow detail. The Sharpness Level adjusts edge enhancement for clarity and texture. Shadow Gamma Correction alters gamma values in shadow areas for nuanced shadow appearance. The Black Gamma Range knob modifies the width of black gamma range for targeted shadow detail enhancement. The Black Gamma Point knob pinpoints the level of gamma correction impact on darker areas.
- Page 28 Focus Menu This menu offers focus control options. The Focus Mode Toggle allows switching between Auto and Manual Focus. Face Detection Mode configures the camera's face detection autofocus with options like 'Face Catch', 'Face Only', and 'Off'. Face Catch Tracking Toggle maintains focus on moving faces in 'Face Catch' mode. Autofocus Speed Selection adjusts the autofocus speed from fast to slow.
- Page 29 36-40: Preset Recall and Store Buttons: Recall a preset by pressing a button. Hold for 1 second to store the current camera position as a preset. Preset status is indicated by a pink color, and storing confirmation by a brief green blink. With the RC-SK5 Pro License, you can customize the display labels for each camera individually.
- Page 30 Trace Menu This menu is for recording and recalling movement patterns. Trace Number Selection identifies different recorded traces. Start Recording Button initiates recording of camera movements. Recall Preset Button provides quick access to saved presets. Trace Store Mode Selection defines how movement patterns are recorded and stored. 26,44: Trace Number Selection: Allows users to select a specific trace number.
- Page 31 Pan/Tilt Speed Menu This menu adjusts the speed of camera movements. Maximum Speed of Pan/Tilt Joystick Movements sets the top speed for joystick-controlled movements. Maximum Speed of Zoom Movements configures zooming speed. Speed of Manual Focus Adjustments determines the speed of manual focus changes. 5,44: Maximum Speed of Pan/Tilt Joystick Movements: This setting adjusts the top speed for pan and tilt movements controlled by the joystick (1,2).
- Page 32 Pan/Tilt Ramp and Zoom Menu This menu controls the ramp (acceleration/deceleration) of camera movements. Adjustment Selector for Pan, Tilt, or Zoom allows selection of the movement type to adjust. Pan/Tilt Ramp Value sets the ramp for pan and tilt movements. Pan/Tilt Speed Mode chooses between 'Dynamic' and 'Constant' speed modes. 26,44: Adjustment Selector for Pan, Tilt, or Zoom: This setting allows the user to choose which camera movement to adjust - Pan (horizontal), Tilt (vertical), or Zoom.
- Page 33 Various Menu This menu includes diverse settings. Boot-Up State Save Function saves current settings as the default on boot-up. Image Stabilization Options provide stabilization settings. On-Screen Display Toggles for 12G SDI and HDMI/3G SDI Outputs enable or disable the OSD on respective outputs. 26,44: Boot-Up State Save Function: Allows the user to push or turn the control to save the camera's current settings as the default state upon boot-up.
- Page 34 Exposure D1 Menu This menu focuses on low-light settings. Infra Red Mode Toggle enables infrared capture. High Sensitivity Toggle enhances image clarity in low light. Gain Boost Toggle expands dynamic range in Manual Exposure mode. Slow Shutter Toggle allows longer shutter speeds for low-light capture. 26,44: Infra Red Mode Toggle: This function enables or disables the infrared mode on the camera.
- Page 35 Exposure D2 Menu This menu deals with exposure adjustments. Auto Exposure Shift Adjustment fine-tunes auto exposure levels. Metering Mode Selection offers different exposure metering options. Exposure Response configures the speed of automatic exposure adjustments. Shockless Gain Adjustment smooths gain transitions. 26,44: Auto Exposure Shift Adjustment: Allows fine-tuning of the auto exposure level.
- Page 36 Exposure D3 Menu This menu includes exposure control features. Iris Limit Toggle restricts aperture size to prevent over or underexposure. Flicker Reduction Toggle minimizes flickering in video. Diffraction Toggle compensates for diffraction at smaller apertures. 26,44: Iris Limit Toggle: This function enables or disables the iris limit. When activated, it restricts the maximum and minimum aperture size, preventing overexposure or underexposure due to extreme aperture adjustments.
- Page 37 Color Matrix 1 Menu This menu adjusts color settings. Color Matrix Gain fine-tunes color depth. Color Matrix Hue Adjustment manipulates color tones. Cyan-Green/Red-Magenta and Cyan-Blue/Red-Yellow Tone Adjustments balance specific color ranges. 26,44: Color Matrix Gain: This feature enables fine-tuning of the video's color depth. The knob adjusts the gain of the color matrix, enhancing or reducing the intensity of colors in the video.
- Page 38 Custom Picture Menu This menu offers picture customization. CP.Selected - Color Profile Selection chooses color profiles like BT.709. Gamma Profile adjusts the gamma curve. HLG Color enhances dynamic range for HDR content. Matrix adjusts the color matrix for overall color tone. 26,44: CP.Selected - Color Profile Selection: Similar to the BT.709 Normal color profile.
- Page 39 Image Quality Menu This menu handles image quality adjustments. Noise Reduction Mode reduces visual noise. Skin Level Adjustment enhances skin tones. Knee Toggle manages highlights to prevent overexposure. Knee Saturation maintains color balance in bright areas. 26,44: Noise Reduction Mode: This setting adjusts the camera's noise reduction levels. It helps in reducing visual noise in the footage, especially in low-light conditions or at higher ISO settings, resulting in cleaner, smoother images.
- Page 40 25: Menu Selection paging button Raw Panel™, Blue Pill™, Reactor™, UniSketch™, Device Core™, and all product names on these pages are trademarks of SKAARHOJ ApS, Denmark, for use with Broadcast, Audiovisual and industrial control applications. SKAARHOJ® is a registered trademark of SKAARHOJ ApS, Denmark.
-
Page 41: Rc-Sk5 & Frame Shot Pro
RC-SK5 & Frame Shot Pro Frame Shot Pro is an innovative side panel designed to seamlessly integrate with the RC-SK5 as a host controller, enhancing the control of Canon PTZ cameras with visual presets. This system simplifies preset management by using color thumbnails as visual references, eliminating the need to memorize preset positions by their number. -
Page 42: Overview Of Benefits
Together, Frame Shot Pro and RC-SK5 deliver a powerful, user-friendly system that streamlines workflow for professionals in the field. Network Connected Frame Shot Pro and RC-SK5 are connected via network. They can sit side by side or as far away from each other as your network can reach. Setup Adding a Frame Shot Pro is very simple to do. -
Page 43: Visual Presets
Finally, add your cameras. You should end up with a result about like this example below: Visual Presets The process for recalling and storing presets on Frame Shot Pro mirrors that of the RC-SK5. A quick tap recalls a preset, while a longer press saves it, capturing and storing the corresponding thumbnail within the controller. -
Page 44: Functional Description
Frame Shot Pro paired with the RC-SK5 creates a harmonious and efficient workstation. Functional Description Detailed below are the functions of Frame Shot Pro's hardware components and their interaction with the RC-SK5, accommodating Canon cameras as well as models from other manufacturers. -
Page 45: Persistent Thumbnail Storage
Panel Mode by activating the "Listen On Port" option in its Hardware Manager. This allows Frame Shot Pro to bypass its own Reactor version and connect to the RC-SK5. Both panels will then be visible in the RC- SK5's Simulation tab, and you can customize their placement side by side by editing the group on the Home Screen and adjusting their positions in the Graphical Editor, as detailed in the SKAARHOJ documentation. -
Page 46: Extended Camera Selector
Extended Camera Selector By expanding the Camera Selector to 10 buttons, the RC-SK5 doubles its display capacity, taking over buttons typically reserved for presets. Customizing User Buttons Frame Shot Pro features seven user buttons, and the RC-SK5 camera selector includes one additional customizable button. - Page 47 In the screenshot above, buttons U2-U7 are pre-configured for advanced color control on Canon cameras, with four-way functionality for incremental adjustments by pressing the sides of the buttons.
- Page 48 The camera selector's eighth button is part of the User Keys and is set for Shooting Mode, providing quick access to this function regardless of the menu selected. Its color is customized to amber, differing from the standard white. Reactor offers a spectrum of configuration capabilities, from straightforward one-click behavior assignments to complex, multi-layered customization options.
-
Page 49: Rc-Sk5 Pro License
UIs and much more. • The Full Blue Pill Power: Unlock the full potential of your RC-SK5 with the Pro License, aligning it with the elite features of SKAARHOJ's Blue Pill platform devices. Control Any Camera and Device The RC-SK5 Pro License significantly expands Reactor's connectivity, enabling control over a wide array of... - Page 50 Adding new camera models to the system remains straightforward. The process mimics the simplicity of adding Canon cameras: simply search, select, and apply instantaneously. The camera selector interface now incorporates additional fields to accommodate the varied configurations required by different manufacturers' cameras. As a result, the Device Config list has expanded to provide specific sub-configurations essential for managing the unique settings displayed on the controllers' knobs and screens.
-
Page 51: Preset Labels
While configurations for non-Canon cameras may offer more basic support for RC-SK5's specialized features, such as dedicated knobs for iris, focus, pedestal, and gain, users can still customize mappings. Out-of-the-box configurations might not cover all features, but the central encoders, menu operations, preset recalls, and camera selection functionalities remain consistent across all supported camera models. -
Page 52: More Configurations
More Configurations With the Pro License, the RC-SK5 and Frame Shot Pro offer expanded configuration options in addition to the standard configurations. Using the Pro License configurations will open up access to new features such as tally, routing, quick classes and provisions for using other camera brands and devices. - Page 53 The system includes tally forwarding profiles for ATEM, vMix, TriCaster, and TSL systems. The Camera Selector interface is also enhanced with additional fields, enabling users to link cameras with specific inputs and outputs for tally and routing triggers.
-
Page 54: Advanced Customization
Advanced Customization With the Pro License, the RC-SK5 offers an extensive User Section that encompasses the entire controller interface. This enables users to go beyond camera-specific adjustment sections and overwrite any default preset functions. For instance, you can easily repurpose a button from the camera selector — perhaps one that's not in use —... -
Page 55: Skaarhoj Ecosystem
Every other controller in the SKAARHOJ lineup supports the Raw Panel Protocol. With the RC-SK5 Pro License, this feature is also functional and allows the RC-SK5 to act as a remote panel for other SKAARHOJ devices or compatible third-party systems. -
Page 56: Control Hub
Control Hub The RC-SK5 can serve as a central control hub, streamlining the management of multiple panels within a single user interface. For example, when integrating the Frame Shot Pro controller with the RC-SK5, it's essential to centralize the configuration in one device, with one acting as the host and the other as an auxiliary panel within the system. - Page 57 Incorporating a device like the Stream Deck panel, for instance, would result in it being displayed on the Home screen. Within the Configuration tab, this custom setup adheres to the familiar page and shift-level paradigm, allowing for easy customization with just a single button click.
-
Page 58: Important Information
Important Information Legal Notice Attention: The content and instructions of this document are subject to change without prior notice. Updates will be added to the manual. Best effort have been conducted to verify the correctness of the content in this manual, but no statement, information, or recommendation in this manual shall constitute formal guarantee of any kind, expressed or implied. - Page 59 Please contact your local authority for further details of your nearest designated collection point. Penalties may be applicable for incorrect disposal of this waste, in accordance with you national legislation. For professional users in the European Union If you wish to discard electrical and electronic equipment (EEE), please contact your dealer or supplier for further information.
Need help?
Do you have a question about the RC-SK5 and is the answer not in the manual?
Questions and answers