Advertisement
Quick Links
Technical Support and E-Warranty Certificate www.vevor.com/support
INSTRUCTION MANUAL
MODEL:HB6089-UL
We continue to be committed to provide you tools with competitive price.
"Save Half", "Half Price" or any other similar expressions used by us only represents an
estimate of savings you might benefit from buying certain tools with us compared to the major
top brands and doses not necessarily mean to cover all categories of tools offered by us. You
are kindly reminded to verify carefully when you are placing an order with us if you are
actually saving half in comparison with the top major brands.
Advertisement

Related Manuals for VEVOR HB6089-UL

Summary of Contents for VEVOR HB6089-UL
- Page 1 Technical Support and E-Warranty Certificate www.vevor.com/support INSTRUCTION MANUAL MODEL:HB6089-UL We continue to be committed to provide you tools with competitive price. "Save Half", "Half Price" or any other similar expressions used by us only represents an estimate of savings you might benefit from buying certain tools with us compared to the major top brands and doses not necessarily mean to cover all categories of tools offered by us.
- Page 2 CustomerService@vevor.com This is the original instruction, please read all manual instructions carefully before operating. VEVOR reserves a clear interpretation of our user manual. The appearance of the product shall be subject to the product you received. Please forgive us that we won't inform you again if there are any technology or software updates on our product.
-
Page 3: Important Safeguards
Warning-To reduce the risk of injury, user must read instructions manual carefully. IMPORTANT SAFEGUARDS Before using the electrical appliance, the following basic precautions should always be followed including the following: 1. Read all instructions. Before using it, check that the voltage of the wall outlet corresponds to the one shown on the rating plate. - Page 4 8. Do not operate the appliance for other than its intended use. 9. Avoid splashing the food into the vent holes of unit body during blending. 10. The blender must be used in a working environment that is far away from corrosive materials or oil pollution, and must be kept away from explosive and flammable materials.
- Page 5 - 4 -...
-
Page 6: Technical Parameter
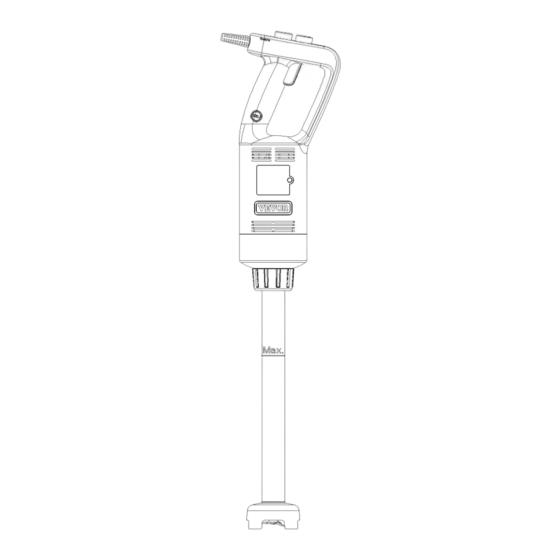
TECHNICAL PARAMETER Rotating Rotating Rated Tool Working speed Model Input Power length speed (Min) noise (Max) ≤85dB 120V~ 4000 18000 HB6089 500W 12 inch 60Hz RPM/Min RPM/Min (A) AC220- ≤85dB 4000 18000 240V; HB6089 500W 12 inch RPM/Min RPM/Min (A) 50Hz ≤85dB 120V~... - Page 7 ATTACHING AND DETACHING OF BLENDING ROD Before attaching and detaching operation, it must be ensured that the appliance stops working and its mains plug is unplugged. How to attach: 1. Insert the blending rod into the threaded inner hole of the unit body. When inserting, Align the slot of the connector with the ribs of the square aluminum cover to ensure that the connector is inserted in place.
-
Page 8: Operation Method
IMPORTANT: Blades are very sharp; handle them with care. Ensure that the hand-held blender is unplugged from the power outlet before installing or removing attachments. OPERATION METHOD GETTING STARTED AND STOPPED 1. Check that the power button (3) is released. 2. -
Page 9: Quick Cleaning
Continuous operation instruction After completing steps 1-5 above, proceed to the following steps: 1. Press the lock button (4) when the power button (3) is pressed down, and the red indicator lights up. 2. Release the power button (3) at this time, the hand blender will continue to work. 3. - Page 10 REMOVAL/INSTALLATION OF BLADE ASSEMBLY 1. Align the blade assembly with wrench 1 and insert into it. 2. Align the blending head slot with wrench 2 and insert into it. Unscrew clockwise to remove the blending rod. FAULT ANALYSI Fault Cause Analysis Exclusion Methods Phenomenon Indicator light is...
- Page 11 Note: Above are common trouble analysis and troubleshooting methods. For other troubles, please contact our customer service department, or go directly to our designated repair point for repair. Do not dismantle and repair yourself. Address: Manufacturer: Made In China - 10 -...
- Page 12 Technical Support and E-Warranty Certificate www.vevor.com/support...
Need help?
Do you have a question about the HB6089-UL and is the answer not in the manual?
Questions and answers