Advertisement
Quick Links
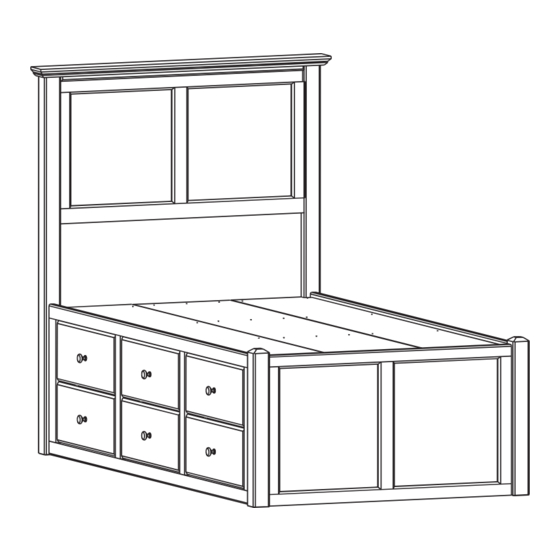
Shaker
Twin Storage Bed
1400AFVCL
Candelite Finish
Assembly Instructions
Congratulations!
This fine piece of furniture will make a handsome
addition to your home. For the best results, start
by reading the Assembly Instructions before you begin
your project.
For normal household use only.
recommended for commercial use.
Unload items from this unit prior to moving.
Before
loading or moving this unit, check all screws
and supports for tightness.
Do not overload drawers in this unit.
Do not stand or climb on this piece of furniture.
DESIGN SUBJECT TO CHANGE WITHOUT NOTICE.
P.O. Box 2827
Eugene, OR 97402 USA
Service Policy:
which are defective, missing or damaged.
Please contact Whittier Wood Products
customer service department directly (by
phone, fax, mail or E-mail) for replacement
parts.
Hours:
Our friendly customer service staff
can be reached Monday-Friday 7:00 a.m. to
5:00 p.m. (Pacific Time). A message can be
left 24 hours a day, 7 days a week.
To Order:
Provide the complete furniture
model number, part letter, production code,
quantity needed, reason for replacement
and your full name and address along with
a telephone number in case we need to
contact you.
Parts ship from our Eugene, Oregon factory
within 1 or 2 business days from the time
we receive the request. Please allow 5-10
business days for delivery.
800-653-3336
800-653-3336
Outside U.S. or Canada: 541- 687- 0213
Outside U.S. or Canada: 541- 687- 0213
Fax: 541-687-2060 •
Fax: 541-687-2060 • w w w
Mail: P.O. Box 2827 • Eugene, Oregon 97402, U.S.A
Mail: P.O. Box 2827 • Eugene, Oregon 97402, U.S.A
Store the item: 1) in the box; 2) in a dry place; 3) in
temperatures ranging from 40° to 90°. (Not on a cold,
possibly damp, cement floor.)
Inspect your furniture periodically for any loose glue
joints or screws, or any other problem which may be
affecting the stability of your furniture. Tighten or repair
as needed.
This Assembly requires two people.
Production Code:
V N
We will replace parts
w w w.whittie
.whittier r wood.com
wood.com
Rev. 07/08
Advertisement

Subscribe to Our Youtube Channel
Related Manuals for Whittier Wood Products Shaker 1400AFVCL


Summary of Contents for Whittier Wood Products Shaker 1400AFVCL
- Page 1 Twin Storage Bed 1400AFVCL Candelite Finish Service Policy: We will replace parts which are defective, missing or damaged. Please contact Whittier Wood Products Assembly Instructions customer service department directly (by phone, fax, mail or E-mail) for replacement parts. Hours: Our friendly customer service staff can be reached Monday-Friday 7:00 a.m.
- Page 2 1400AFVCL Shaker Twin Storage Bed — Parts List Before beginning assembly, check that the quantities of parts received match this list. If you need to replace a part, please refer to the following name/number. 1402AFVCL (x1) R — Left/Right Deckboard S —...
-
Page 3: Tools Required
1400AFVCL Shaker Twin Storage Bed Assembly Instructions This Assembly Requires Two People TOOLS REQUIRED: Phillips screwdriver and 7/16" wrench Remove the Trestles (C) from the back of the Headboard (A). Remove the Drawers from the Pedestal Kit (I). Note where each drawer comes from for easy re-installation. - Page 4 Attach the Trestle (C) to the Pedestal (I) by using four ¼" x 1¾" Hex Bolts (G) and Washers (H). Be sure to use the end of the Trestle (C) that has two holes. To attach the two outside trestles, use the hole shown in Figure 2a. To attach the two middle trestles, use the hole shown in Figure 2b.
- Page 5 Attach the Footboard (B) to the Pedestal (I) with ¼" x 3-3/8" Hex Bolts (F) and Washers (H); and to the Side Panel (S) with ¼" x 2½" Hex Bolts (T) and Washers (H) as shown in Figure 4. Fig. 4 T x 3 F x 3 H x 6...
- Page 6 Position Left/Right Deckboard (R) as shown in Figure 6 and Center Deckboard (P) as shown in Figure 6a. There should be a small gap between each deckboard and between the Left/Right Deckboard and the side panel. Fasten deckboards in place with #8 x 1¼" Black Screws (E). Fig.
Need help?
Do you have a question about the Shaker 1400AFVCL and is the answer not in the manual?
Questions and answers