Table of Contents
Advertisement
Quick Links
Advertisement
Table of Contents

Related Manuals for Vixen X002518


Summary of Contents for Vixen X002518
- Page 1 Instruction Manual for Vixen Altazimuth Mount Telescopes...
-
Page 2: Preface
Preface T h a n k y o u f o r y o u r p u r c h a s e o f a V i x e n a s t r o n o m i c a l t e l e s c o p e f r o m t h e “ P O R T A I I ” s e r i e s o f a l t a z i m u t h m o u n t e d t e l e s c o p e s . -
Page 3: Table Of Contents
Table of Contents Preface --------------------------------------------------------------------Page 2 Warning ---------------------------------------------------------------Page 2 Table of Contents -------------------------------------------------------Page 3 Before Use ---------------------------------------------------------------Page 4 Parts List ------------------------------------------------------------------------Page 4 ◎ Parts Description -------------------------------------------------------------Page 4 ◎ Specifications -----------------------------------------------------------------Page 5 ◎ Optical Tubes ------------------------------------------------------------------Page 5 ◎ Preparation ----------------------------------------------------------------Page 6 Setting up the Tripod/Attaching the Slow Motion Handles -----------------Page 6 Ⅰ... -
Page 4: Before Use
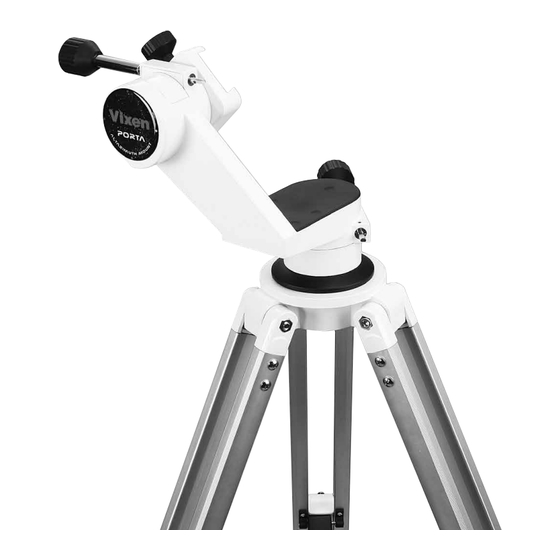
Before Use Parts List The PORTA II altazimuth mount and tripod box Shown PORTA Mount with Tripod contains the parts listed below. Smaller Allen Wrench Smaller Allen Wrench (for adjusting tension (for adjusting tension Make sure that your shipment contains all the of altitude/azimuth motion) of altitude/azimuth motion) parts. -
Page 5: Specifications
Before Use Specifications Mount PORTA Altazimuth Mount Altitude (Vertical) Motion Whole-circle Fine Motion and Quick Slewing Motion Azimuth (Horizontal) Motion Whole-circle Fine Motion and Quick Slewing Motion Optical Tube Attachment Dovetail Tube Plate Attachment System with Safety Screw Max. Loading Weight About 5 Kgs.(11 lb) Tripod Two-section Aluminum Legs with Accessory Tray... -
Page 6: Preparation
Preparation Assembling the Telescope Setting Up the Tripod / Attaching the Slow Motion Handles Stand the tripod on an ② P u l l t h e t r i p o d l e g s ① even and sold ground. apart until the tripod Adjust the height of the leg spreader has been... -
Page 7: Mounting The Optical Tube
Preparation Assembling the Telescope Mounting the Optical Tube Attach the dovetail mounted Dovetail Lock Dovetail Lock Dovetail Lock knob Dovetail Lock knob knob knob scope into the dovetail moun -ting block of the PORTA mount, tighten the dovetail lock knob onto the dovetail tube plate centering notch until snug. -
Page 8: Attaching The Finder Scope ( Porta Ii A80Mf And Porta Ii R130Sf )
Preparation Attaching the Finder Scope to the Telescope Attaching the Finder Scope (PORTA II A80Mf and PORTA II R130Sf) Slide the rubber O-ring onto the eyepiece end of the Back out the adjustment Adjustment Screws Adjustment Screws finder. There are two grooves on the finder tube. screws on the finder brac -ket to allow passage of Position the O-ring on the narrow groove at the middle... -
Page 9: Using An Optional Sxg Half Pillar ( For Porta Ii Only )
Preparation Using an Optional SXG Half Pillar You can easily separate the tripod from the PORT Altazimuth mount assembly with the provided lock knob underneath the tripod head. It enables you to use an optional SXG half pillar and other accessories sold separately. 1. -
Page 10: Basic Operation
Basic Operation Slewing the Telescope Quick Slewing Motion You can quickly move the telescope toward the desired target by grasping the tube and moving it in altitude or azimuth. Do this to center the target in the finder and then fine-tune the position in the eyepiece by following the steps below. -
Page 11: Aligning The Finder Scope ( Porta Ii A80Mf And Porta Ii R130Sf )
To p To p In the illustration, a distant Vixen tower is brought into the center of the field of view of the telescope. P la c e t he to w e r i n t h e c e n te r of th e... - Page 12 Basic Operation Aligning the Finder Scope Aligning the Finder Scope (PORTA II Telescopes with the XY Red Dot Finder) Loosen the alignment clamp knob on the XY red dot ① ① ② A l i gn m e n t A l i gn m e n t finder and move the upper portion of the dot finder C l a m p K no b...
-
Page 13: Adjustments
Adjustments Adjusting the Altitude / Azimuth Slewing Motion Test the motion smoothness of the PORTA II Mount with a balanced scope by moving the telescope tube by hand in altitude and azimuth (without using the alt-azimuth handles). Depending on the length and weight of the telescope, you may find too much or too little resistance to the motion. -
Page 14: Adjusting The Azimuth Handle Position
Adjustments Adjusting the Azimuth Handle Position You can change the orientation of the azimuth handle relative to the optical tube to suite your observing preference. You may wish to do this to avoid obstructing the optical tube. Put the scope in a hori- Pull the rubber cover on ①... -
Page 15: Observation
Observation Observing the Moon II telescope for your celestial With the finder scope aligned and the eyepiece attached, you are ready to use the PORTA observation in the night sky. Let’s begin by observing a bright and easy-to-find object, the Moon, and then proceed to finding planets and dark objects easily visible at moderate power. - Page 16 5-17-3 H igash itokorozawa,Tokorozawa, Saitama 359-0021, Japan P h o n e +81-4-2944-4141 ( International ) ht t p s: / / w w w.vixe n.c o.jp F a x +81-4-2944-9722 ( International ) 68ki-7- 8199 -1S-...
Need help?
Do you have a question about the X002518 and is the answer not in the manual?
Questions and answers