Advertisement
Quick Links
Installation and
Maintenance Guide
Contents
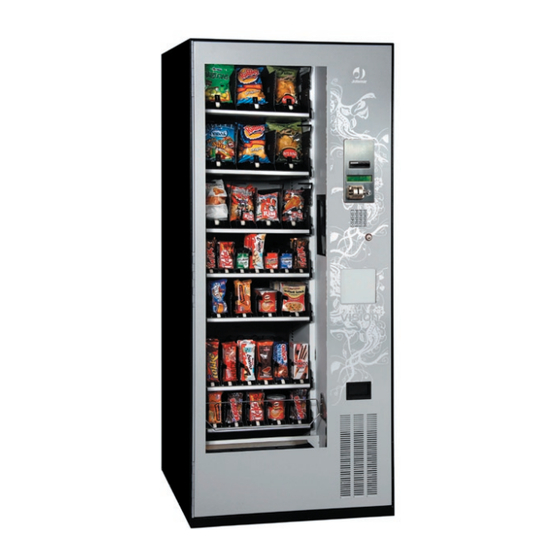
Machine Layout
Characteristics
Installation
Programming mode
Programming options
Configuration and reloading
First load of the coin changer
Reloading of the products
Checking and resetting of the faults
Preventive maintenance and cleaning
Adjusting channel to new products
Ctra, Marcilla, Km.2. 31350 PERALTA, Navarra SPAIN
Ctra, Marcilla, Km.2. 31350 PERALTA, Navarra SPAIN
Ctra, Marcilla, Km.2. 31350 PERALTA, Navarra SPAIN
Ctra, Marcilla, Km.2. 31350 PERALTA, Navarra SPAIN
Ctra, Marcilla, Km.2. 31350 PERALTA, Navarra SPAIN
Ctra, Marcilla, Km.2. 31350 PERALTA, Navarra SPAIN
Ctra, Marcilla, Km.2. 31350 PERALTA, Navarra SPAIN
Ctra, Marcilla, Km.2. 31350 PERALTA, Navarra SPAIN
Ctra, Marcilla, Km.2. 31350 PERALTA, Navarra SPAIN
:
Read the safety instructions at page 3 of this manual before
starting working on the machine.
multi plus
multi plus
Tel. +34 948 75 12 12
Fax +34 948 75 04 20
www.Jofemar.com
www.Jofemar.com
www.Jofemar.com
www.Jofemar.com
Page 1 of 20
Advertisement

Subscribe to Our Youtube Channel
Related Manuals for Jofemar vision multiseller


Summary of Contents for Jofemar vision multiseller
- Page 1 Ctra, Marcilla, Km.2. 31350 PERALTA, Navarra SPAIN Ctra, Marcilla, Km.2. 31350 PERALTA, Navarra SPAIN Ctra, Marcilla, Km.2. 31350 PERALTA, Navarra SPAIN Ctra, Marcilla, Km.2. 31350 PERALTA, Navarra SPAIN Ctra, Marcilla, Km.2. 31350 PERALTA, Navarra SPAIN www.Jofemar.com www.Jofemar.com www.Jofemar.com www.Jofemar.com Page 1 of 20...
- Page 2 Layout of the machine: Exterior of the machine 1.- Display glass (or front picture on Multi- plus machines) 2.- Credit display 3.- Coin entry 4.- Bill validator entry 5.- Refund button 6.- Selection buttons 7.- Door lock 8.- Coin return cup 9.- Delivery door 10.- Ventilation grille Interior of the machine- cabinet...
- Page 3 ◊ If you need to replace the power supply cable, please replace it with the appropriate one for your country: Argentina, Jofemar code 5500014. Australia, Jofemar code 5500006. Spain (STANDARD), Jofemar code 5500000. UK, Jofemar code 5500011. Switzerland, Jofemar code 5500004. USA, Jofemar code 5500010. Page 3 of 20...
- Page 4 Installation: Installation of the machine: To remove the trans- 1.- Level the machine, the machine port paws Jofemar transport paws can be replaced by optionally provide the adjustable paws by which the with a jack specially machine can be properly levelled.
- Page 5 Programming mode: Elements of the programming system: Detail of the programming button 1.- Programming button on the interior of the door on the interior of the door Press this button to get into the programming mode. It’s recommended to close the door once it’s on the programming mode in order to avoid any loss of temperature inside of the machine.
- Page 6 Map of the programming addresses: Programming Options: In order to put into service: Communication via modem (MDB) Fourth step Prices programming Product accountings Reloading of change tubes (MDB) Fifth step Unloading of change tubes (MDB) Money accountings (MDB) Second Step Setting of the clock Fault checking Clearing all faults...
- Page 7 Language selection: Scroll through the programming options until you reach option “32” “Language Programming” Press to visualize the program language Press to change to the desired language Set the clock: Scroll through the programming options until you reach option “05” “Setting of the clock”...
- Page 8 Assigning the channels to the selection numbers: (Only change the confi guration if necessary) Scroll through the programming options until you reach option “09” “Machine Composition” and press At that moment, the machine will ask you for a selection number. Once you enter the selection number for that product, the machine will ask you for the channel number for that product.
- Page 9 Pricing the selections: Scroll through the programming options until you reach programming option “00” “Prices Programming” and press The display will read price $ 0.00 Depending on the machine program we can fi nd two diff erent modes to program the price: Mode A: Button...
- Page 10 Load of the coin changer: First load of the coin changer J-2000: If the tubes of the coin changer are totally empty, do the fi rst initial load: Press once button 1 of the coin changer to get to option 25 and insert coins in this order(*) Three coins for tube 2 Three coins for tube 3...
- Page 11 Checking and resetting faults: Functioning of the coin changer programming: Button 1: To go into programming mode and scrow through the options 1.- ACCESS TO THE 2.- TO CHECK THE PROGRAMMING OPTION Button 2: OPTIONS To get into a specifi c option and go through its different fi elds.
- Page 12 Review and resetting faults of the machine: In case a malfunction has been detected follow the next steps: Go through the programming options until you reach option “06” “Fault Checking” Press button to display all the general faults of the machine Press button to display all the tray photosensors short-circuited...
- Page 13 Cleaning and maintenance For a proper function of the machine, For a proper function of the machine, For a proper function of the machine, For a proper function of the machine, For a proper function of the machine, it’s recommended to do a periodically it’s recommended to do a periodically it’s recommended to do a periodically it’s recommended to do a periodically...
- Page 14 Product delivery system Each of the machine channels has a back pusher to move the whole line of products. We will diff erentiate between two channel models: recommended for uniform shape products recommended for uniform shape products recommended for uniform shape products recommended for uniform shape products recommended for uniform shape products recommended for uniform shape products...
- Page 15 General reloading of the products: 1.- When you stock products in the machine put the “new” products When you stock products in the behind the remaining product by machine put the “new” products placing the pusher to the back of the behind the remaining product by placing the pusher to the back of channel.
- Page 16 General reloading of the products: products 7.1.- Place products standing up with the in vertical brand facing the customers. position In order to adjust the pusher 7.2.- Products pushers come with a to the width of the channel, precut break off point that allow you break off the excess by to adjust the width per any channel pulling forward...
- Page 17 Adjusting channels to new products: On case we want to change the product a motor is selling and the new product is thicker or thinner than the current one Empty the channel follow the next steps: of the products we want to replace 1.- Empty the channel with the old product.
- Page 18 Setting the voltage of the motors Scroll through the programming options until you reach option “25” “Voltage for channel motors” and press A message saying “Voltage programming” will appear, press The display will read 5.0 volts. To change this voltage: Button increases in 0.5 volts increments...
- Page 19 Products to lie down (Very tall products) In order for the tall products not to interfere with the movement of the elevator, you must use the “products to push over” option. This will move the elevator band and cause the product to lie fl at prior to elevator movement.
- Page 20 Ctra, Marcilla, Km.2. 31350 PERALTA, Navarra SPAIN Ctra, Marcilla, Km.2. 31350 PERALTA, Navarra SPAIN Ctra, Marcilla, Km.2. 31350 PERALTA, Navarra SPAIN Ctra, Marcilla, Km.2. 31350 PERALTA, Navarra SPAIN Ctra, Marcilla, Km.2. 31350 PERALTA, Navarra SPAIN www.Jofemar.com www.Jofemar.com www.Jofemar.com www.Jofemar.com Page 20 of 20...
Need help?
Do you have a question about the vision multiseller and is the answer not in the manual?
Questions and answers