
Related Manuals for Rexing V1 FHD


Summary of Contents for Rexing V1 FHD
- Page 1 V1 FHD Quick Start Guide The information in this manual is subject to change without notice. www.rexingusa.com...
-
Page 2: Month Warranty
1. Overview Thank you for choosing REXING! We hope you love your new Activate Your product as much as we do. 18-Month If you need assistance, or have any suggestions to improve it, please contact us. You can reach us via care@rexingusa.com... -
Page 3: What's In The Box
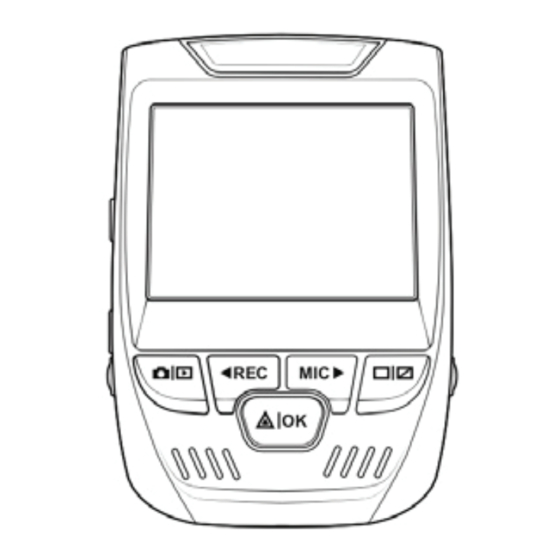
Quick Start Guide MIC (Microphone) Button *** Screen Button Mini-USB Port GPS Logger Port (Not Support) Rexing V1 FHD Dash Cam Rear Camera Port (Not Support) Car Charger Lens Angle Adjustment Dash Cam Mount Plate & 3M Adhesive 32GB SD Card Cable Management Tool *The Camera is recording when the LED is flashing red. -
Page 4: Installation
Step 3: Insert the Memory Card 1.2 Position the Sticker Next, carefully peel off the protective film from the electrostatic The Rexing V1 FHD accepts [Class 10/UHS-3 or higher] Micro SD sticker. memory cards up to 256GB. You will need to insert a memory Attach the sticker to the windshield, ideally behind the rear-view card before you can begin recording. - Page 5 Power on the camera by connecting the charger to the car cigarette lighter and camera. To ensure the V1 FHD records to your memory card properly and without error. Before you start using a new memory card, you must format the card within the camera using the format function.
-
Page 6: Basic Operation
5. Basic Operation Step 5: Installing the Camera onto the Windshield Device Power Place the camera on the mount and carefully route the power cable around the windscreen and tuck in under the trim. The device is automatically powered on when plugged into a Plug the Car Charger Cable into a 12V DC power outlet or the 12V accessory socket or cigarette lighter and received a car cigarette lighter. -
Page 7: Video Playback
Settings. Playback of videos can be done on the device or a System icon computer. Also, if you have purchased a Rexing GPS Video Mode icon Logger you may play back the recordings in a specialized application. To playback a video on the... -
Page 8: Option 2: Motion Detection
Option 2: Motion Detection Option 1: Vibration Detection To use this feature, you need to connect it with a Rexing To activate the Parking Mode, you need to connect it with a Intelligent Hardwire Kit (sold separately). Make sure that the Smart hardwire kit (sold separately). -
Page 9: Taking Photos
GPS Logger Taking Photos Toggle to GPS Signal (Not conntected) (Need to purchase seperatly To take a photo, stop video Playback mode and rexingusa.com/product/gps-logger/) recording and hold the select a button. photo to When connected to the camera, it will view Press the OK Button to take record the speed and location of your... - Page 10 This device complies with part 15 of the FCC Rules. Operation is subject to the following two conditions: (1) This device may not cause harmful interference, and (2) this device must accept any interference received, including interference that may cause undesired operation.Changes or modifications not expressly approved by the party responsible for compliance could void the user's authority to operate this equipment.
Need help?
Do you have a question about the V1 FHD and is the answer not in the manual?
Questions and answers