Table of Contents
Advertisement
Available languages
Available languages
Quick Links
Advertisement
Chapters
Table of Contents

Related Manuals for BEHABELT HP01


Summary of Contents for BEHABELT HP01
- Page 1 HP01 Heißpresse · Hotpress BEDIENUNGSANLEITUNG INSTRUCTION MANUAL...
-
Page 2: Table Of Contents
Profil in den Formschuh einlegen ....................13 Polyester Formschuh einsetzen ........................14 TPE 40 D 200°C 392°F Gerät schließen und Presskraft einstellen ..................15 Heizvorgang vom HP01 PPuls Controller starten ................15 TPE 55 D 215°C 428°F Keilriemen Haltezeit ............................16 Kühlung ............................16 TPE 63 D silber 220°C... -
Page 3: Vorwort
Die Betriebsanweisung ständig am Einsatzort des Gerätes griffbereit auf- und Beschädigungen des Gerätes können durch sorgsamen Umgang vermieden werden. bewahren! Die HP01 Heißpresse ist speziell für die Anforderungen in den verschiedensten Ausfüh- 2.2.2 Ergänzend zur Betriebsanweisung allgemeingültige gesetzliche und sonstige ver- rungen und Typen konzipiert. -
Page 4: Personalauswahl Und -Qualifikation
Personalauswahl und -qualifikation Weitere Sicherheitshinweise 2.3.1 Arbeiten mit dem Gerät dürfen nur von zuverlässigem Fachpersonal durchgeführt 2.6.1 Not-Aus Schalter sind nicht vorhanden. Im Not-Aus Fall den Netzstecker ziehen. werden. Gesetzliches Mindestalter beachten! 2.6.2 Das Gerät darf nur von unterwiesenen Fachkräften unter Einhaltung der einschlä- 2.3.2 Nur geschultes oder unterwiesenes Personal einsetzen. -
Page 5: Eg-Konformitätserklärung
Das Gerät ist geeignet zum Betrieb mit herausnehmbaren Profi l-Formschuhen. Bezeichnung des Gerätes: Heißpresse Die vorbereiteten Enden werden in den Formschuh eingesetzt, mit der Deckplatte abge- Gerät Typ: HP01 für PU und Polyester Profi le deckt und in die Heißpresse eingesetzt. Einschlägige EG-Richtlinien Zur Höhen- und Pressdruckeinstellung wird das federbelastete Oberteil manuell mit einer... -
Page 6: Lieferumfang
Breite B 70 mm (1) 1 St. Haltegriff und Ringöse Höhe H 60 mm (2) 1 St. PPuls Controller HP01 (3) 1 St. Seitenschneider SE02 (4) 1 St. Schraubendreher (5) 1 St. Schere AS04 Formschuh für Überlappschweißen Schweißbereich 120 x 50 mm Länge L... -
Page 7: Inbetriebnahme Der Heißpresse Vor Schweißungen
Anschluss Kühlung Anschluss Heizplatte ersetzen! oben Lange Wasserschläuche Kurzer Wasserschlauch Wasserkühlung: Anschluss der Pressenkabel am Controller 5.0 Bedienung Heißpresse HP01 Stoßschweißung Anschluss Heizplatte Gehrungsschnitt unten Vorbereitungen Riemenlänge bestimmen, Riemenenden mittels gerader Schnitt Anschluss Heizplatte Gehrungsschnitt oder geradem Schnitt plan abschneiden. -
Page 8: Profil In Den Formschuh Einlegen
Formschuh mit Spannhebel (Stumpfschweißung), Spann- hebel auslösen, damit Material nachgeschoben werden kann. 5.5 Heizvorgang vom HP01 PPuls Controller starten Zum Schließen das Oberteil passgenau auf das Unterteil zwischen die Führungsstege Den Netzstecker des PPuls Controllers am Netz anstecken und einlegen. -
Page 9: Haltezeit
Formschuh. Hitzeschutzmaßnahmen ergreifen! Vorsicht: Die Wasserschläuche dürfen während des Vorgangs nicht entfernt wer- 60mm den. Hitzeschutzmaßnahmen ergreifen! 6.0 Bedienung Heißpresse HP01 Überlappschweißung Vorsicht: Beim Starten des Kühlvorgangs wird kurzzeitig Wasserdampf in das 60mm = 2mm Restmaterial Wasserfass eingeleitet. Hitzeschutzmaßnahmen ergreifen! -
Page 10: Profil In Den Formschuh Einlegen
6.2 Profil in den Formschuh einlegen Heizvorgang vom PPuls Controller starten Das Profil und der Formschuh müssen vom gleichen Typ sein. Den Netzstecker des PPuls Controllers am Netz anstecken und den PPuls Controller einschalten. Wahl der Schweißparameter durch Direkteingabe Das Oberteil abnehmen und das Profil in das Unterteil einlegen. oder Auswahl gespeicherter Rezepte. -
Page 11: Abbruch Des Kühlvorgangs Bzw. Schweißung Ohne Aktive Kühlung
PPuls Controller Schnellanleitung Vorsicht: Beim Starten des Kühlvorgangs wird kurzzeitig Wasserdampf in das Wasserfass eingeleitet. Hitzeschutzmaßnahmen ergreifen! Nach Ablauf der vorgegebenen Haltezeit startet die Kühlung automatisch. Sobald die ein- Bevor Sie das Gerät verwenden oder in Betrieb nehmen unbedingt die beigelegte gestellte Entnahmetemperatur erreicht ist, stellt die Wasserpumpe bzw. -
Page 12: Pu 95 A 205°C 401°F
HP01 Recommended welding parameters Temperature (approx.) (±10°C) Hold time (approx) (±50 sec.) HP01 Polyurethane (PU) Round belts PU 75 A 180°C 352°F Durchmesser mm) PU (sec.) TPE (sec.) Hotpress PU 85 A 190°C 374°F PU 90 A 200°C 392°F PU 95 A 205°C... - Page 13 Further security advices.......................27 and breakdowns of the machine can be avoided easily trough a careful handling. EC-Declaration of conformity.......................29 The hotpress HP01 was specially created for varying applications and many different 3.0 Technical data ............................30 types of belts. Hotpress HP01 with programmable controller ................30 Scope of delivery ........................31...
-
Page 14: Organisational Measures
device. The manufacturer is not liable for any resultant damages. For resultant Security advices at certain operating stages damages of unintended use, the user bares all liability. The intended use also 2.4.1 Undertake measures so that the machine is only operated in safe and workable includes the consideration of the instructional manual and adherence to conditions! Only operate the machine if all protection devices and security-related inspection and attendance loads. -
Page 15: Ec-Declaration Of Conformity
2.6.11 Transport and storage of the machine only in closed conditions. Product type: HP01 for PU and Polyester profiles 2.6.12 The hotpress is an electrical heating appliance for the welding of conveyor and drive belts. Thermal security: Category 1 VDE 0721 – Part 2 §10. -
Page 16: Technical Data
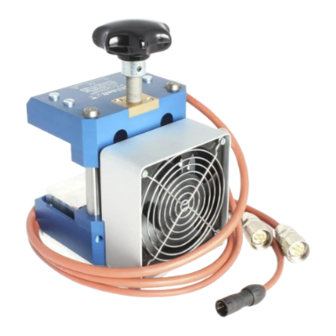
1 pc HP01 with air cooling Hotpress HP01 with programmable controller The handy and double-sided heated hotpress HP01 with controller is especially suitable for precise joining of PU and Polyester belts. The hotpress is perfectly suited for the accurate welding of small profi les. -
Page 17: Mould
Air cooling: Connecting the press cables on the controller Every type of profi le needs its own mould! Connection heating plate The mould for the hotpress HP01 is available in many varied and well-established sizes. Moulds of high quality are the requirements for every good weld. bottom... -
Page 18: Water Cooling: Connection Of Cooling Hoses To Hot Press And Water Tank
Short cooling hose Apply the upper part of the mould accurately, then fit the lower part of the mould. 5.0 Operation HP01 butt splice miter cut Preparation notch Determine belt length, cut both belt ends of the profile vertical cut bevel and vertical to the desired length. -
Page 19: Closing Of The Machine And Selection Of The Press Capacity
Now you can open the hotpress and remove with safety gloves the mould and profi le. Caution: Components may still be very hot. Beginning of the heating process of the HP01 Controller Information: End-temperature can be preset in the menue settings at the controller. Please Connect PPuls Controller with the power line and switch on refer to the separate controller manual. -
Page 20: Operation Of Hp01 Overlap Welding
60mm/2inch 60mm/2inch 6.0 Operation of HP01 overlap welding To close the upper part precisely installed on the = 2mm / 0,08 inch remaining material 60mm/2inch lower part between the guide webs. During overlap Preparation = 2mm / 0,08 inch remaining material... -
Page 21: Exposure Time
Beginning of the heating process of the HP01 Controller Caution: By starting the cooling process, for a short time hot steam will fl ow in the water tank. Take heat protection measures! Connect PPuls Controller with the power line and switch on the controller. -
Page 22: Ppuls Quick Reference
PPuls Quick Reference This is not an operation manual! Before using the unit refer to operation manual! The operating instructions contain information and references required for safe operation and use of the instrument. Before using the instrument, read the operating manual instructions carefully and follow them in all respects. - Page 23 Subject to changes without notice. Änderungen und Irrtümer vorbehalten. ® BEHA Innovation GmbH In den Engematten 16 D-79286 Glottertal Phone: +49 (0) 7684 / 907-0 Fax: +49 (0) 7684 / 907-101 E-Mail: info@behabelt.com Internet: www.behabelt.com Version: 02.2017 · PBMHP01V001...
Need help?
Do you have a question about the HP01 and is the answer not in the manual?
Questions and answers